Depending on the installation method used either start the pure::variants-enabled Eclipse or under Windows select the item from the menu.
If the Variant Management perspective is not already activated, do so by selecting it from in the menu.
Before importing a directory tree into a Family Model, a variants project has to be created. Also it is suggestive to have features defined in an Feature Model already. Please consult the pure::variants documentation for help about these steps.
The actual import is started by selecting the Import... action either in the context menu of the Projects view or with menu in the menu. Select Variant Models or Projects from category Variant Management and press . On the following page select Import a Family Model from source folders and press again.
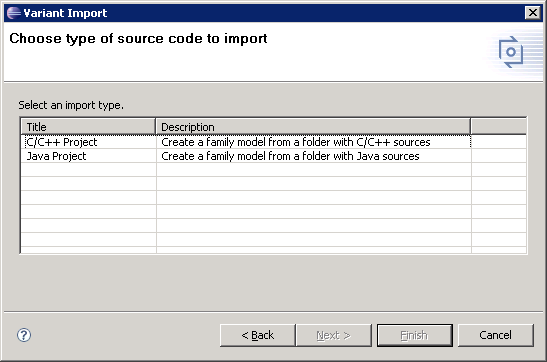
The import wizard appears (see Figure 1, “Page of the import wizard to select the type of source code that may be imported”). Select a project-type to import and press . Each type contains of a predefined set of file types to import to the model.
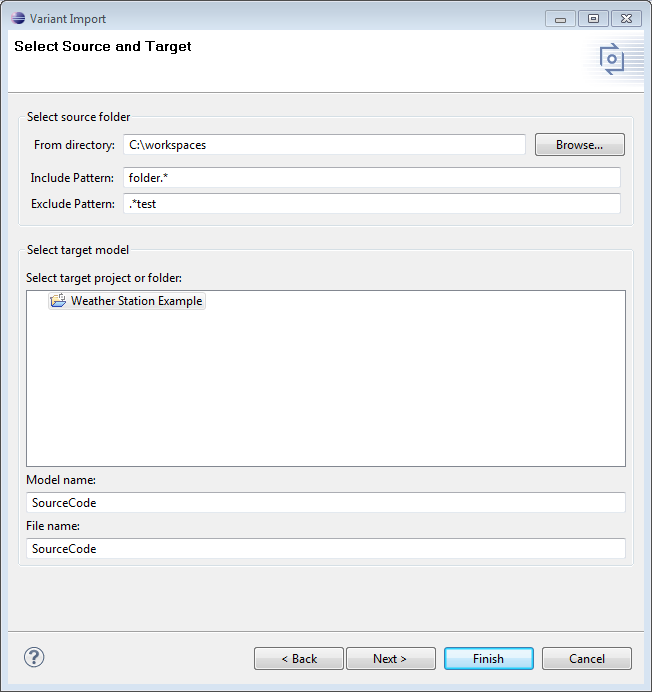
On the next wizard page (Figure 2, “Page of the import wizard to select the source and the target for the import”) the source directory and the target model must be specified.
Press the button to select the directory where the source code exists that should be imported. By default the current workspace is selected because this might be a useful point to start navigating.
Below you can specify include and exclude pattern. These pattern have to be java regular expressions. Each input path, relative to the source root folder, is checked with these pattern. If the include pattern match, a folder is imported, if the exclude pattern does not match. Meaning the include pattern does pre select the folders to import, the exclude pattern does restrict this preselection.
After selecting the source code directory a target model must be defined. Therefore
select a variant project or a folder where the model should be stored and enter a model
name. The file name is extended automatically with the .ccfm
extension if it is not given in this dialog. By default it will be set to the same name as
the model name itself. This is the recommended setting.
After an expedient source folder and the desired model name are specified, the dialog might be finished by pressing . If the button is pressed, a further page is coming up where additional settings can be done.
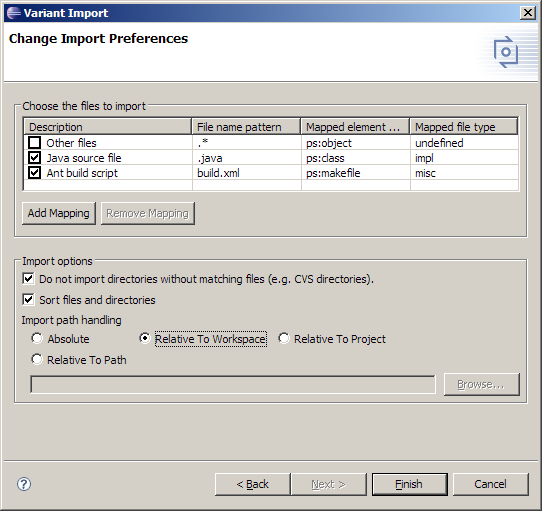
On the last wizard page (Figure 3, “Page of the import wizard to define an individual configuration”) there are preferences that can be done to customize the import behaviour for the imported software project.
The dialog page shows a table where the file types are defined, that will be considered by the import process. Each line consists of four fields.
The Description field contains a short descriptive text to identify the file type.
The File name pattern field is used to select files to be imported when they match to the fields value. The field uses the following syntax:
The most common usecase may be a file extension. The usual syntax is
.EXT, whereEXTis the desired file extension (e.g..java).Another common situation is a special file, like a makefile. Therefore, it is possible to match on the exact file name. To do this, just enter the file name into the field (e.g.
build.xml).In some cases the mapping desires are more specific, so only files that match to a special pattern should be imported. To fit this requirement it is possible to use regular expressions in the File name pattern field. Describing the syntax of regular expressions would exceed the intend of this help. Please consult the regular expressions section of the reference chapter in the pure::variants user's guide (e.g.
.*).
The Mapped element type field sets the mapping between a file type and a pure::variants family element type. The family element type is a descriptor for the source file to provide further information to the mapped element in the imported model. Typical selections are
ps:classorps:makefile.The Mapped file type field sets the mapping between a file type and a pure::variants file type. The file type in pure::variants is a descriptor for the source file to provide further information to the mapped element in the imported model. Typical selections are
implfor implementations ordeffor definition files.
New file types may be added by using the button.
All fields are filled in with the value undefined and must be filled in by
the user. To edit a value in a field, just click into the field with the mouse. The value
becomes editable and can be changed. It is not possible to change the default file name
patterns of the table. To make a customization flexible, it is possible to deselect a file
type by deselecting the row. Deselected file name patterns stay in the configuration but
will not be used by the importer. User defined file types may be removed again by using
the button.
By default an Other files file name pattern is available in the table but deselected. Typically it is not wanted to import all files but this can be easily changed by selecting the according row.
There are three general import options to customize the behavior of the importer.
Do not import directories without matching files (e.g. CVS directories).
If the importer finds a directory where no matching file is in it and where no subdirectory has a matching file, the directory will not be imported. This is often useful, if projects are managed by version management systems like CVS. For CVS, each relevant directory contains a CVS-directory where irrelevant files are stored. If this option is selected and the CVS-files do not match to any file type defined above, the directory will not imported as a component into the Family Model.
Sort files and directories.
Enable this option to sort files and directories each in alphabetical order.
Import path handling.
For further synchronization the importer needs to store the original path of all imported elements into the model. In many cases Family Models are shared with other users. The directory structure may be different for each user. To support most common usage scenarios the importer can work in different modes:
- Absolute
The absolute path to the imported element will be stored into the model. For later synchronization and during the transformation the files have to placed on the exactly same location as during the first import.
- Relative to Workspace
The paths are stored relative to the workspace folder. For synchronization the files has to be part of the Eclipse workspace. The transformation has to use the Eclipse workspace as input directory.
- Relative to Project
The paths are stored relative to the project. For synchronization the files are part of the project inside Eclipse. The transformation has to use the project folder as input directory.
- Relative to Path
The paths are stored relative to the given path. For synchronization the files have to be placed on the exactly same location. The transformation input directory is the same as the relative path during the import.
All preferences of this dialog are stored persistently. The personal customizations must not redone each time the import runs. This makes the import workflow easy and fast.
Press the button  to synchronize an imported model
with its directory path. The root path of the project is stored in the model so it will
synchronize to the same directory as before. To enable the button, open the model and select any element. After pressing the
button a Compare Editor is
opened where the current Family Model and the model of the current directory structure is
opposed (see Figure 4, “Model update from Directory Tree in Compare Editor”).
to synchronize an imported model
with its directory path. The root path of the project is stored in the model so it will
synchronize to the same directory as before. To enable the button, open the model and select any element. After pressing the
button a Compare Editor is
opened where the current Family Model and the model of the current directory structure is
opposed (see Figure 4, “Model update from Directory Tree in Compare Editor”).

The compare editor is used throughout pure::variants to compare model versions but in this case is used to compare the physical directory structure (displayed in the lower right side) with the current pure::variants model (lower left side). All changes are listed as separate items in the upper part of the editor, ordered by the affected elements. Selecting an item in this list highlights the respective change in both models. In the example, a added element is marked with a box on the right hand side and connected with its feasible position in the model on the left hand side.
The Merge toolbar between upper and lower editor windows provides tools to copy single or even all (non-conflicting) changes as a whole from the directory tree model to the Feature Model.
Note
The synchronization is done with the last used importer settings. This makes it possible to update the model with other settings as made while the import was done.