Most tutorials consist of two eclipse projects. One can be used to build an eclipse plugin which has to be installed in the Eclipse plugins folder (these projects have the suffix .plugin) and example pure::variants projects (these projects have the suffix .pvproject). These projects can only be used when the respective Eclipse plugin is installed.
To ease the installation process, installed SDK provides two example packages installable from "New"->"Examples"->"Variant Management SDK". The Extensibility Example Plugins package contains all eclipse plugin projects and installs them into the workspace when selected. The Extensibility Example Projects package contains all example projects.
The reader must have basic knowledge of pure::variants and the Java Plugin Development under Eclipse. For more information about the Eclipse Plugin concept see chapter Plattform Plug-in Developer Guide in the Eclipse Help.
This tutorial explains how to develop a new check and corresponding quick fix for the pure::variants Model Validation Framework. Model Validation checks are applied in order to examine the correctness of a pure::variants model. If a check detects problems in a model, the provided quick fix can be used to solve this problem automatically.
A check is a Java class that is registered as Model Validation Framework extension in the Eclipse plugin containing the check. The quick fix also is a Java class that does not need to be registered. In the following it is shown how to setup a new Eclipse plugin, implement and register the check, and provide a quick fix for the check. The presented example check examines all unique names of the elements of a feature model. The names must begin with the string feature, otherwise a problem is announced.
The tutorial is structured as follows. Chapter 2 describes how a new Eclipse plugin is created. Chapter 3 shows the implementation and registration of the check class. Chapter 4 shows how the new check is activated and applied to a model. Chapter 5 explains how the quick fix for the check is implemented and connected to the check. Chapter 6 shows how the quick fix for the check is used. The last chapter provides information about how to install the new plugin in an Eclipse installation.
Before reading this tutorial it is recommended to read section Model Check Framework (Tasks/Validation Models/Model Check Framework) from the pure:: variants User's Guide.
The plugin described in this tutorial is part of the pure::variants SDK. It can be installed by choosing New -> Example from the Eclipse File menu, and then Examples -> Variant Management SDK -> Extensibility Example Plugins -> com.ps.pvesdk.examples.modelvalidation.plugin.
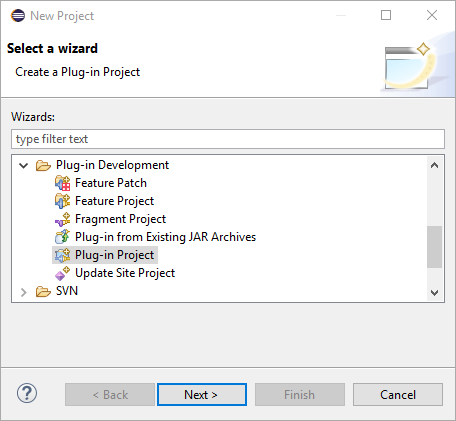
As first a new Eclipse plugin project has to be created. Right-click in the Eclipse Projects View and choose New -> Project -> Plug-in Project from the context menu (see Figure 6, “New Plug-in Project Wizard”).
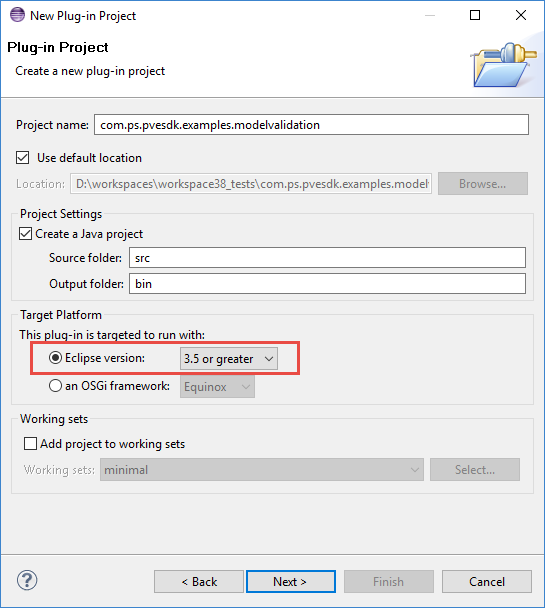
The name of the new project shall be com.ps.pvesdk.examples.modelvalidation. Figure 7, “Plug-in Project Settings” shows further settings required for the plugin. Please note that the plugin has to work with an eclipse version and must not work with OSGI framework.
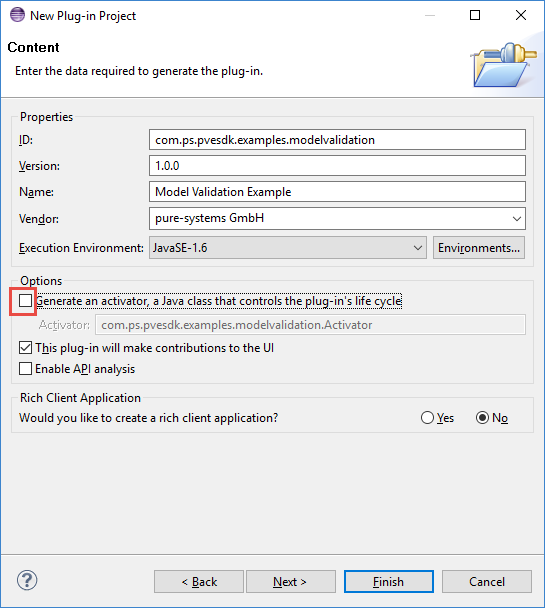
After pressing Next the Plug-in Content page is opened. Please apply the settings as shown in Figure 8, “Plug-in Content Settings”.
After pressing the Finish button a new plugin project is created. The new project contains an empty src-directory for the Java code and a plugin.xml file.
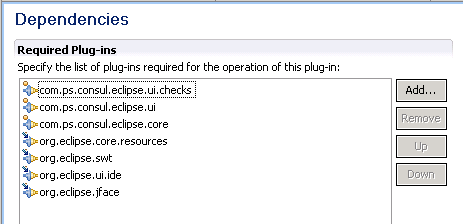
Next the dependencies should be added for the plug-in. For this double-click on the plugin.xml file to open it in the Plug-in Manifest Editor. Switch to the Dependencies page and press the Add button to add the plugin-ins listed in Figure 9, “Dependencies”.
This is all to setup the project. The next step is to write the check class.
This chapter shows how to implement the Java class for the new Model Validation check.
First the new Java package com.ps.pvesdk.examples.modelvalidation.plugin has to be created in the src-directory of the plug-in. Then create a new Java class within the package and name it CheckElementUniqueNameExample.java. This class has to be derived from class Check and has to implement the IElementCheck interface.
Each check class implements the check() methods from the interfaces it implements (IElementCheck in this case). These methods are called by the Model Validation Framework for each model item to check (model elements in this case), and implement the check functionality. The return value of a check() method is an object of type ICheckResult. This object contains the problems found by this check (of type CheckProblem).
In the presented example a problem is provided for all features with a unique name that does not start with the string feature. The problem object contains:
1) The problem-class. The problem-class has to match the name of the check as given at the extension point of the plugin.
2) The problem-type, here ELEMENTCHECK_TYPE. The type corresponds to the interfaces implemented by the check.
3) The problem-code to identify the problem. This code has no special format but shall be unique.
4) The problem-severity, here ERROR_SEVERITY. A problem can also have the severtities warning and info.
Furthermore the problem object contains information about the model item that was checked, i.e. the element id in this case, and a textual problem description.
This is the implementation of the check() method of the example check.
/**
* This method implements the check. It is called by the model validation
* framework for every element of the checked model. It gets the element to
* check and an abort listener that is used to find out whether the user has
* aborted the current model validation run. In this case the check also
* should be aborted. This is only useful for long running checks.
*
* The result of the check is an object of type CheckResult (or any other type
* implementing the ICheckResult interface). This result object contains the
* problems that were found during the check, i.e. that the unique name of the
* checked element does not start with 'feature'.
*
* @param element
* The element to check.
* @param listener
* The abort listener.
* @return ICheckResult with a vector of problems if the check fails.
*/
public ICheckResult check(IPVElement element, ICheckAbortListener listener) {
/*
* Create an empty CheckResult object. If no problem is added to the result
* object, then this is interpreted as success by the model validation
* framework, i.e. the element's unique name starts with 'feature' as
* claimed by the check.
*/
CheckResult result = new CheckResult();
/*
* Ensure that the element is valid and has a non-empty unique name. Family
* model elements do not need to have a unique name. Since this check is
* also applicable for family models, simply ignore elements that have no
* unique name.
*/
if (element != null && element.getName().length() > 0) {
/*
* Get the unique name of the element. This is name that is to be checked
* in the next step.
*/
String name = element.getName();
if (name.startsWith("feature") == false) { //$NON-NLS-1$
/*
* The unique name of the element does not start with 'feature'. This
* means that the check is failed. To let the user know that the check
* failed and what exactly is wrong, a problem description is created
* represented by a CheckProblem object.
*
* The first argument of the constructor of class CheckProblem is the
* name of the check, followed by the check type (an element check),
* followed by a unique problem code for this problem, followed by the
* severity of the problem.
*/
CheckProblem problem = new CheckProblem(element.getModelContainer(), getName(),
CheckConstants.ELEMENTCHECK_TYPE, "CheckElementUniqueNameExample",
CheckConstants.ERROR_SEVERITY);
/*
* To let the model validation framework know on which element to place
* the problem marker for this problem, the unique ID of the checked
* element has to be set in the problem description.
*/
problem.setElementID(element.getID());
/*
* This message is shown to the user for instance as the label of a
* corresponding problem marker in the Problems View.
*/
problem.setMessage(MessageFormat.format(Messages.CheckElementUniqueNameExample_3, name));
result.addProblem(problem);
}
}
return result;
}
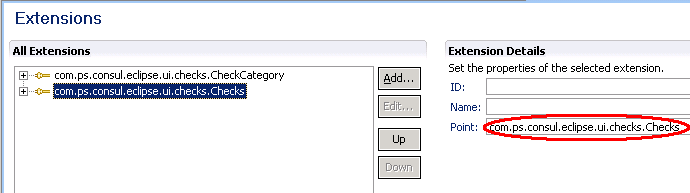
... In the next step the new check must be registered as an Extension for the Model Validation Framework. For this purpose open the file plugin.xml with the Plug-in Manifest Editor again and switch to the Extensions page. Click the Add button to select com.ps.consul.eclipse.ui.checks.Checks extension. After press Finish button the new check extension is added to the extensions list. The Check-Extension is shown in Figure 10, “Check-Extension”.
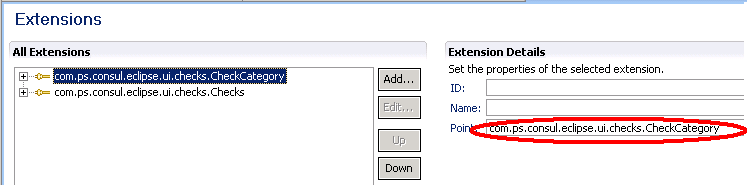
Since each check has a specific category (like whole model or single element check) the example check also needs an extension for the category of the check. Select com.ps.consul.eclipse.ui.checks.CheckCategory extension from the extensions list. The CheckCategory-Extension is shown in Figure 11, “CheckCategory-Extension”.
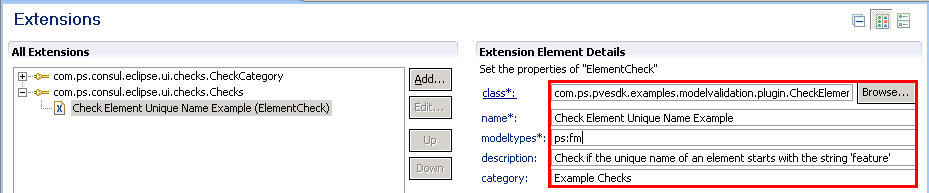
Now a new Category and a new Check can be added to the Extensions. Right-click on the check extension and choose New -> ElementCheck from the context menu. In the description field add a description for the new check. Fill in the other fields as shown in Figure 12, “New ElementCheck”. class is the path the check class, modeltypes is used to specify for which model types the check is applicable, and category specifies the check category the check belongs to.
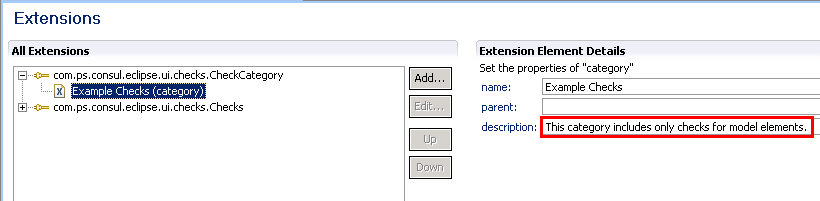
Right-click on the category extension and choose New -> Category from the context menu. Add a description and fill in the other fields as shown in Figure 13, “New Category”.
For testing the new check CheckElementUniqueNameExample the plugin has to be installed. Therefor two different possibilities exist. Either the plugin is exported as Deployable Plugin and installed into pure::variants. Or an Eclipse Runtime is started using the Check Example plugin. This approach is described in the Eclipse help in chapter PDE Guide->Getting Started->Basic Plug-in Tutorial->Running a plug-in. How to export and install the plugin as a Deployable Plugin is described in the PDE Guide->Getting Started->Basic Plug-in Tutorial->Exporting a Plugin.
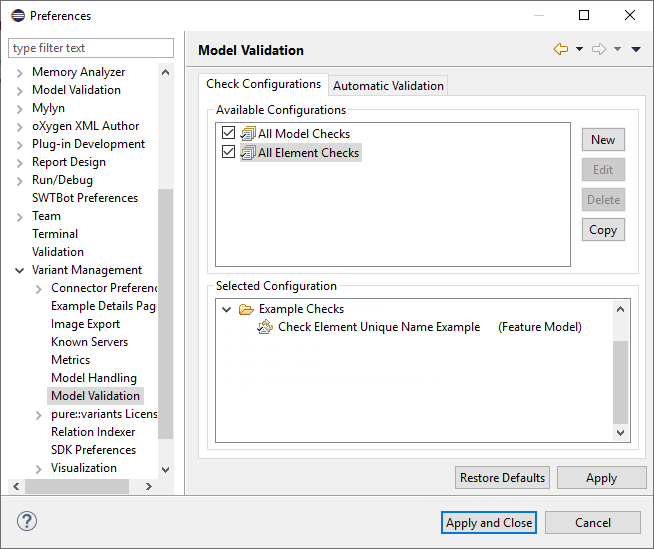
After the Runtime is started or the Deployable Plugin is installed open the Preferences by choosing Window->Preferences from the Eclipse menu. Change to page VariantManagement -> Model Validation where the registered checks can be configured and activated (see Figure 14, “New Check Configuration”).
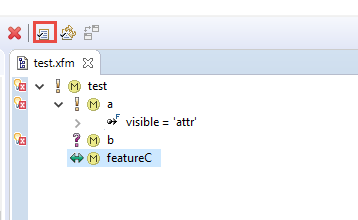
After closing the preferences open for instance a feature model. Then click on button Validate Model in the Eclipse toolbar. Figure 15, “Validated Model” shows a sample feature model where the check has found three problems. On the left side of the model editor markers are shown for each problem in the model, placed on the corresponding elements. The whole list of problems also is shown in the Problems View.
After the check is tested, the next step is to write a quick fix for the problems found by the check (if possible and/or needed).
After a model is validated and problems were found in the model, the user can apply automatic quick fixes for these problems if available. This chapter explains how a quick fix can be provided for problems found by a check, and how the quick fix can be connected to the check class.
In the package com.ps.pvesdk.examples.modelvalidation.plugin create a new Java class with name CheckElementUniqueNameExampleQuickFix.java. This class has to be derived from the class CheckQuickFix. Each quick fix class has a getLabel()-Mathod, getImage()-Mathod and a getDescription()-Method, where the functionality of the check is explained. See the following code.
public class CheckElementUniqueNameExampleQuickFix extends CheckQuickFix2 {
   /**
   * This is the label of the quick fix shown in the list of available quick
   * fixes for a problem.
   */
  private String m_Label = Constants.EMPTY_STRING;

  /**
   * This method is called by Eclipse to get the label for a quick fix. This
   * label is shown in the in list of available quick fixes for a problem and
   * shall briefly explain what the quick fix does.
   *
   * @return The label string.
   */
  @Override
  public String getLabel() {
    return m_Label;
  }

  /**
   * This method is called by Eclipse to show the description of a quick fix.
   * The description shall explain in detail what the quick fix does.
   *
   * @return The description string.
   */
  @Override
  public String getDescription() {
    /*
     * For simple quick fixes it is not necessary to provide a detailed
     * description. If the label is self-explanatory it may also be used as the
     * description text.
     */
    return m_Label;
  }

  /**
   * This method is called by Eclipse to get the image for a quick fix. A quick
   * fix does not need to have an image. If it has not an image, this method
   * simply can return null. The image is shown in the list of available quick
   * fixes right before the label of the quick fix.
   *
   * The image shall give the user a hint what kind of operation is performed by
   * the fix, e.g. changing, creating, or removing something.
   *
   * @return The image of the quick fix.
   */
  @Override
  public Image getImage() {
    /*
     * This quick fix does a change, i.e. it changes the unique name of an
     * element. Thus, a change image is chosen (ICheckImages.CHANGE_IMG).
     */
    ComposeImageManager im = UiPlugin.getDefault().getImageManager();
    return im.getImage(ICheckImages.CHANGE_IMG);
  }

 ...
The initialize()-method initializes the quick fix by evaluating the given problem marker containing the description of the problem to fix.
/**
   * This method is called by the check to initialize the quick fix object. From
   * the given problem marker the quick fix gets the information about the
   * current model and the model element that was checked. With this information
   * it can create a meaningful label and description for the quick fix.
   *
   * @param marker
   *          The problem marker.
   * @param model
   *          The model.
   */
  @Override
  public void initialize(IMarker marker, IPVModel model) {
    /*
     * Get the element that has the problem and that needs to be fixed. For this
     * purpose the class VariantMarkerResolver is used that provides various
     * useful methods to get information from a problem marker. In this case
     * getRelatedElement is used to get the checked element.
     */
    IPVElement element = VariantMarkerResolver.getRelatedElement(marker, model);
    if (element != null) {
      /*
       * Using the element a meaningful label for the quick fix can be created.
       */
      m_Label = MessageFormat.format(Messages.CheckElementUniqueNameExampleQuickFix_1,
       new Object[] { element.getName(), "feature" + element.getName() }); //$NON-NLS-1$
    }
  }
Each quick fix has a run()-method that is called when the quick fix is applied. It implements the quick fix functionality, i.e. adding the string feature to the unique name of the element for which the given problem marker is delivered. The following code shows how the quick fix is implemented.
 /**
   * This method is called by Eclipse to perform the quick fix if the user has
   * chosen it from the list of the available quick fixes for a problem. The
   * problem is described in the given problem marker.
   *
   * This quick fix prepends 'feature' to the unique name of a model element.
   * For this purpose it has to get the checked element, has to calculate the
   * new unique name, and has to set the new unique name to the element. If the
   * quick fix succeeds it has to remove the problem marker to show the user
   * that the problem is fixed.
   *
   * @param marker
   *          The problem marker.
   * @param op
   *          The {@link ModelOperation}.
   * @throws CoreException
   */
  @Override
  public void run(IMarker marker, ModelOperation op) throws CoreException {
    /*
     * Get the checked element to change its unique name. As explained above,
     * first the model has to be opened and then the element can be got from the
     * marker.
     */
    IPVElement element = VariantMarkerResolver.getRelatedElement(marker, op.getModel());

    /*
     * Calculate the new unique name by prepending 'feature' to the original
     * unique name of the element.
     */
    String newname = "feature" + element.getName(); //$NON-NLS-1$
    /*
     * Changes on the element cannot be performed directly. Instead the element
     * has to be put into changing mode.
     */
    Element changed = op.changeElement(element);
    /*
     * Now the name can be set using the Model API.
     */
    changed.setName(newname);
    /*
     * The changes are executed by calling the perform() method of the
     * ModelOperation. After that call, the model changes are committed.
     */
    op.perform();
  }
For connecting the quick fix with the example check, two methods have to be added to the check class. The first method, hasResolutions(), has to return true if there are quick fixes for problems reported by the check. The second method, getResolutions(), returns the available quick fixes and is only called when hasResolutions() has returned true.
  /**
   * This method is called by the model framework to find out if there are any
   * quick fixes available for the given problem marker. The marker contains all
   * the information about the problem to fix. This method is only called for
   * markers describing problems that are created by this check.
   *
   * If hasResolutions returns true, the model validation will call
   * getResolutions to get the quick fixes for the given problem. These quick
   * fixes are shown to the user and invoked by the user.
   *
   * @param marker
   *          The problem marker.
   * @return True if there are any quick fixes available.
   */
  @Override
  public boolean hasResolutions(IMarker marker) {
    // There is a quick fix for this problem (see below).
    return true;
  }

 /**
   * This method is called by the model validation framework if hasResolutions
   * returned true for the given marker. It is used to return the quick fixes
   * for the problem described by the problem marker. This method is only called
   * for markers describing problems that are created by this check.
   *
   * The quick fixes that are returned by this method are objects of classes
   * implementing the ICheckQuickFix interface. Each check can provide its own
   * quick fix class that can be returned this way. There are no limitations on
   * what a quick fix can do to fix the problem. It may open dialogs or
   * automatically fix the problem without any user interaction.
   *
   * @param marker
   *          The problem marker.
   * @return An array of ICheckQuickFix objects.
   */
  @Override
  public IMarkerResolution[] getResolutions(IMarker marker) {
    /*
     * This vector is used to collected the quick fixes for the problem created
     * by this check. There are two quick fixes. The first prepends 'feature' to
     * the unique name of the checked element. The second is a so-called multi
     * quick fix, that applies the first quick fix to all problems with the same
     * unique error code, i.e. to all problems with the error code
     * "CheckElementUniqueNameExample" (see above). After a quick fix is chosen
     * by the user the corresponding problem marker is automatically removed.
     */
    List<ICheckQuickFix> resolutions = new Vector<ICheckQuickFix>();

    /*
     * The quick fix for the problem created by this check is implemented by
     * class CheckElementUniqueNameExampleQuickFix implementing the
     * ICheckQuickFix interface. It simply prepends the missing 'feature' to the
     * unique name of the element.
     */
    CheckElementUniqueNameExampleQuickFix fix = new CheckElementUniqueNameExampleQuickFix();
    /*
     * A quick fix object always is initialized using the marker from which it
     * gets all the information needed to fix the the problem.
     */
    fix.initialize(marker);
    resolutions.add(fix);
    ...
If a model contains several problems of the same type, then a MultiQuickFix can be added for fixing these problems at once. For this a new MultiQuickFix()-object has to be created and added to the resolutions vector.
    /*
     * Class MultiQuickFix also implements the ICheckQuickFix interface but does
     * not have to be implemented by the user.
     */
    MultiQuickFix multifix = new MultiQuickFix(fix.getID());
    /*
     * A quick fix also can have an image that is shown to the user in the list
     * of the available quick fixes for a problem. Since this quick fix changes
     * the unique name of an element, an image signaling a change is used, i.e.
     * ICheckImages.CHANGE_IMG. This image does not have to be set for the above
     * quick fix because it sets this image by its own.
     */
    ComposeImageManager im = UiPlugin.getDefault().getImageManager();
    multifix.setImage(im.getImage(ICheckImages.CHANGE_IMG));
    /*
     * This message is shown to the user in the list of the available quick
     * fixes, right after the above image. It is the textual description of what
     * the quick does.
     */
    multifix.setLabel(Messages.CheckElementUniqueNameExample_4);
    /*
     * It is also initialized using the marker. From the marker it gets the
     * information which problems it has to fix using the unique problem code of
     * the problem. Thus the multi quick fix executes all the fixes returned by
     * this method, except of this multi quick fix.
     */
    multifix.initialize(marker);
    resolutions.add(multifix);

    /*
     * ICheckQuickFix implements the IMarkerResolution2 interface which expects
     * an array of IMarkerResolution objects as the result of this method.
     */
return resolutions.toArray(new IMarkerResolution[resolutions.size()]);This chapter shows how the problem reported by the example check can be fixed automatically using the provided quick fix.
Install the plugin and change the preferences as described in chapter 4. Then open a model and click on the Validate Model button in the toolbar of Eclipse. If the check found elements in the model with unique names not starting with 'feature', then markers are shown on the left side of the editor and in the Problems View.
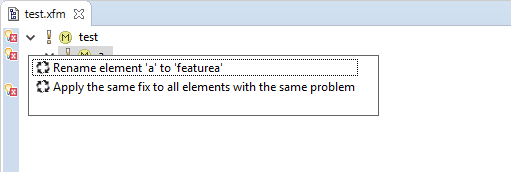
If quick fixes are available for a problem, then a yellow lamp is shown at the corresponding problem marker. Left-clicking on such a marker opens a window with the list of available quick fixes for the problem (see Figure 16, “Resolve Problem”). For the example check two quick fixes are shown. The first renames the corresponding element by predending 'feature' to its unique name. The second is the multi quick fix that applies all the quick fixes for problems found by the example check.
This tutorial shows the use of the pure::variants Synchronization Framework for creating and synchronizing pure::variants models from external data sources. The tutorial example is the import and update of feature models from CSV[1] files.
The synchronization framework is used by several pure::variants extensions like the Connector for IBM Rational Doors and the Connector for Source Code Management.
The presented implementation is an Eclipse plugin consisting of two parts, the import function and the update function. The importer consists of a wizard that is registered as a pure::variants Importer and appears on the menu point Import->Variant Models or Projects->Simple CSV Import (Example). This wizard shows how a CSV file can be mapped to a pure::variants model. The feature model produced by the import can be compared with the original CSV file with the help of the update function. Changes in the CSV file can be visualized and merged into the imported model.
The tutorial is structured as follows. Chapter 2 describes how a new Eclipse plugin is created. Chapter 3 provides a short introduction to the synchronization framework and explains how to map the information from a CSV file to a pure::variants model. Chapter 4 shows how to create the pure::variants model from the mapped CSV information and it shows the steps needed to provide the import wizard. Chapter 5 explains the implementation and registration of a compare provider implementing the update function. Finally in chapter 6 it is shown how to use the new import wizard to import a CSV file. And it is shown how to use the model synchronization functionality of pure::variants to compare and update the imported model with the CSV file.
The reader must have basic knowledge of pure::variants and the Java Plugin Development under Eclipse. For more information about the Eclipse Plugin concept see chapter Plattform Plug-in Developer Guide in the Eclipse Help.
The plugin described in this tutorial is part of the pure::variants SDK. It can be installed by choosing New->Example from the Eclipse File menu, and then Examples->Variant Management SDK->Extensibility Example Plugins->com.ps.pvesdk.examples.import.csv.plugin.
The first step to set up a new integration of an external data source, a CSV file in this case, is to create a new Eclipse plugin. This plugin contains the Java implementation of the importer and updater as well as the registration entries for the import wizard and the compare provider.
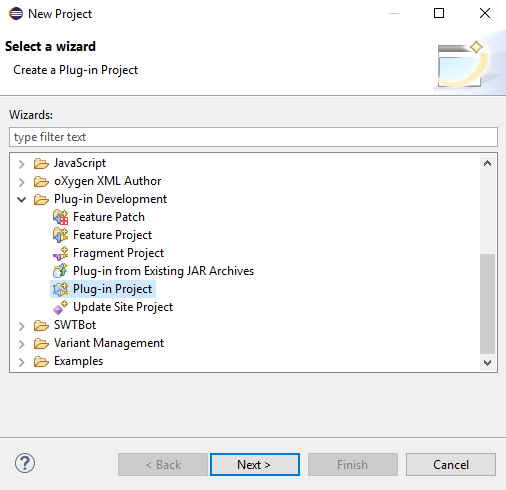
Choose item File->New->Project from the Eclipse menu and select "Plugin Project" in the list of available project wizards, see Figure 17, “Plug-in Project”.
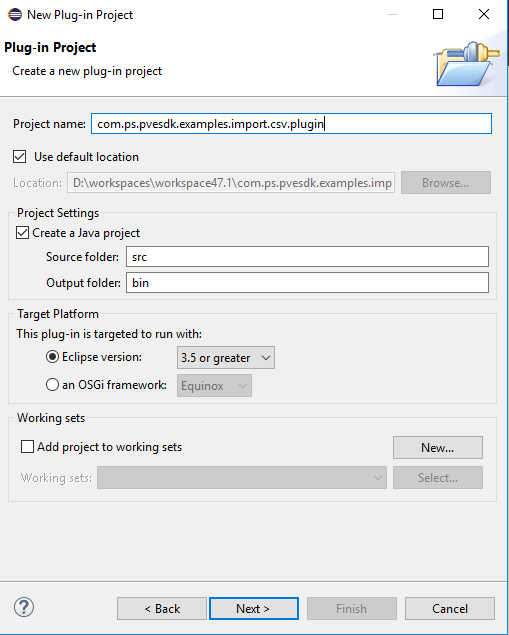
The name of the new project shall be "com.ps.pvesdk.examples.import.csv.plugin". All other settings should be made according to Figure 18, “Create new Plug-in Project”. Please note that the plugin has to work with an eclipse version and must not work with OSGI framework.
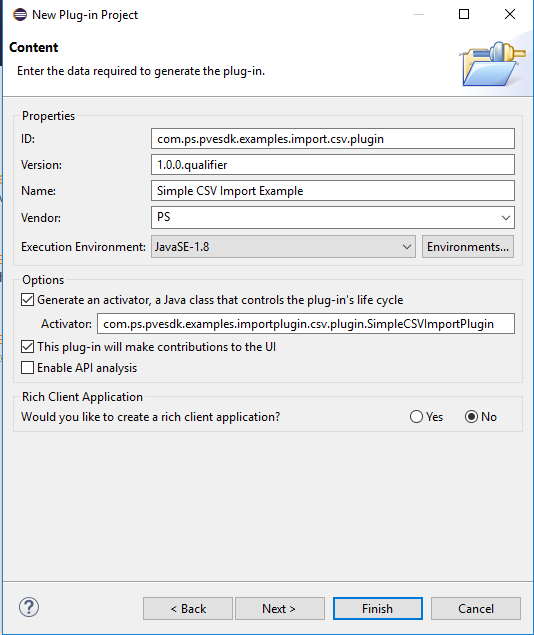
Click on button to switch to the "Plug-in Content" page. Apply the settings as shown in Figure 19, “Plug-in Content”.
The new plugin project is created after clicking on . It
contains a source directory for the Java implementation of the importer, the plugin
description file plugin.xml, and the file
SimpleCSVImportPlugin.java defining the plug-in's life cycle
class.
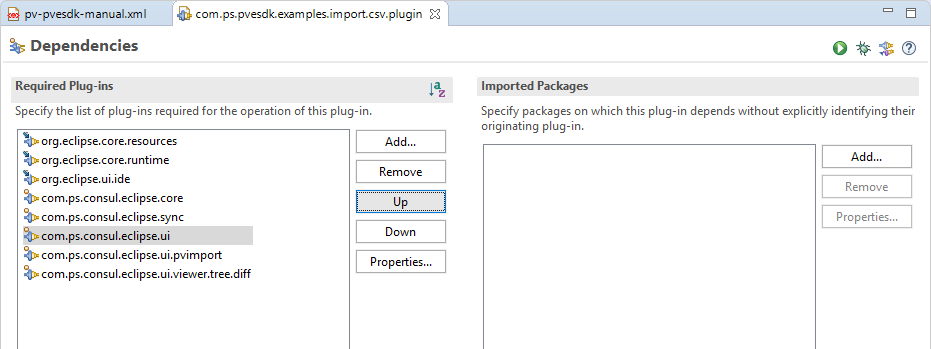
To be able to use the synchronization framework some additional plugin dependencies
have to be specified. Open file plugin.xml with the Plug-in Manifest Editor by double-clicking on it. On the
"Overview" page you can see the fundamental information about the project. Switch to the
"Dependencies" page and click on the button to add the plugins
listed below (see Figure 20, “Plug-in Dependencies”).
The plugin is now ready for the next step, i.e. using the synchronization framework to import a CSV file.
Now the information about the model elements have to be imported from the CSV file. The CSV file must fulfill some fundamental assumptions for this example. Each model element has a valid variation type (for example ps:optional), a unique ID, and a unique name (unique in the model). For each element the ID of the parent element is needed to build the hierarchy of the model. Thus, the CSV file needs the following 4 columns: Unique ID, Unique Name, Type, Parent Unique ID. All other columns are interpreted as element attributes in this example. Following steps are necessary to construct a model from a CSV file:
Open the CSV file and read the first line containing the column headers.
Read the other lines of the file containing the element definitions.
Create the elements using the information from the lines of the CSV file.
Create the model structure, i.e. the element hierarchy, using the parent element information.
Example 1. initFileContent() in ImportRunner.java
// Open the CSV file
BufferedReader reader = new BufferedReader(new FileReader(file));
// Read the first line
String tableHeader = reader.readLine();
// Parse the first line and identify the columns
String[] columns = m_Parse.parse(tableHeader);
// Read all other lines
while(reader.ready()){
   // Read the next line
   String line = reader.readLine();
}With knowledge of the columns in the CSV file, an Element can
be created for each line. First, the columns of a line have to be identified. Then, if
the values for Unique ID, Unique Name and Type
are known, a new empty element can be created and the values can be set.
Example 2. createElement() in ImportRunner.java
// Create an empty element
Element newElement = Operations.makeElement(ModelConstants.FEATURE_CLASS, ModelConstants.ATTRIBUTES_FEATURE_TYPE);
// Parse the current line
String[] values = m_Parse.parse(line);
// Find the element properties
String ID         = getID(values)
String type       = getType(values)
String uniqueName = getUniqueName(values)

// Set the unique element ID
 newElement.setID(new ID(ID));
// Set the element type
newElement.setType(type);
// Set the unique name of the element
newElement.setName(uniqueName)
Additionally, the value for Parent Unique ID must be stored for later use. Later the unique IDs of the parent and the current element are used to create the element hierarchy. If no parent ID is given for an element, then this element is taken as the root element of the model. There must be exactly one root element in a pure::variants feature or family model.
All columns other than the columns described above are interpreted as element's attributes. The name of the attribute is gathered from the column header. The values are defined in the lines. Only constant attributes are supported by this example.
private void addProperties(CSVEntry entry, String[] columns, Element element) {
    LinkedHashSet<String> properties = new LinkedHashSet<String>(Arrays.asList(columns));
    // Remove all columns entries that are already added.
    properties.removeAll(Arrays.asList(getRequiredColumns()));

    for (Iterator<String> iter = properties.iterator(); iter.hasNext();) {
      String currentColumn = iter.next();
      String value = (String) entry.get(currentColumn);
      if (currentColumn.equals(ATTR_CLASS)) {
        if (value.length() > 0) {
          element.setKlass(value);
        }
      }
      else if (currentColumn.equals(ATTR_DESCRIPTION)) {
        Operations.setDesc(element, value, null, element.getModelContainer().getMimeType());
      }
      else if (currentColumn.equals(ATTR_VISIBLENAME)) {
        // Attribute "Visible Name" is used as visible name
        if (value.length() > 0) {
          Operations.setVName(element, value);
        }
      }
      if (m_NameValidator.isValid(currentColumn) == null) {
        Operations.setPropertyValue(element, currentColumn, ModelConstants.ATTRIBUTES_STRING_TYPE, value);
      }
    }
}The pure::variants model is created using the ModelCreator class.
// Create a new model using
m_Model = ModelCreator.createModel(id, name, type, rootid, rootname);
After all elements are created, the hierarchy of the elements has to be created. The starting point for this process is the root element of the model, i.e. the element that has no parent ID. The ModelOperation has a method
addElement(child, parent, relType)
With this method the child elements of an element are specified. Beginning with the root element all elements are added to the element hierarchy step-by-step.
The last step for realizing the import is providing the import wizard. The import wizard is used to select the CSV source file, the target model name and location, and to start the import process. Therefore a new wizard has to be added to the list of pure::variants import wizards.
Following steps have to be performed:
Add the extension point com.ps.consul.eclipse.ui.pvImport.VariantImportWizards to extensions list of the plugin
Create a new class named
SimpleCSVImportWizardand register it as a "wizard" extension at this extension pointImplement a wizard page named
TargetSelectionPagefor theSimpleCSVImportWizardImplement the
performFinish()method of theSimpleCSVImportWizard
To register a wizard the file plugin.xml has to be opened in the
Plug-in Manifest Editor. The "Extensions" page shows
all extensions the plugin provides to the eclipse architecture.

The right side of Figure 21, “Adding the Import Wizard extension” shows the attributes describing the new wizard. Provide as name "Simple CSV Import Wizard (Example)" and as description "Creates feature models from a csv file". The icon field is optional and does not need to be filled in. Once Eclipse is notified about the wizard the wizard class has to be implemented. Click on the "class" field name and the "New Class" wizard appears.
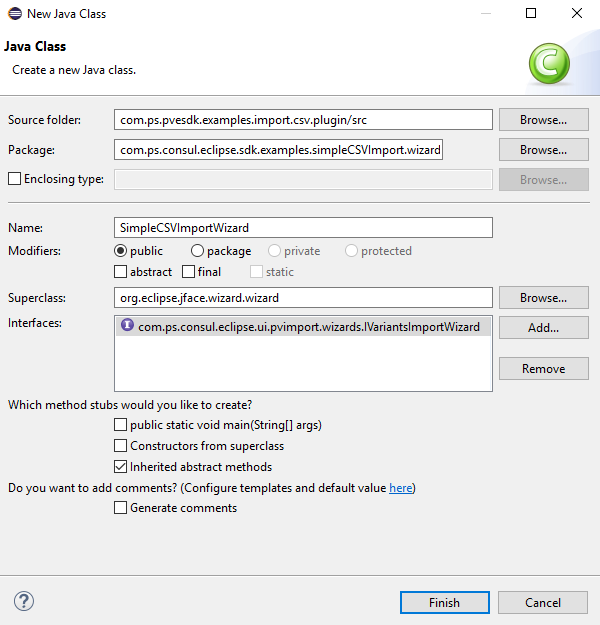
The wizard class should be named SimpleCSVImportWizard. The
class has to extend class org.eclipse.jface.wizard.Wizard and
implement the interface
com.ps.consul.eclipse.ui.pvimport.IVariantImportWizard.
Click on to create the new class.
Once the wizard class is created, a wizard page has to be implemented that is
displayed in the wizard. The page should allow to select a target file for the imported
model in the file system. Also the page should provide a file selection dialog that allows
the user to select the CSV source file. The wizard itself is finished by clicking on the
button. If the button is clicked the wizard's
performFinish() method is called from by Eclipse
environment.
The performFinish() method collects the values entered in the
target selection page. Then a new ImportRunner is created and
initialized with the collected values. Finally the import process is started.
Example 3. performFinish() in SimpleCSVImportWizard.java
 /**
   * This method is called when the Finish button of the wizard is pressed.
   */
  @Override
  public boolean performFinish() {
    IResource file = null;
    File sourceFile = m_TargetPage.getSourceFile();
    IPath container = ResourcesPlugin.getWorkspace().getRoot().getLocation().append(m_TargetPage.getSelection());
    IContainer res = ResourcesPlugin.getWorkspace().getRoot().getContainerForLocation(container);

    String fileName = m_TargetPage.getFileName();
    /*
     * If file already exists, ask the user if the existing file shall be
     * replaced.
     */
    if (handleExistingResource(res, fileName)) {
      try {
        ImportRunner csvimport = new ImportRunner(null, fileName, sourceFile, res, new CSVParser());

        IPVModel model = csvimport.importModelFromCSVFile();

        file = Utils.getResourceFile(res, fileName);

        // Import to the server
        if (file != null && model != null) {
          // Add model nature to enable synchronization
          NatureModeler.addNature(model, NATURE_CSV_IMPORT_EXAMPLE);

          // created model is imported by the server
          if (ConsulProjectEvaluator.isRemoteProject(res.getProject()) == false) {
            /*
             * Created model is imported by the local core server, if is local
             * project.
             */
            m_ModelURL = URLUtil.decodeURL(file.getLocation().toFile().toURI().toURL());
            ConsulCorePlugin.getDefault().getModelManager().importModel(model, m_ModelURL, null);
          }
          else {
            // if project is remote project, model is imported to remote server
            RemoteProject rp = ConsulProjectEvaluator.getRemoteProjectInfo(res.getProject()).getProject();
            RemoteEntry parent = rp.getEntryForMappedResourceRelativeName(res.getProjectRelativePath().toOSString());
            rp.importModel(model, parent);
          }
        }
        else {
          throw CoreManager.makeCoreException(0, "The properties could not be detected");
        }
      }
      catch (Exception e) {
        IStatus status = Utils.log(IStatus.ERROR, Messages.SimpleCSVImportWizard_4, e);
        ErrorDialog.openError(new Shell(), Messages.SimpleCSVImportWizard_5, Messages.SimpleCSVImportWizard_6, status);
        return false;
      }
      finally {
        /*
         * Independent on any exception, let refresh the created models
         * container.
         */
        refreshProject(res);
      }
    }
    return true;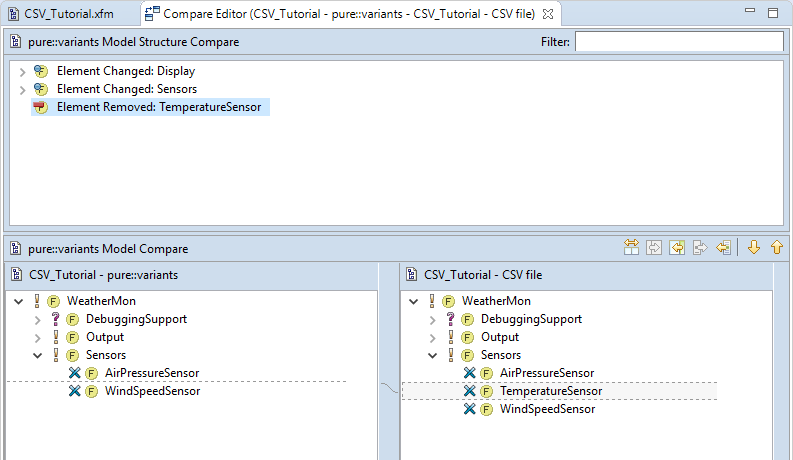
}After implementing the import functionality it is now explained how to provide the update functionality. The model imported from the CSV file can be compared with the original CSV file. The changes between the model and the CSV file are shown in the Compare Editor and can also be merged. For comparing two models it is substantial that both models have the same model ID. All model elements are compared on the basis of its IDs. Two elements are identified as pair and can only be compared if both have the same ID. Otherwise an "Element Removed" and an "Element Added" action indicates the change. The same applies to element properties, relations, constants, etc.
Following steps have to be performed to add the compare functionality:
Add the extension point com.ps.consul.eclipse.ui.viewer.tree.diff.CompareProvider to the plugin's extension list
Create a new class implementing the interface
IConsulModelCompareProvider2Register the new class as a "provider" extension at the Compare Provider extension point
In pure::variants a Compare Provider has to be registered to compare a model. For
this purpose open the file plugin.xml again. Then change to page
"Extensions".
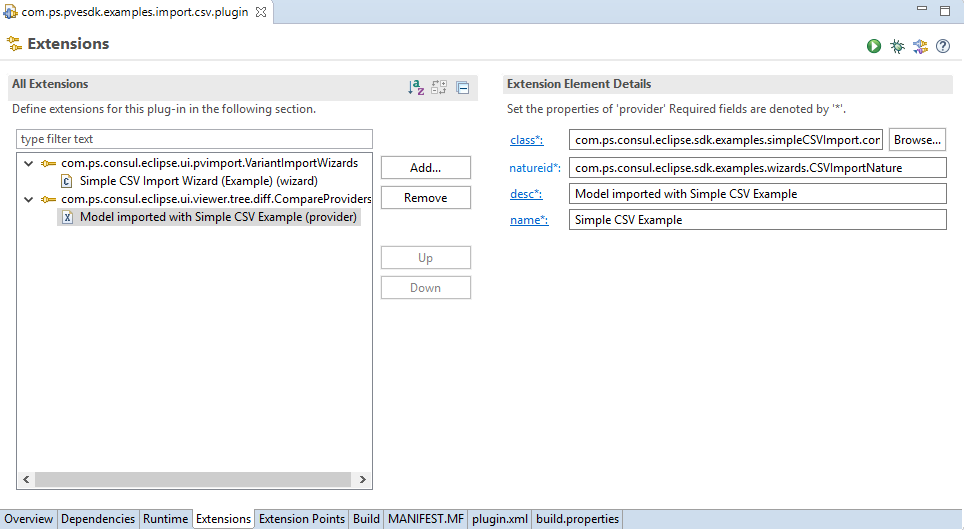
Click on button Add to add a new extension for the extension
point com.ps.consul.eclipse.ui.viewer.tree.diff.CompareProviders.
Select the extension point and choose from
the context menu. On the right side of the "Extensions" page the required settings must
be made. The attribute "class" specifies the path to the class implementing the
IConsulModelCompareProvider2. For the attribute
"natureid" insert the Nature ID as the one used for creating the imported models, i.e.
"com.ps.consul.eclipse.sdk.examples.wizards.CSVImportNature". The description and name
are freely selectable.
Each comparison between two models must implement the
IConsulModelCompareProvider2 interface. For this add a
new class to the plugin. This class implements the interface and has to extend class
com.ps.consul.eclipse.ui.viewer.tree.diff.editor.ConsulModelCompareProvider.
The models to compare should be opened with the method
initialize(input:IEditorInput).
The left model, i.e. the imported model, can be got with the following code
private File getFileForInput(IEditorInput input) {
  File result = null;
  if (input instanceof FileEditorInput) {
    result = ((FileEditorInput) input).getFile().getLocation().toFile();
  }
  return result;
}
Then the file can be opened with the pure::variants model manager:
ConsulCorePlugin.getDefault().getModelManager()openModel(URL url)
The model manager opens the model file and creates a corresponding
IPVModel object. The right model must be temporarly produced
from the CSV file. For this purpose, the same steps can be performed as for importing a
model from the CSV file. The only difference is, that it is not necessary to import the
model to the local or remote server.
// Create a pure::varaint's mode and add nature
ImportRunner csvModel = new ImportRunner(...);
IPVModel model = csvModel.importModelFromCSVFile();
The next two method calls pass the models to the compare editor:
setLeftModel(left);
setRightModel(right);
Finally the text identifying the models in the compare editor has to be defined. The initialize method must return true to let the compare editor evaluate the models and show the changes.
Note that all models opened with the pure::variants model manager must also be closed with this model manager:
IModelManager.safe.closeModel(IPVModel model)
Now it is time to test the importer and update functionality. For testing the plugin two different possibilities exist. Either the plugin is exported as Deployable Plugin and installed into pure::variants. Or an Eclipse Runtime is started using the CSV Example plugin. This approach is described in the Eclipse help in chapter PDE Guide -> Getting Started -> Basic Plug-in Tutorial -> Running a plug-in. How to export and install the plugin as a Deployable Plugin is described in the PDE Guide -> Getting Started -> Basic Plug-in Tutorial -> Exporting a Plugin.
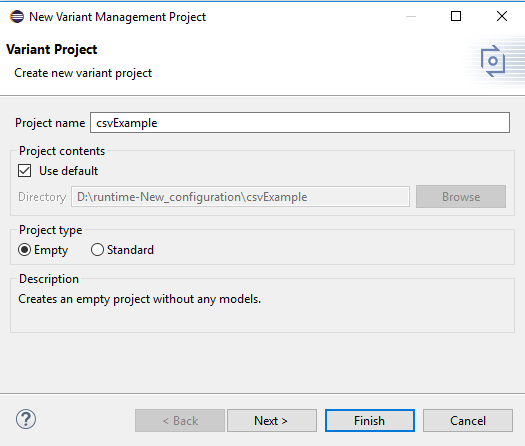
To demonstrate the use of the CSV importer, a new pure::variants project should be created. In the context menu of the Variant Projects view choose New->Variant Project.
The models created from the CSV files can be imported into the new project. Select the new project in the Variant Project View. Then choose Import->Variant Models or Projects->Simple CSV Import (Example) from the context menu. This opens the CSV Import wizard.

In the upper part of Figure 25, “CSV Import Wizard” the target project or
directory for the imported model has to be selected. In the lower part, the model and
the file names have to be specified. At last the CSV input file has to be selected using
the button Choose. After clicking on Finish
the performFinish() method of class
SimpleCSVImportWizard is called and the import starts. This
method executes the algorithm described in section 4. It uses the
ImportRunner to create a pure::variants model from the CSV file
and saves it into the target project or directory.
The pure::variants synchronization functionality is invoked by opening the imported
model and clicking on the Synchronize Model button  in the Eclipse tool bar. Then choose the
original CSV file. The compare editor opens showing the changes, if there are
any.
in the Eclipse tool bar. Then choose the
original CSV file. The compare editor opens showing the changes, if there are
any.