The pure::variants Integration for DOORS NG is distributed in a
WAR archive
(com.ps.consul.web.ui.doorsng-x.x.x.war) and can be
found in the pure::variants Windows Installer
package on the pure::variants update site.
Note
For brevity we have renamed the war-archive to pvwidget.war. At least for Apache Tomcat, the war-archive name implies the context-path, so the pure::variants Integration's Catalog will be reachable at https://[pv-server-FQDN]:[port]/pvwidget/catalog.xml.
Remember FQDN is the fully qualified domain name. The port number might be optional, if configured with standard SSL port (443)
The deployment of pure::variants Integration for DOORS NG has the following requirements:
Extenstion must be hosted on a web server application that can be configured to run with Oracle JDK/JRE or OpenJDK.
Extension must be accessible from a web server via HTTPS.
The web server must not require any form of authentication to read the extension files.
The certificate that is installed in the web server must be a valid certificate and must match the server's domain.
Java Runtime Envritonment (JRE) or Java Development Kit (JDK) version 1.6 or later.
The pure::variants Integration for DOORS NG must be deployed on your application server. This has to be done once by the system administrator. It entails copying of pvwidget.war into the webapps directory, which is located in the Apache Tomcat installation directory.
Note
In a Tomcat deployment, name of the war file becomes the context path of the web application. In order to configure a nested context path for a web application, the name of the war should contain the individual context path parts separated by '#'. For example, to make the pure::variants Integration's Catalog accessible by a url like https://localhost:8443/pv/widget/dng/catalog.xml, the name of the war file needs to be named as pv#widget#dng.war. And the war file should be placed into the webapps directory. For further details please see the Official Tomcat documentation.
As pure::variants Integration does client requests to DOORS NG application server, the Integration's client must be configured with the trusted SSL-certificates. One way to do this is to create a keystore, add the DOORS NG SSL-certificate to it and configure Tomcat's Java-Runtime with this keystore as a trust store.
In case of Windows, please create and open [TOMCAT_INSTALL_DIR]/bin/setenv.bat file to add the following lines:
set "JAVA_OPTS=%JAVA_OPTS% -Djavax.net.ssl.trustAnchors=[TRUST_STORE_PATH]"
set "JAVA_OPTS=%JAVA_OPTS% -Djavax.net.ssl.trustStore=[TRUST_STORE_PATH]"
set "JAVA_OPTS=%JAVA_OPTS% -Djavax.net.ssl.trustStorePassword=[TRUST_STORE_PASSWORD]"
An example configuration could look like this:
set "JAVA_OPTS=%JAVA_OPTS% -Djavax.net.ssl.trustAnchors=c:\keystore.jks"
set "JAVA_OPTS=%JAVA_OPTS% -Djavax.net.ssl.trustStore=c:\keystore.jks"
set "JAVA_OPTS=%JAVA_OPTS% -Djavax.net.ssl.trustStorePassword=password"
In case of Linux, please create and open [TOMCAT_INSTALL_DIR]/bin/setenv.sh file to add the following lines:
export JAVA_OPTS=$JAVA_OPTS" -Djavax.net.ssl.trustAnchors=[TRUST_STORE_PATH]"
export JAVA_OPTS=$JAVA_OPTS" -Djavax.net.ssl.trustStore=[TRUST_STORE_PATH]"
export JAVA_OPTS=$JAVA_OPTS" -Djavax.net.ssl.trustStorePassword=[TRUST_STORE_PASSWORD]"
An example configuration could look like this:
export JAVA_OPTS=$JAVA_OPTS" -Djavax.net.ssl.trustAnchors=c:\keystore.jks"
export JAVA_OPTS=$JAVA_OPTS" -Djavax.net.ssl.trustStore=c:\keystore.jks"
export JAVA_OPTS=$JAVA_OPTS" -Djavax.net.ssl.trustStorePassword=password"
Stop the Apache tomcat. Go to the Apache Tomcat installation directory, go in to work directory then go in to Catalina directory and delete the localhost directory. Go back to Apache Tomcat installation directory, go in to webapps directory and delete the previously installed pvwidget.war and pvwidget directory. Now copy the new pvwidget.war in the webapps directory and start the Apache Tomcat again. No configuration change in Apache Tomcat is required in case of an update.
Please follow the following steps for WebSphere Liberty setup:
Install the WebSphere Liberty according to the official documentation.
Create a server by running the following command:
bin\server create [SERVER_NAME]
Please add the following lines into the server.config.dir/server.xml file:
<featureManager>
  <feature>jsp-2.3</feature>
  <feature>ssl-1.0</feature>
</featureManager>
Please run the following command:
bin\installUtility install [SERVER_NAME]
Please ensure that the server is configured with SSL. Please refer to the Securing communications with Liberty section of the official documentation.
Copy the war archive file pvwidget.war to server.config.dir/apps. Add following line into the server.config.dir/server.xml file:
<webApplication contextRoot="pvwidget" location="${server.config.dir}/apps/pvwidget.war"/>
Note
Nested context path can be configured by specifying the whole path in contextRoot attribute of the webApplication. For example, to make the pure::variants Integration's Catalog accessible by a url like https://localhost:8443/pv/widget/dng/catalog.xml, the contextRoot attribute should be configured as contextRoot="pv/widget/dng".
The final server.config.dir/server.xml file should look similar to this:
<?xml version="1.0" encoding="UTF-8"?>
<server description="new server">
  <!-- Enable features -->
  <featureManager>
    <feature>jsp-2.3</feature>
    <feature>ssl-1.0</feature>
  </featureManager>

  <httpEndpoint host="*" httpPort="-1" httpsPort="9443" id="defaultHttpEndpoint"/>
  <ssl id="defaultSSLConfig" keyStoreRef="defaultKeyStore" sslProtocol="SSL"/>
  <keyStore id="defaultKeyStore" location="keystore.jks" password="{xor}LykrOiwr" type="JCEKS"/>

  <webApplication contextRoot="pvwidget" location="${server.config.dir}/apps/pvwidget.war"/>
</server>
As pure::variants Integration does client requests to DOORS NG application server, the Integration's client must be configured with the trusted SSL-certificates. One way to do this is to create a keystore, add the DOORS NG SSL-certificate to it and configure Liberty's Java-Runtime with this keystore as a trust store. Please create and open server.config.dir/jvm.options (see Directory locations and properties) to add the following lines:
-Djavax.net.ssl.trustAnchors=[TRUST_STORE_PATH]
-Djavax.net.ssl.trustStore=[TRUST_STORE_PATH]
-Djavax.net.ssl.trustStorePassword=[TRUST_STORE_PASSWORD]
An example configuration could look like this:
-Djavax.net.ssl.trustAnchors=c:\keystore.jks
-Djavax.net.ssl.trustStore=c:\keystore.jks
-Djavax.net.ssl.trustStorePassword=password
Stop your Web Application Server (like Tomcat or WebSphere Liberty. Replace the pvwidget.war in the server.config.dir/apps directory. Start the web server again.
If you have used the pre-defined settings, as described in the section Section 7.1.8, “Pre-defined settings for Web Integration in DOORS NG”, please re-add the settings.json file accordingly, as done before.
Once finished, please start your Web Application Server again.
In order to uninstall pure::variants Integration for DOORS NG, stop the Apache Tomcat. Please go to Apache Tomcat installation directory and then go to webapps directory. Delete the pvwidget.war file and the pvwidget directory from the webapps folder.
Go back to Apache Tomcat installation directory, go in to work directory and then go in to Catalina directory and delete the localhost directory from it. Start the Apache Tomcat.
In order to uninstall the pure::variants Integration for DOORS NG, please stop the WebSphere Liberty server. Go to server.config.dir/apps folder and remove thepvwidget.war. Edit the server.config.dir/server.xml and remove the following line from the file.
<webApplication contextRoot="pvwidget" location="${server.config.dir}/apps/pvwidget.war"/>Save the file and start the WebSphere Liberty server again.
In order to visualize the variability, folloing settings need to be configured on the Jazz side.
Browse to JTS home page. Click Manager Server and then click Advanced Properties in the left menu.
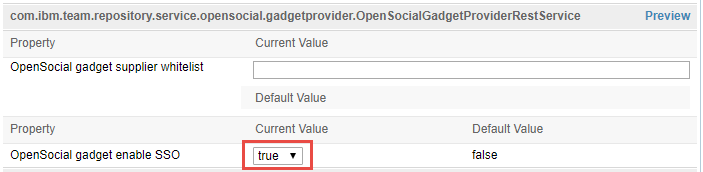
Scroll down to OpenSocial gadget enable SSO and set its value to true as shown in figure Figure 57, “OpenSocial gadget enable SSO Setting”.
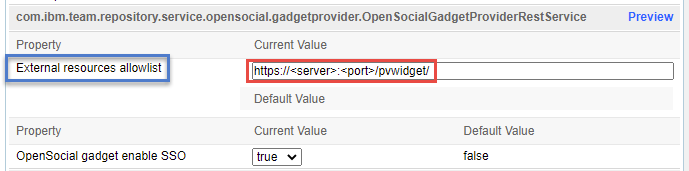
For the versions ELM 7.0.2 iFix004, ELM 7.0.1 iFix009, CLM 6.0.6.1 iFix018, CLM 6.0.6 iFix022 and onwards, an extra configuration is required. In External resources allowlist, please enter the URL of the widget. For example if pure::variants Integration for DOORS NG is accessible at https://jazz.server.net:8443/pvwidget/catalog.xml then enter https://jazz.server.net:8443/pvwidget/ in the allowlist as shown in the figure Figure 58, “External resources allowlist”.
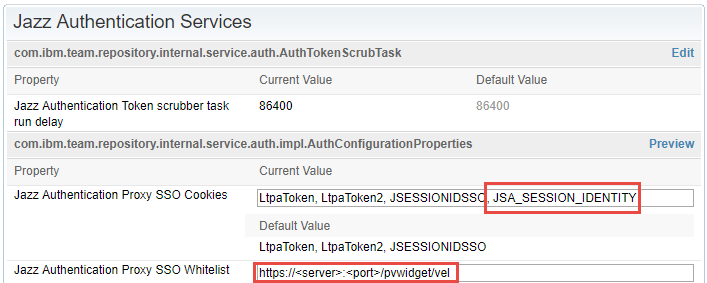
Further, scroll down to Jazz Authentication
Services, in Jazz Authentication Proxy SSO
Cookies field and replace its value with LtpaToken,
LtpaToken2, JSESSIONIDSSO, JSA_SESSION_IDENTITY. In the next
field in Jazz Authentication Proxy SSO
Whitelist, write the URL of the server hosting the
widget. Assuming that pure::variants Integration DOORS NG
war was renamed as pvwidget.war, the URL
must end with /pvwidget/vel as shown in the figure
Figure 59, “Jazz Authentication Proxy SSO Settings”.
As shown in Figure 60, “Adding A URL In RM Whitelist”, go to Jazz RM application administration page. Click the Whitelist (Outbound) on the left menu. In the Enter Base URL field of the Add New Whitelist URL section, enter the Base URL of the server where the pure::variants Integration for DOORS NG is installed. Click button and the newly added URL should be added to the Outbound URL list on the same page.
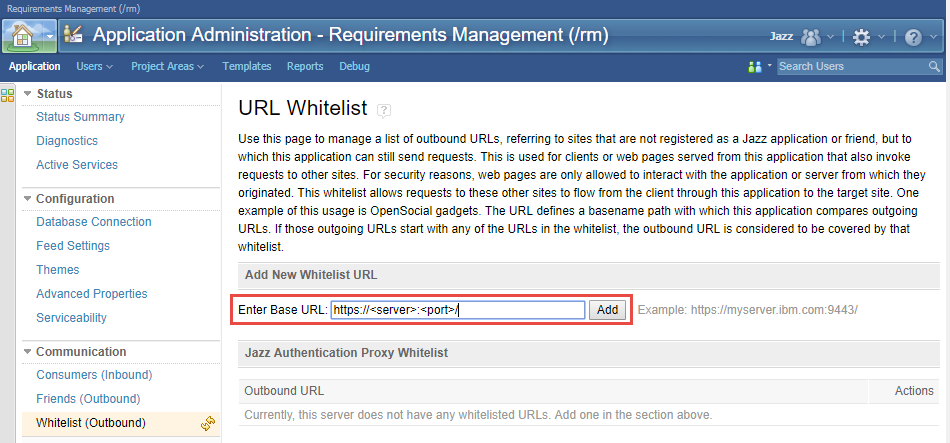
Note
On clicking the Add button, Jazz tries to access the URL being added. And if the URL is accessible only then the URL is added to the list of Outbound URL.
Browse to Jazz RM Advanced Settings page. RM Advanced Settings page can be accessed by pointing the web browser to following URL:
https://<server>:<port>/rm/admin#action=com.ibm.team.repository.admin.configureAdvanced
Scroll to User Extension Catalog URL as shown in figure Figure 61, “RM User Catalog Configuration”.
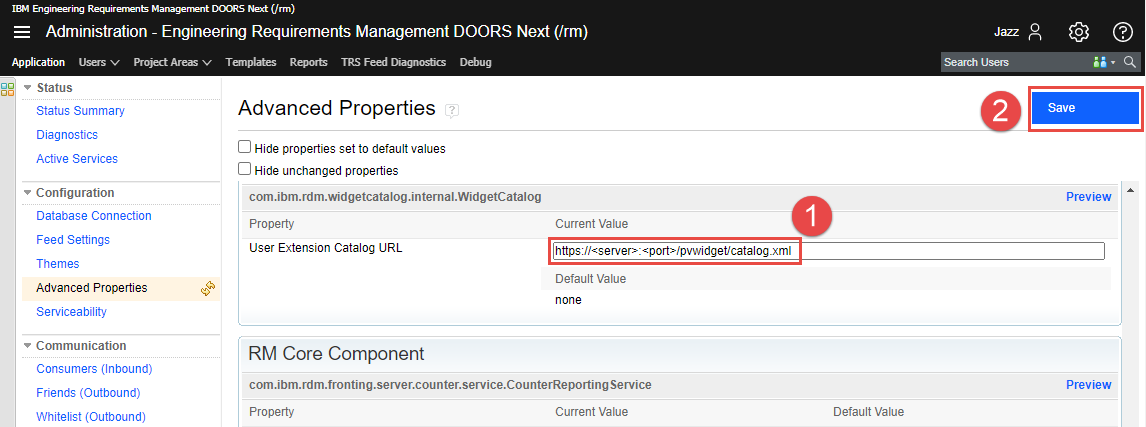
Considering that the context path of the pure::variants
Integration is pvwidget, enter the
Catalog URL as
https://<server>:<port>/pvwidget/catalog.xml
and Save the settings.
Jazz RM allows configuration of only one Catalog URL. If you already have a Catalog URL configured in RM Advanced Properties. Then the pure::variants Integration for DOORS NG can be added to the existing catalog document. Lets consider that pure::variants Integration for DOORS NG is deployed on a web server and accessbile via a URL like this:
https://server.local.com:8443/pvwidget/catalog.xml
Open the catalog xml document that is already configured in the RM Advanced Properties. Add the following ju:catalog-entry in the list of existing ju:catalog-entry nodes.
<ju:catalog-entry>
	<dc:title>pure::variants Integration</dc:title>
	<dc:description>Enables adding variability information to requirements in a DOORS NG module. Enables editing of Restrictions and Calculations. Also provides the functionality of creating a Variability Preview.</dc:description>
	<ju:gadget rdf:resource="https://server.local.com:8443/pvwidget/pvscl.xml"/>
	<ju:icon rdf:resource="https://server.local.com:8443/pvwidget/pv.png"/>
	<ju:preview rdf:resource="https://server.local.com:8443/pvwidget/preview.png"/>
	<ju:thumbnail rdf:resource="https://server.local.com:8443/pvwidget/thumbnail.png"/>
	<ju:category>pure::variants</ju:category>
	<ju:category>Requirements</ju:category>
</ju:catalog-entry>
Note
Please note that the starting URL in the ju:gadeget, ju:icon, ju:preview and ju:thumbnail depends on the deployement of the pure::variants Integration. Try to access the ju:gadget URL in browser and see if the pvscl xml document is shown or not. If the xml document is shown in the browser then the pure::variants widget should be available in the 'Add Widget' dialog.
In order to interact with the Integration, it needs to be added inside Jazz' Mini Dashboard. Hence, open the Mini Dashboard on the left side panel inside DOORS NG. At the top left of Mini Dashboard, click the Add Widget button. A dialog opens as shown in the figure Figure 62, “Adding Integration inside Mini Dashboard”.
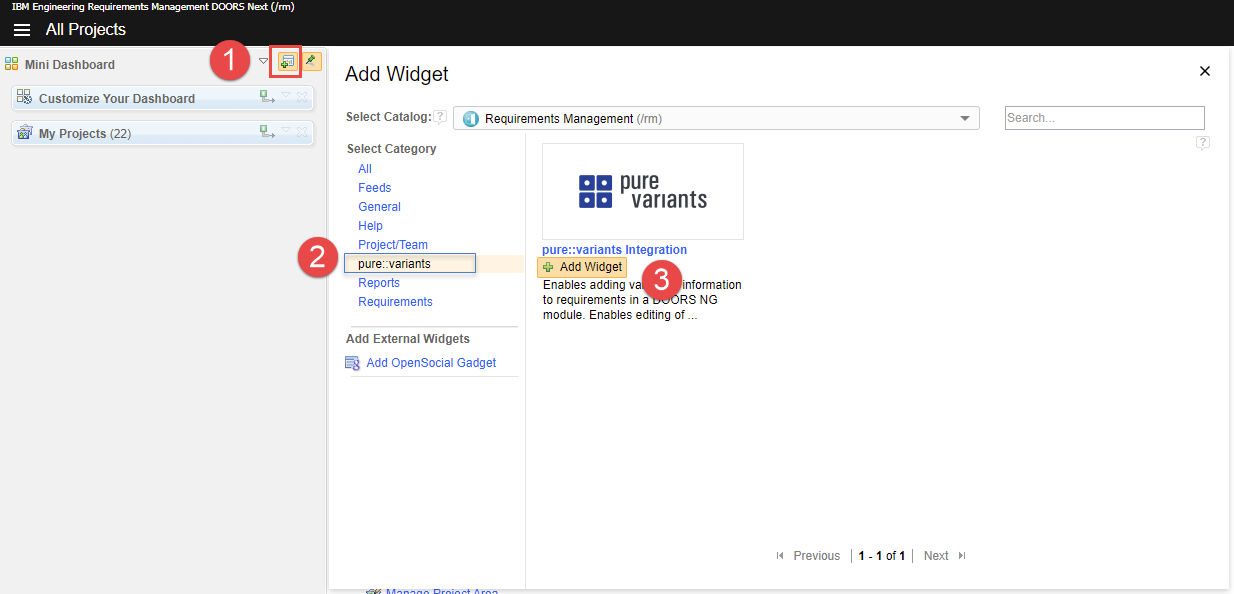
On the left side of the dialog, in the widget category, click pure::variants. Then under the pure::variants Integration click the Add Widget.
For further instructions see section Adding an OpenSocial gadget in the documentation of IBM's Rational Collaborative Lifecycle Management
Note
If pure::variants Integration for DOORS NG is going to be used in Web Hub mode with Jazz V7.0 then it is required that the pure::variants Web Components' relative domain-name must be same as DOORS NG's relative domain-name (e.g. *.local.net). For example, if DOORS NG is accessible via https://server.local.net:9443/rm then pure::variants Web Components must be accessible via URL like https://otherserver.local.net:8443/pv.
If a common domain-name is not possible, the WebComponents should be configured regarding SameSite attributation for Cookies. For this, please see the optional step in our Tomcat resp. WebSphere configuration guide.
The following list contains all necessary steps to be have taken to make successful deployment of the DOORS NG integration along with the DOORS NG application:
Verify the web application server is started with a Java/JDK/JRE, which is not provided by IBM
Hint: Choose any other Java vendor, like Oracle, Amazon, Adoptium, OpenJDK instead.
Verify the web application server is configured to be accessed via HTTPS/SSL endpoint.
Hint: Try to access via browser, using the HTTPS scheme, e.g. https://<server:port>/<widget>/pvscl.xml
Verify the web application server is configured to have the SSL certificate of the DOORS NG application trusted.
Hint: See section Configuration of Trust Store (Apache Tomcat or WebSphere Liberty) for defining a truststore, which contains the DOORS NG application's SSL certificate.
Verify the web application server can resolve the hostname of the DOORS NG application's URL.
Hint: Log-in to the web application server's machine, and try to follow the link of DOORS NG application URL, with help of browser application, or any other command-line tool, like wget or curl.
Verify the web application server has deployed the DOORS NG integration functional, by accessing the the following URL: https://<server:port>/<widget>/vel (Please substitute with proper server and port, if other than 443, and use the appropriate context-path).
Hint: If successful, you should see a webpage showing the following line:
{"errorClass":"","errorMessage":"Module URI not received","errorCode":400}
The Web Integration for DOORS NG allows you to pre-define specific settings to simplify or limit the setup for end-user.
Please see chapter Section 7.2, “Pre-defined settings for Web Integration” for detailed explanations, which settings are available and how they are configured.
To use these pre-defined settings for DOORS NG Integration, you need to write the configuration (in JSON format) into a file called settings.json and put this into the deployment directory.
If your Web Application Server (like Tomcat or WebSphere Libterty) extracts the war-archive automatically, please add the settings.json file into the war-archive (called "com.ps.consul.web.ui.doorsng.*.war"
If your Web Application Server (like Tomcat or WebSphere Libterty) does not extract the war-archive automatically and you extract it manually, please add the settings.json into the deployment directory of the Integration.
Finally, the deployment directory should have located the settings.json next to the pvscl.xml, as follows:
|-META-INF
|-WEB-INF
|-pvscl.xml
|-settings.json
|-... (other files)
As administrator, one can pre-define the settings for the end-user, e.g. to connect to the WebHub immediately. Thus, the user does not need to be aware of the connection configuration and can use the Widget out-of-the-box.
Therefore, a JSON structure must be created as described in the following for WebHub and DesktopHub, respectively, and deployed:
{
     "PV_HUB": "webhub",
     "PV_HUB_URL": "https://webhub.server/pv",
     "PV_HUB_EDITABLE": true,
     "PV_HUB_URL_EDITABLE": true
}
{
"PV_HUB": "desktophub",
"PV_HUB_PORT": "4773",
"PV_HUB_EDITABLE": true
}The PV_HUB property defines the hub to be used, which can be either the WebHub (webhub) or DesktopHub (desktophub).
The PV_HUB_PORT property defines the port number for the DesktopHub. It can be configured as either a string or a number
The PV_HUB_URL property defines the URL for the WebHub.
The PV_HUB_EDITABLE property defines, if the hub should be editable by the user. If it is undefined, the hub is editable by the user in the widget's settings.
The PV_HUB_URL_EDITABLE property defines, if the webhub URL should be editable by the user. If it is undefined, the webhub URL is editable by the user in the widget's settings.
Note
Regarding the deployment of the JSON structure, see the previous sections.
You need to add pure::variants Web Components as a Friend to Jazz Team Server (JTS) in order to enable JTS to access the pure::variants web components data. Jazz Official Documentation can be visited for details.
Note
After finishing the pure::variants web components setup and before starting the friend setup in JTS, it is a must that the web server hosting the pure::variants web components must be restarted.
Procedure
Browse to the JTS Admin page. Then click Manage Server and then click Friends (Outbound). This page can also be directly accessed by pointing your web browser to https://[jazz-server-FQDN]:9443/jts/admin#action=com.ibm.team.repository.admin.friends.
On the Friends Page, in the Friends List section, click Add.
In the Add Friend dialog, provide the following information.
Provide the URI for root services of the pure::variants Web Components in this form: https://[pv-server-FQDN]:[port]/pv/rootservices.
Enter a name to identify the pure::variants web components e.g. VM.
Click Next to continue.
As both jazz and pure::variants web components are configured in SSO mode that's why this dialog does not ask for any credentials. Click Create Friend and click Finish to close the wizard.
Note
On step 4 of the above procedure, if you are asked to enter OAuth credentials then it is a problem. It means that JTS is unable to recognize that the pure::variants web components is also SSO enabled and registered with the same Jazz Authorization Server as JTS. In this case you have to close the friend setup dialog and wait for 10 to 15 minutes and start the friend setup again. If the problem persists then you have to restart the jazz server and then do the friend setup again.