For using the pure::variants Integrations for several tools the integrations have to be installed. If pure::variants is installed using the Installer, the tool integrations are installed along with the corresponding pure::variants connector. If the installer was not used or the integration was not installed along with the corresponding connector then follow the next steps. Usually a dialog comes up after pure::variants starts informing about not installed or not up-to-date integrations.
If this dialog does not come up automatically it can be opened using the follwing menu entry in the pure::variants Help menu. Go to -> the item .
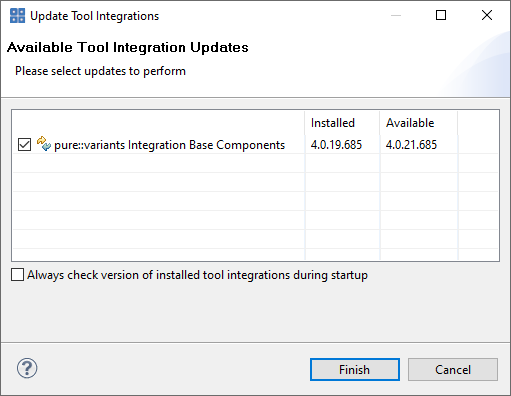
A dialog comes up listing all available Tool Integrations. Just select the integrations you want to install or update and finish the dialog. pure::variants will guide you through the installation process. If an automatic update is possible, pure::variants will just perform the update, without showing an installer.
The option Always check version of installed tool integrations during startup enables a check if all available tool integrations are already installed and up to date. This check is performed each time pure::variants starts.
The pure::variants Tool Integration installers have a silent mode. This mode installs the pure::variants Tool Integrations without user interaction. The different Tool Integration installers can be found in this path <PV_INSTALL_DIR>\<ECLIPSE_DIR>\plugins.
To do this, call the installer with command line option /S. Note that the target directory must not contain any quotation marks. Here's the generic example commandline for silent install of a Tool Integration:
<PV_INSTALL_DIR>\<ECLIPSE_DIR>\plugins\<integration_plugin_folder>\<tool_name>AddIn\setup.exe"
             /S /D=<PV_INSTALL_DIR>\com.ps.consul.eclipse.ui.<tool_name>.integration
For example, to silently install the Office Integration the following commandline can be performed:
"C:\Program Files\pure-systems\pv_Enterprise_6.0\eclipse\plugins\com.ps.consul.eclipse.ui.ms.office.integration_5.x.x.xxx\msOfficeAddIn\setup.exe"
             /S /D=C:\Program Files\pure-systems\pv_Enterprise_6.0\com.ps.consul.eclipse.ui.ms.office.integration
It is also possible to run the update in the background or silent mode to update an existing installation. Note that there will be no console output as well.
To do this, call the installer with command line option /UPDATE /S. To run it in silent mode but not in background start "" /WAIT "Setup.exe" /UPDATE /S can be used.
If the pure::variants Desktop Client was installed with the installer the pure::variants Desktop Hub is already installed along with the pure::variants Desktop Client. If the installer was not used or the pure::variants Desktop Hub is missing for another reason the installation can be triggered from within the pure::variants Desktop Client.
Please see Section 6.1, “Install pure::variants Tool Integrations” for installing the pure::variants Integration Base Components.
Please see Section 6.1, “Install pure::variants Tool Integrations” for installing the integration executable.
After finishing the installation successfully, the Doors client has to be started with a command line option, which enables the Integration menu within Doors.
The command line should look similar to this: doors -a
"<Menu installation path>\pure-variants". Without this
command line option the Integration cannot be triggered and so not be
used.
On Windows platforms it is also possible to add the directory to
the registry key HKLM\Software\Telelogic\Doors\Doors
version\Addins.
Open the Registry editor
Browse to Doors installation in HKEY_LOCAL_MACHINE\SOFTWARE\Telelogic\DOORS\<DOORS version number>\Config
Right click config Key to add a new string value
Value Name set to Addins
Value Data set to the path of the pure::variants menu directory
With administrative access to the Doors installation the Add-In can also be installed for all users of this installation using the shared DXL library. See the Doors Help topic "Configuring Doors" for more information.
Note
This requires adaptions of the pure::variants Integration menu DXL scripts.
Now the Integration should be available in Doors. To verify if the installation was successfull, open a Doors module and select from the menu the item . If the pure::variants Integration window opens, the Integration was installed correctly.
Please see Section 6.1, “Install pure::variants Tool Integrations” for installing the integration executable.
For starting the integration within PTC Integrity some additional steps have to be performed. Start the PTC Integrity client application. Open menu -> and switch to page Actions. Click on action group Custom to view the custom user actions.
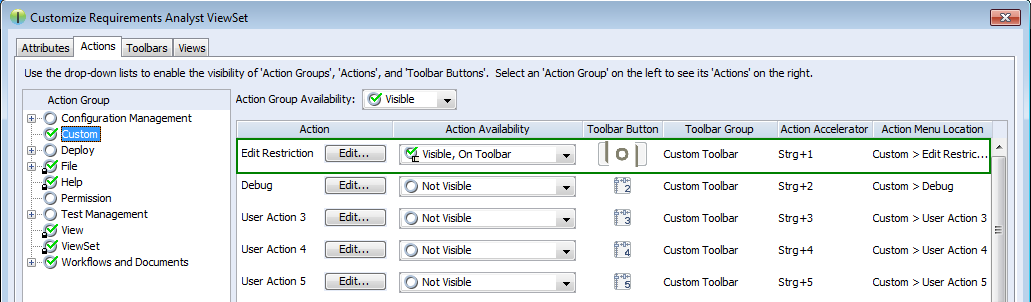
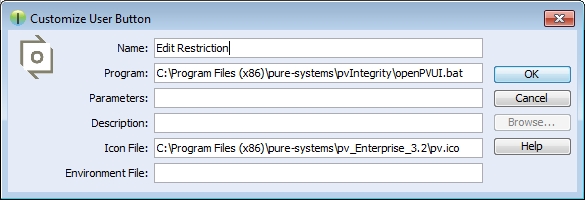
Click the button of a user action to customize it. Name the action Edit Restriction. As the program to execute enter or browse to the path of file openPVUI.bat which is located in the installation path of the pure::variants Integration for PTC Integrity. There is also an icon file pv.ico in this directory you can use.
Please see Section 6.1, “Install pure::variants Tool Integrations” for installing the integration executable.
To use the Integration, it still needs to be added to your Rhapsody project:
Open a Rhapsody project
Select >
Select the file "pvRhapsody.sbs" from the Integration installation directory
Now the Integration should be available for the given project. You can open the Integration window at > .
Per default the Integration is loaded when opening the Rhapsody
project. If you want to only load the Integration when clicking
>
, you can edit file
pvRhapsody.prp in the pure::variants Integration
for Rhapsody installation folder. Open the file with a text editor and
set property showonstart to False. After
restarting Rhapsody, the Integration window should only open after
clicking >
.
Please see Section 6.1, “Install pure::variants Tool Integrations” for installing the integration executable.
Now the Integration should be available in Enterprise Architect. Select -> to open the Add-In window, which shows the pure::variants Integration user interface. Furthermore, you can enable or disable the Integration at -> (Since Enterprise Architect 14, you can find both entries in tab ).
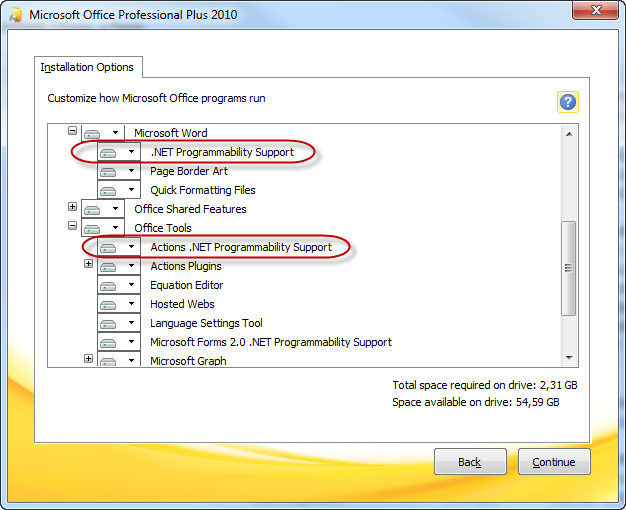
The Integration will not work if the following features are not installed with Microsoft Office:
Microsoft Word / .NET Programmability Support (if using Microsoft Office Word Integration)
Microsoft Excel / .NET Programmability Support (if using Microsoft Office Excel Integration)
Office Tools / Actions .NET Programmability Support
They can be added to the Microsoft Office installation as follows:
Open the Windows Control Panel and navigate to
Right-click on your Microsoft Office Installation and select
Select Add or Remove Features
Add the features marked in Figure 50, “Adding Missing Features to the Office Installation” to your Office Installation.
Press and close the Dialog.
Now the installation of the pure::variants Integration for Microsoft Office should run successfully.
Administrator: At first, please download the pure::variants windows installer package from your pure::variants update site and extract the pure::variants TFS integration zip archive with name com.ps.consul.web.ui.tfs2015-x.x.x.zip. To install the integration navigate to the -> and press . Thereby browse to your local copy of pure::variants TFS Integration zip archive.
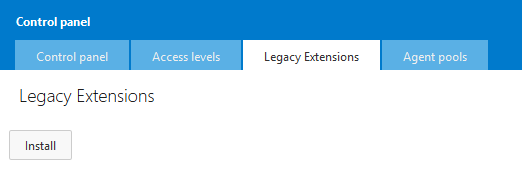
Please ensure that the pure::variants TFS Integration is enabled, after installation.
If you are using a pure::variants model or license server, establishing a connection with that server may need extra configuration. This may be the case, for example, if the server is located behind a proxy server or the communication with the server is encrypted and a self-signed certificate is used.
The steps needed to do in these cases differ, depending on which type of integration you are using. For java-based integrations, such as the Integration for IBM Rational Rhapsody and the Integration for PTC Integrity, it is necessary to specify proxy and certificate settings manually in pv.properties files. For .NET-based integrations (all other integrations), the Windows proxy and certificate settings are used automatically, so no additional setup is necessary.
The following integrations are Java-based:
pure::variants Integration for IBM Rational Rhapsody
pure::variants Integration for PTC Integrity
All extra configurations in java-based integrations can be
done by manually editing file pv.properties.
You can find it in two different locations:
If you want to configure the settings for all users on the machine, please edit
%PROGRAMDATA%/pure-variants-6/pv.properties
If you want to configure the settings only for the current user, please edit
%APPDATA%/pure-variants-6/pv.properties
Note that:
In case the file does not exist, you need to create it and any necessary folders first.
Before editing
pv.properties, make sure that no pure::variants Integration is running (e.g. Integration for Word, Excel, Doors, or the p::v Desktop Hub), otherwise your changes may be overwritten when closing the integration.Path delimiters in any paths you enter must be forward slashes or escaped backward slashes (
/or\\). Otherwise the path cannot be read.All property names are case-sensitive.
The following properties can be set to configure your proxy settings.
Table 6. Proxy Settings
| Property Name | Comments based on Java system property documentation |
|---|---|
| http.proxyHost | The hostname, or address, of the proxy server |
| http.proxyPort | The port number of the proxy server |
| https.proxyHost | The hostname, or address, of the proxy server in case HTTPS is used |
| https.proxyPort | The port number of the proxy server in case HTTPS is used |
| http.nonProxyHosts |
Indicates the hosts that should be accessed without going through the proxy. Typically this defines internal hosts. The value of this property is a list of hosts, separated by the '|' character. In addition the wildcard character '*' can be used for pattern matching. For example http.nonProxyHosts=*.foo.com|localhost will indicate that every hosts in the foo.com domain and the localhost should be accessed directly even if a proxy server is specified. The default value excludes all common variations of the loopback address. |
| java.net.useSystemProxies | Set this to "true" to use Windows' global proxy settings (default: false), which are set in the Internet Explorer or in the Windows system settings. If one of the above properties is set, it overrides the respective Windows system property. |
For example to use Windows' proxy settings, you would
need to append this line to pv.properties:
java.net.useSystemProxies=true
Or to set all properties manually, you would need to append something like this:
http.proxyHost=YourHTTPProxyHost
http.proxyPort=80
https.proxyHost=YourHTTPSProxyHost
https.proxyPort=443
http.nonProxyHosts=*.foo.com|localhost
The following HTTPS-related properties can be set. For more details, please refer to the respective Java system property documentation.
Table 7. HTTPS Settings
| Property Name | Comments |
|---|---|
| javax.net.ssl.trustStore | Path to your trust store |
| javax.net.ssl.trustStorePassword | Password of your trust store |
| javax.net.ssl.trustStoreType | Trust store type (e.g. JKS) |
| javax.net.ssl.keyStore | Path to your key store |
| javax.net.ssl.keyStorePassword | Password of your key store |
| javax.net.ssl.keyStoreType | Key store type (e.g. JKS) |
| javax.net.debug | Activation of debug mode (e.g. "all" to write all possible debug logs) |
| com.sun.net.ssl.checkRevocation | Enable certificate revocation checking |
For example when using a self-signed certificate that is
stored in trust store
D:/sandbox/servercert/cert-trusted.jks you
could append the following lines:
javax.net.ssl.trustStore=D\:/sandbox/servercert/cert-trusted.jks
javax.net.ssl.trustStorePassword=password
However, it is also possible to permanently accept a self-signed certificate when trying to first connect to your model or license server. pure::variants or the integrations will open an certificate acceptance dialog on the first connection attempt.
The following integrations are .NET-based:
pure::variants Desktop Hub
pure::variants Integration for Doors
pure::variants Integration for Microsoft Excel and Microsoft Word
pure::variants Integration for Enterprise Architect
pure::variants Integration for Zuken CR-8000
Since pure::variants 4.0.19, the way the connection to pure::variants model or license servers is done has changed. Therefore, no advanced setup as for java integrations is necessary anymore. The proxy and certificate settings configured in Windows are used for the connection. So if the connection works in a browser that uses the Windows certificate and proxy settings (e.g. Chrome or Edge), the connection should work in all .NET-based integrations, too. The only exception from that rule are the supported security protocols:
Per default, the following security protocols are supported in .NET-based integrations: SSL3, TLS 1.0 - 1.3. To instead let Windows decide which protocols to support, you need to add registry entry "SystemDefaultTlsVersions" as documented here: https://docs.microsoft.com/en-us/mem/configmgr/core/plan-design/security/enable-tls-1-2-client#configure-for-strong-cryptography.
If for some reason you want to switch back to the old server connection behavior as used in all java integrations, you can do that as described in the following section.
There are two ways to switch back to the previous server
connection behaviour. Either you add the Windows environment
variable PV_FORCE_JAVA_SOAP_SERVER_CONNECTION with
value true, or you add line
forceJavaSoapConnection=true to file
pv.properties (see the section called “Advanced Setup of Java-based Integrations” for instructions how
to edit pv.properties).
After switching back to the previous server connection behaviour, you may need to configure connection settings (e.g., proxy settings) in the same way as for java integrations.
To update an pure::variants tool integration the same mechanism as for installing a pure::variants tool integration is used. Please consult section Section 6.1, “Install pure::variants Tool Integrations” for a detailed description.
The uninstaller for the pure::variants integration can be started in two different ways. The first one is to go to the Windows Add or remove programs application and search for the pure::variants integration and start the uninstaller by using the Uninstall action. The uninstaller requires Administrator privileges.
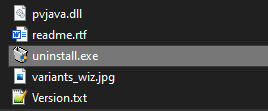
The second possibility is to navigate to the pure::variants Desktop Client installation folder and start the uninstaller by double clicking it.
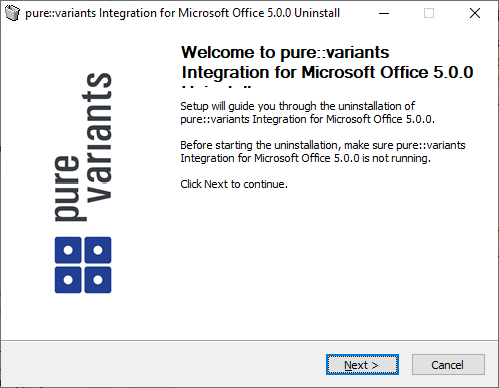
Click Next.
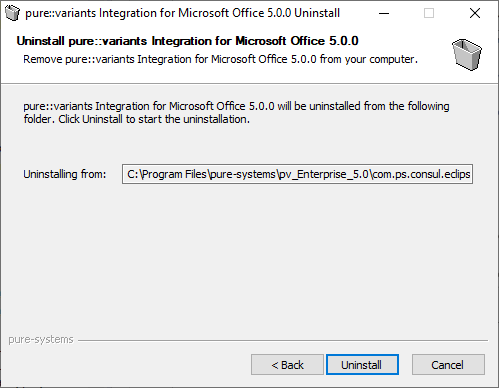
Click Uninstall to start the uninstall process.
The installation is succesfully finished. Click Finish to close the uninstaller.
When you first use the Desktop Hub after installation, it is
necessary to check whether the license preferences are correct. To this
end, open the preferences dialog via the  button in the
Desktop Hub window or by selecting
from the pure::variants tray menu.
button in the
Desktop Hub window or by selecting
from the pure::variants tray menu.
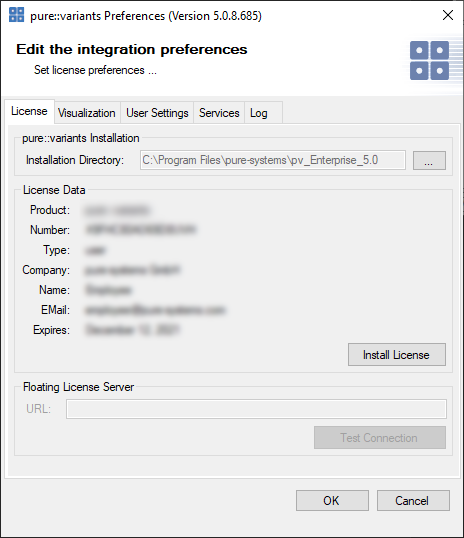
A dialog opens that shows the path to your pure::variants installation and your license information (see Figure 56, “Preferences Dialog”). If any of the information is missing, you need to enter it. Use the button in the pure::variants Installation group to enter the installation directory, and the button to specify your license.
If you are using a floating license and the URL in the Floating License Server group is not set already, you need to enter the URL. To test if the connection to the floating license server is established, press the button .
Now you can use the Desktop Hub.
If you are using a pure::variants floating license, establishing a connection with the pure::variants license server may need extra configuration. This may be the case, for example, if the license server is located behind a proxy server or the communication with the server is encrypted and a self-signed certificate is used.
Since pure::variants 4.0.19, the way the connection to pure::variants model or license servers is done has changed. Therefore, no advanced setup should be necessary anymore, since the settings configured in Windows are used (e.g., proxy settings, certificates). However, it is still possible to switch back to the previous server connection behavior.
This sections describe the switch back to the Java based Soap connection method. It is not recommended to use this but may help to fix connection problems. This mechanism is available for .net based integrations only.
.net based integrations are
pure::variants Integration for Microsoft Office
Section 6.1.7, “pure::variants Integration for Enterprise Architect”
Section 6.1.9, “pure::variants Integration for Team Foundation Server”
There are two ways to switch back to the previous server
connection behaviour. Either you add the Windows environment
variable PV_FORCE_JAVA_SOAP_SERVER_CONNECTION with
value true, or you add line
forceJavaSoapConnection=true to file
pv.properties (see below for instructions how to edit
pv.properties).
Once you have switched back, you may again need extra configuration to connect to a license or model server. See the section called “Advanced Integration Setup” for extra configuration setps.
This steps are necessary only, if you have switched the Soap server connection method to the ols behavior. See the section called “Switching Back to Previous Server Connection Behaviour”.
If you are using a pure::variants floating license, establishing a connection with the pure::variants license server may need extra configuration. This may be the case, for example, if the license server is located behind a proxy server or the communication with the server is encrypted and a self-signed certificate is used.
All extra configurations can be done by manually editing file
pv.properties. You can find it in two different
locations:
If you want to configure the settings for all users on the machine, please edit
%PROGRAMDATA%/pure-variants-6/pv.properties
If you want to configure the settings only for the current user, please edit
%APPDATA%/pure-variants-6/pv.properties
When editing pv.properties, please note
that:
In case the file does not exist, you need to create it and any necessary folders first.
Before editing
pv.properties, make sure that no pure::variants Integration is running (e.g. Integration for Word, Excel, Doors, or the p::v Desktop Hub), otherwise your changes may be overwritten when closing the integration.Path delimiters in any paths you enter must be forward slashes or escaped backward slashes (
/or\\). Otherwise the path cannot be read.All property names are case-sensitive.
The following properties can be set to configure your proxy settings.
Table 8. Proxy Settings
| Property Name | Comments based on Java system property documentation |
|---|---|
| http.proxyHost | The hostname, or address, of the proxy server |
| http.proxyPort | The port number of the proxy server |
| https.proxyHost | The hostname, or address, of the proxy server in case HTTPS is used |
| https.proxyPort | The port number of the proxy server in case HTTPS is used |
| http.nonProxyHosts |
Indicates the hosts that should be accessed without going through the proxy. Typically this defines internal hosts. The value of this property is a list of hosts, separated by the '|' character. In addition the wildcard character '*' can be used for pattern matching. For example http.nonProxyHosts=*.foo.com|localhost will indicate that every hosts in the foo.com domain and the localhost should be accessed directly even if a proxy server is specified. The default value excludes all common variations of the loopback address. |
| java.net.useSystemProxies | Set this to "true" to use Windows' global proxy settings (default: false), which are set in the Internet Explorer or in the Windows system settings. If one of the above properties is set, it overrides the respective Windows system property. |
For example to use Windows' proxy settings, you would
need to append this line to pv.properties:
java.net.useSystemProxies=true
Or to set all properties manually, you would need to append something like this:
http.proxyHost=YourHTTPProxyHost
http.proxyPort=80
https.proxyHost=YourHTTPSProxyHost
https.proxyPort=443
http.nonProxyHosts=*.foo.com|localhost
The following HTTPS-related properties can be set. For more details, please refer to the respective Java system property documentation.
Table 9. HTTPS Settings
| Property Name | Comments |
|---|---|
| javax.net.ssl.trustStore | Path to your trust store |
| javax.net.ssl.trustStorePassword | Password of your trust store |
| javax.net.ssl.trustStoreType | Trust store type (e.g. JKS) |
| javax.net.ssl.keyStore | Path to your key store |
| javax.net.ssl.keyStorePassword | Password of your key store |
| javax.net.ssl.keyStoreType | Key store type (e.g. JKS) |
| javax.net.debug | Activation of debug mode (e.g. "all" to write all possible debug logs) |
| com.sun.net.ssl.checkRevocation | Enable certificate revocation checking |
For example when using a self-signed certificate that is
stored in trust store
D:/sandbox/servercert/cert-trusted.jks you
would need to append the following lines:
javax.net.ssl.trustStore=D\:/sandbox/servercert/cert-trusted.jks
javax.net.ssl.trustStorePassword=password
Per default, the self-signed certificate that is used for securing the model access service connection is only generated for the current user. Thus, when there are multiple users working on the same machine, each user would use a different self-signed certificate and each user would get a security exception the first time he uses the model access service (e.g., when working with DoorsNG).
To prevent that, you as an administrator, can manually configure which certificate is used for all users and register it in the Windows Trusted Root Certification Authorities store to make sure no security exception is shown. To achieve that, you can set the following properties in
%PROGRAMDATA%/pure-variants-6/pv.properties
Table 10. Model Access Service Settings
| Property Name | Comments |
|---|---|
| enableHttpService | true if the model access service should be enabled |
| httpServicePort | Port that the model access service should run on |
| enableHTTPS | true if the connection should be secured |
| keystore | Path to your key store |
| keystorePassword | Password of the given key store |
For example, if you wanted to enable the model access
service for all users, use a secure connection, and use your own
keystore that is located at
C:/ProgramData/pure-variants-6/selfsigned.jks,
you would need to append the following lines to
pv.properties:
# enable the model access service
enableHttpService=true
# secure the connection
enableHTTPS=true
# the port on which the service listens
httpServicePort=9443
# the path to your keystore, which must be a java keystore and which contains your certificate
keystore=C:/ProgramData/pure-variants-6/selfsigned.jks
# the password to the keystore
keystorePassword=password