pure::variants supports user-defined generation of product variants, described by Variant Description Models, using an XML-based transformation component. See Section 5.9, “ Variant Transformation ” for a detailed information about the transformation process.
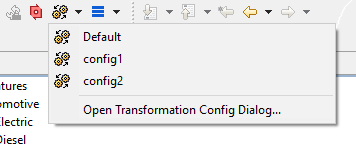
A VDM is transformed by opening it in the VDM Editor and clicking on
button
![]() in the Eclipse toolbar.
If more than one transformation is defined in a Configuration Space
then this button can be
used to open the list of defined transformations and to choose one.
Additionally this button
allows to open the Transformation Configuration Page of the corresponding
Configuration
Space to add, remove, or modify transformations.
in the Eclipse toolbar.
If more than one transformation is defined in a Configuration Space
then this button can be
used to open the list of defined transformations and to choose one.
Additionally this button
allows to open the Transformation Configuration Page of the corresponding
Configuration
Space to add, remove, or modify transformations.
The transformation must initially be set up for a specific Configuration Space. Therefore the Configuration Space properties have to be opened from the Variant Projects view by choosing from the context menu of the corresponding Configuration Space.
The editor is divided into six separate pages, i.e. the Model List page, the Input-Output page, and the Transformation Configuration page.
This page is used to specify the list of models to be used in the Configuration Space. At least one model must be selected. By default, only models that are located in a Configuration Space's project are shown.
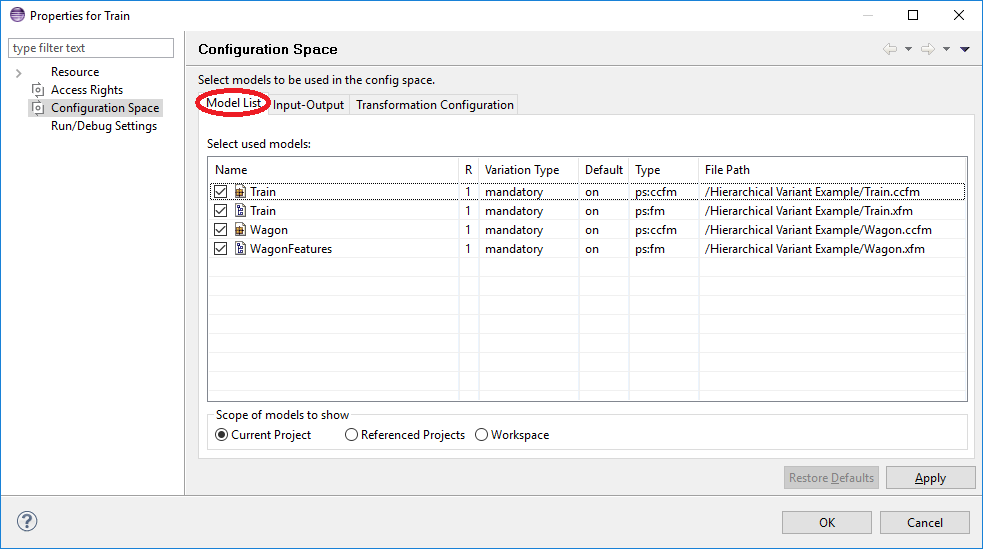
In the second column ("R") of the models list the rank of a model in this Configuration Space is specified. The model rank is a positive integer that is used to control the model evaluation order. Models are evaluated from higher to lower ranks i.e. all models with rank 1 (highest) are evaluated before any model with rank 2 or lower.
The third column enables the user to select the variation type of a pure::variant model. Two variation types are available mandatory and optional . An optional model can be deselected in a variant, mandatory models are always part of the variant.
The next column ("Default") can be used to specify whether a optional model is default selected in the variants or not. This semantic is ether equal to the default selected state of pure::variants model elements.
Clicking right in the models list opens a context menu providing operations for changing the model selection, i.e. Select all , Deselect all , and Negate selection .
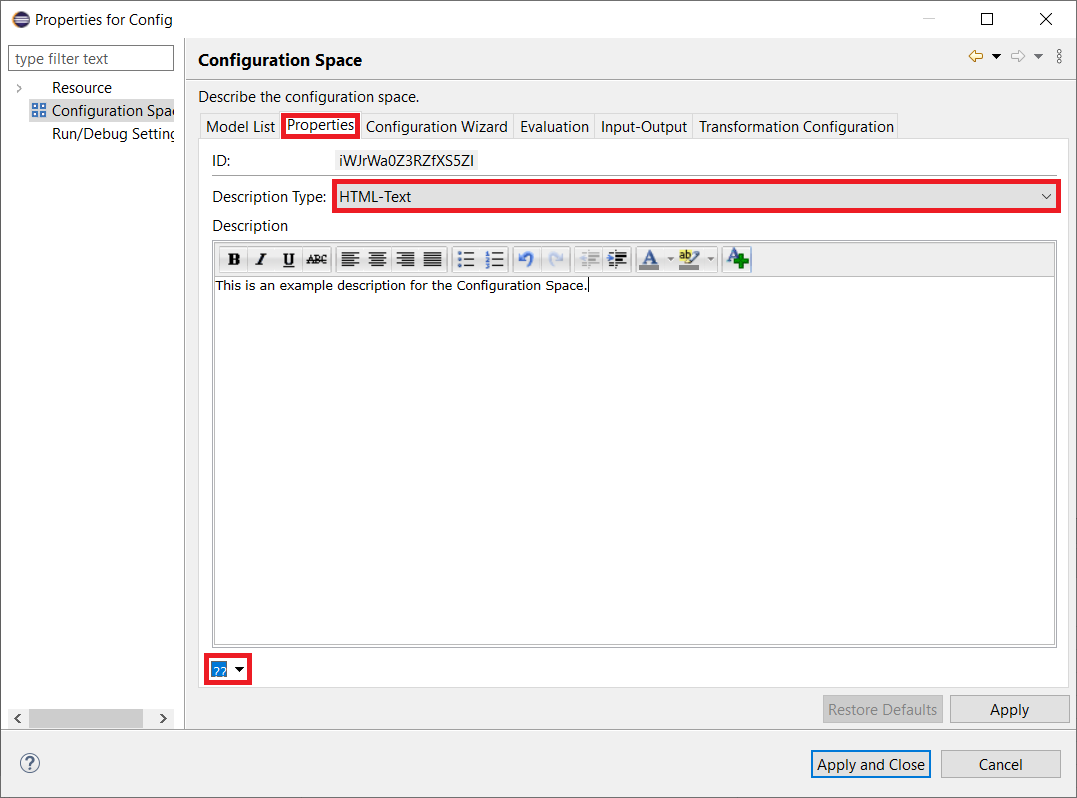
This page is used to specify a description for the Configuration Space. You can also retrieve the Configuration Space ID from here. The description supports different MIME types, like plain or HTML text. The MIME type can be changed by clicking on the description type combo box. By changing the MIME type, all descriptions of that Configuration Space are getting converted. The description also supports different languages. You can switch between the languages by clicking on the dropdown on the bottom left. A Configuration Space can hold different descriptions, one for each language.
This page is used to specify certain input and output options to be used in model transformations. The page can be left unchanged for projects with no transformations.
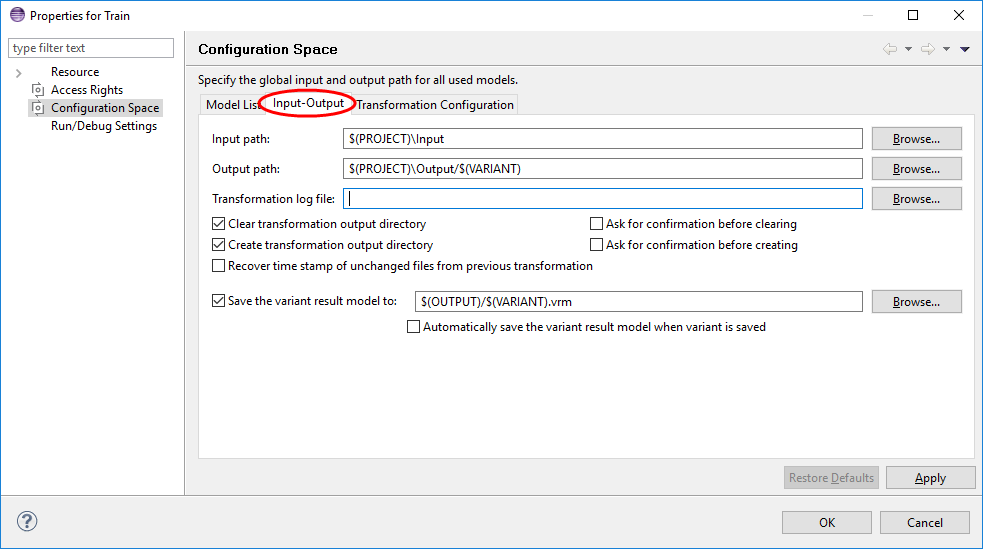
The input path is the directory where the input files for the transformation are located. The output path specifies the directory where to store the transformation results. The transformation log file is used by transformation modules to log their activities while transformation. All path definitions may use the following variables. The variables are resolved by the transformation framework before the actual transformation is started. To see which variables are available for path resolution in transformations refer to Section 9.8, “ Predefined Variables ”
The Clear transformation output directory check box controls whether pure::variants removes all files and directories in the Output path before a transformation is started. TheAsk for confirmation before clearing check box controls whether the user is asked for confirmation before this clearing takes place. The remaining check boxes work in a similar manner and control what happens if the Output path does not exist when a transformation is started.
The Recover time stamp... option instructs the transformation framework to recover the time stamp values for output files whose contents has not been changed during the current transformation. I.e. even if the output directory is cleared before transformation, a newly generated or copied file with the same contents retains its old time stamp. Enable this option if you use tools likemake which use the files time stamp to decide if a certain file changed.
The "Save the variant..." option instructs the transformation framework to save the Variant Result Model to the given location. The Variant Result Model is the input of the transformation framework containing the concrete variants of the models in the Configuration Space.
The option "Automatically save the variant result model when variant is saved" does instruct pure::variants to save the Variant Result Model each time the corresponding Variant Description Model is saved.
This page is used to define the model transformation to be performed for the Configuration Space. The transformation configuration is stored in an XML file. If the file has been created by using the wizards in pure::variants it will be named moduleconfig.xml and will be placed inside the Configuration Space. However, there is no restriction on where to place the configuration file, it may be shared with other Configuration Spaces in the same project or in other projects, and even with Configuration Spaces in different workspaces.
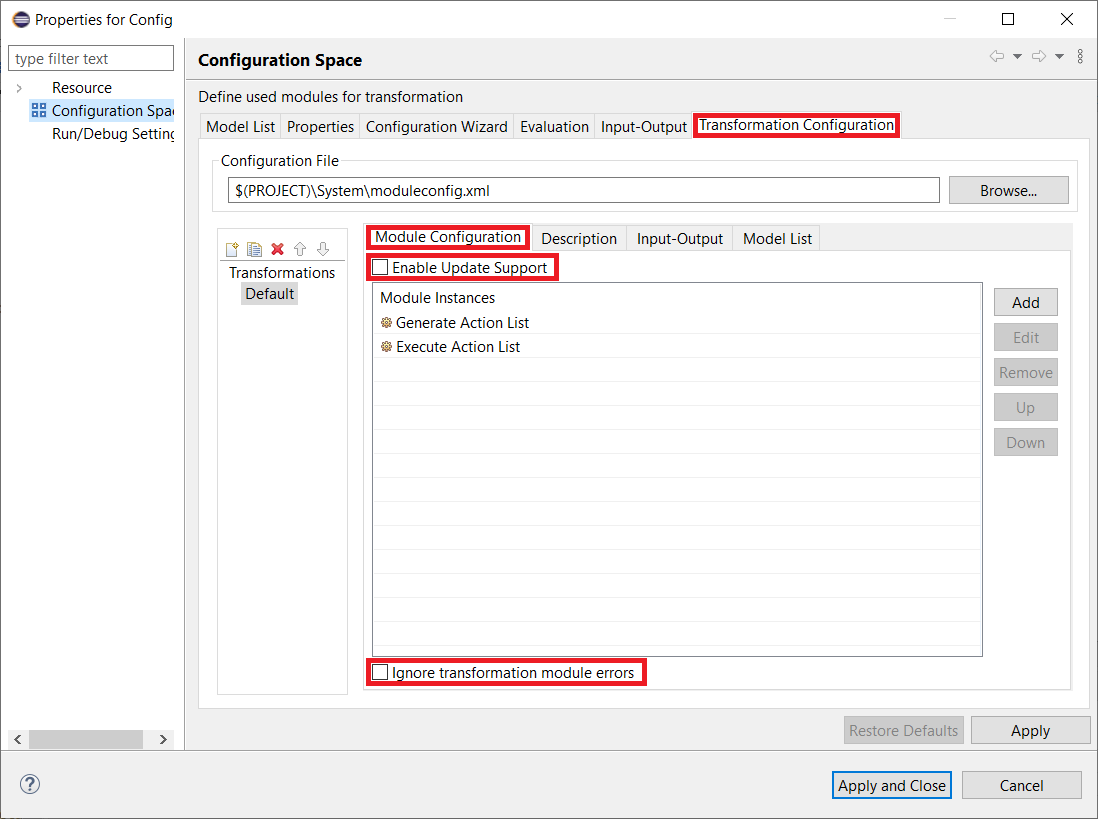
The Transformation Configuration Page allows to define a free number of Transformation Configurations which all will be available for the Configuration Space. The lower left part of the Transformation Configuration Page allows to create, duplicate, delete and moveModule Configuration entries up and down. After pressing the left most buttonAdd a Module Configuration a new entry is added immediately whose name can be changed as desired. If a complexModule Configuration is created it might be useful to create a copy of it and edit it afterwards. Use the button right to the add buttonCopy selected Module Configuration for this task. Following buttons allow to delete and move aModule Configuration .
When a Transformation Configuration is selected on the left side, it can be edited with the lower right part of the Transformation Configuration Page. A Module Configuration consists of a list of configured modules. Since many modules have dependencies on other modules they must be executed in a specific order. The order of execution of the transformation modules is specified by the order in the Configured Modules list and by the kind of modules. This order in the list can be changed using the Up and Down buttons.
If the Enable Update Support button on the top of the right page is checked, the created output of transformation modules for a given variant has to support variant update scenario. In that case an already existing output for this variant may not be overwritten while transformation but can be updated afterwards with the newly created output.
If the Ignore transformation module errors button on the bottom of the right page is checked, errors reported by transformation modules do not cause the current transformation to be aborted. Use this option with caution, it may lead to invalid transformation results.
The buttons on the right side allow transformation modules to be added to or removed from the configuration, and to be edited. When adding or editing a transformation module a wizard helps to enter or change the module's configuration.
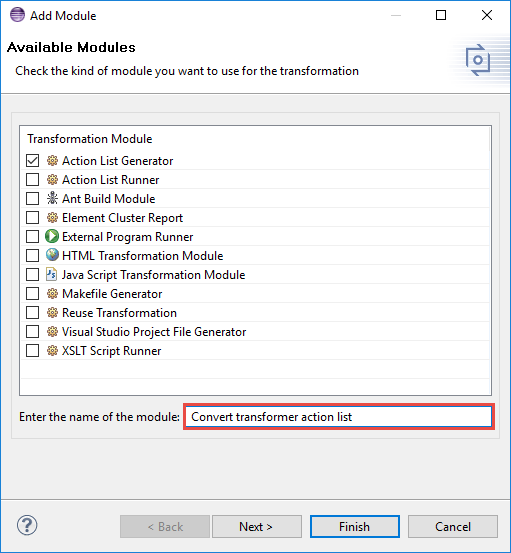
In the transformation module selection dialog a name has to be entered for the chosen transformation module. The module parameters are configured in the "Module Parameters" dialog opened when clicking on button Next.

A transformation module can have mandatory and optional parameters. A module can not be added to the list of configured modules as long as there are mandatory parameters without a value. Module parameters have a name and a type. If there are values defined for a parameter, a list can be opened to choose a value from (see Figure 6.20, “Transformation module parameters” ). If a default value is defined for a parameter, then this value is shown as its value if no other value was entered. Some modules accept additional parameters that can be added and removed using the Add and Remove buttons. Additional parameters are always optional and can have any name, type, and value.
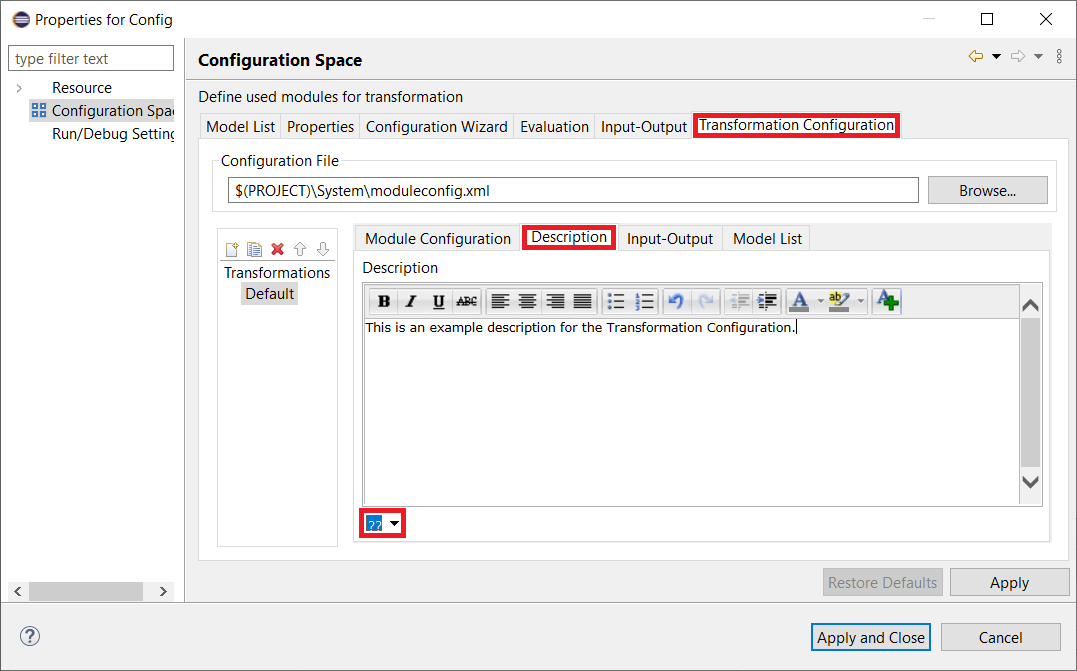
For collaboration purposes and for a better overview, it is possible to add a description to a Transformation. Therefore the Transformation description uses the same MIME type as the related Configuration Space. It is also possible to define different descriptions for different languages. You can switch the description language by clicking on the dropdown on the bottom left.
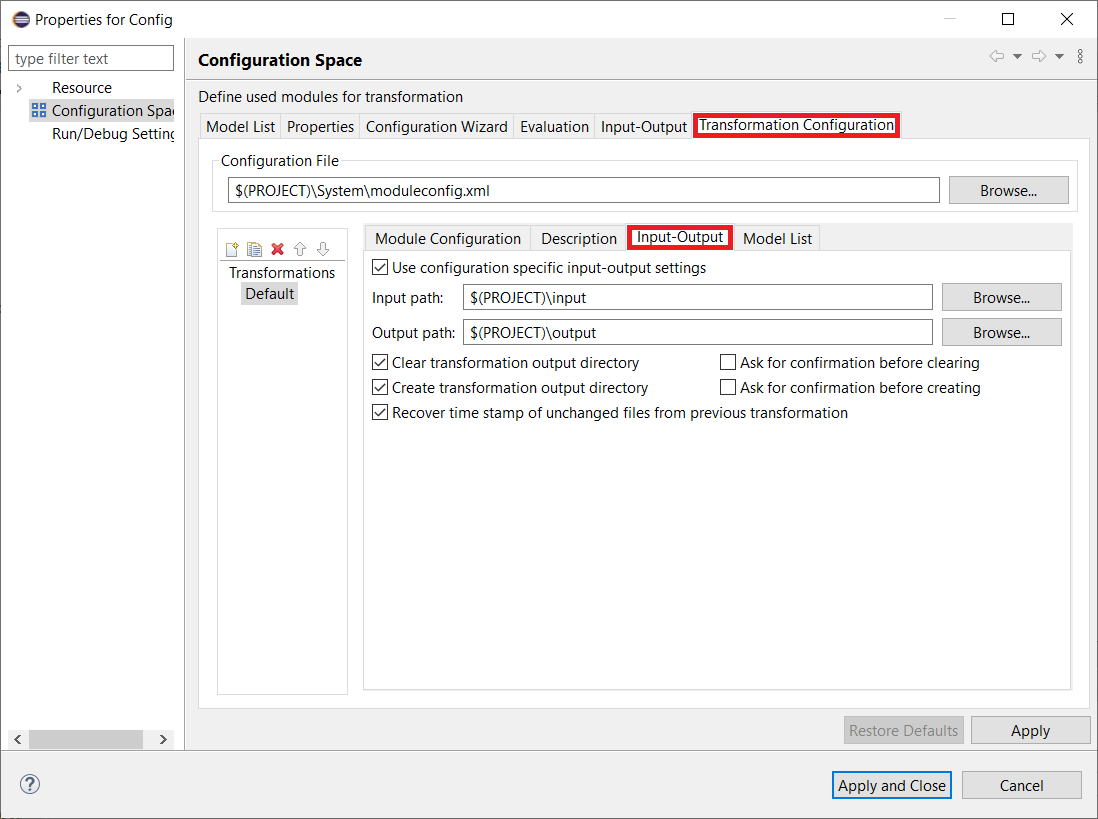
For a special Module Configuration it is also possible to specify special Input and Output paths, which overwrite the settings from Configuration Space. The Input and Output paths can be edited when selecting the Input-Output tab as shown inFigure 4.5, “Transformation configuration in Configuration Space Properties” . Layout and behavior are identical to the Input-Output Page of the Configuration Space Properties Dialog with the exception thatTransformation log file and the Save the variant result model to fields are not available. The use of Module Configuration specific Input and Output paths can be enabled with the check button Use configuration specific input-output settings .
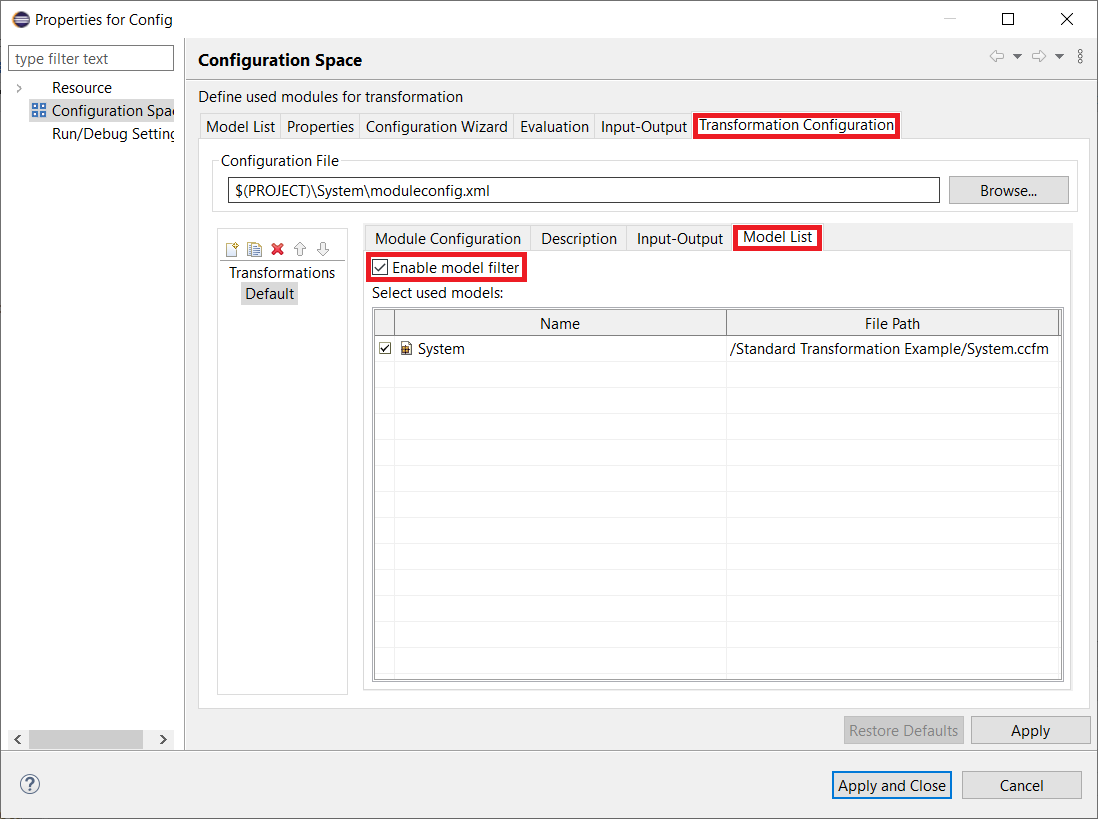
The Model List tab allows to specify a transformation configuration specific set of input models. The list can not contain more then the used models defined for the config space itself. It is not possible to remove feature models from the input model set. The selected input models will be processed by the defined transformation modules. The deselected input models are not known by the transformation modules and will be completely ignored during transformation. The variant evaluation will always use all input models as defined for the configuration space. The use of a transformation module configuration specific input model set can be enabled with the check button Enable model filter.
Note
Reducing the set of input models may have an unwanted impact in the transformation result.
Please see Section 5.9, “ Variant Transformation ” for more information on model transformation.

The User Parameter tab allows you to specify parameters that can be used to request user input before a transformation begins. These user parameters function like any other transformation variables, which means they can be set as values for transformation parameters and allow users to provide values for transformation parameters.
To add a parameter, use the "Add" button and specify the user parameter. A name must be given, as well as the parameter type. All other fields are optional. An optional parameter does not need to be specified by the user; it will receive an empty value if no value is given and no default value is defined.
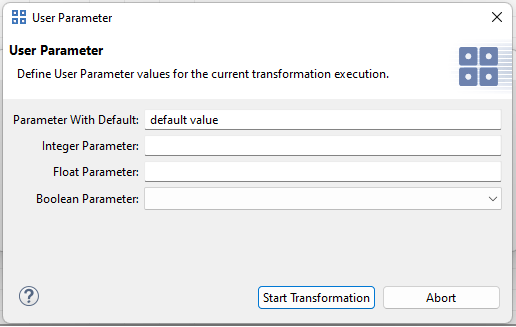
During the transformation, a dialog box appears asking the user to provide values for the parameters. Optional parameters do not need to be set. However, mandatory parameters, which are written in bold letters, must be given a value. At this point, the transformation has not started and can be aborted.
The standard transformation is suitable for many projects, such as those with mostly file-related actions for creating a product variant. This transformation also includes some special support for C/C++-related variability mechanisms like preprocessor directives and creation of other C/C++ language constructs.
The standard transformation is based on a type model describing the available element types for Family Models (see Figure 6.26, “The Standard Transformation Type Model” ).
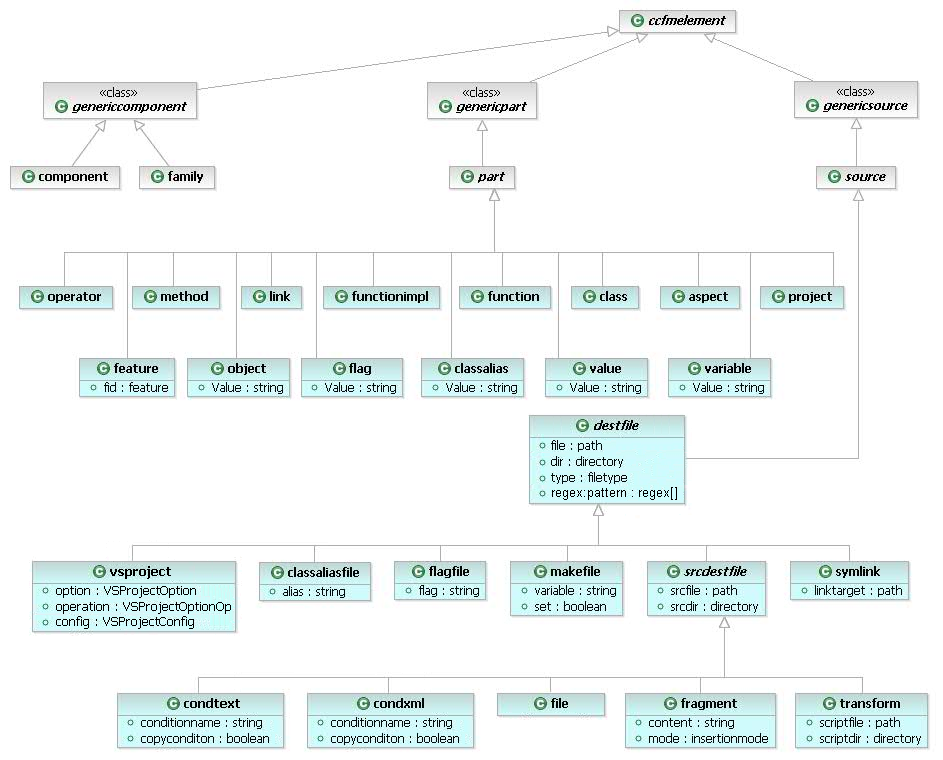
The standard transformation supports a rich set of part and source elements for file-oriented variant generation. For each source and part element type a specific transformation action is defined in the standard transformation. Source elements can be combined with any part element (and also with part types which are not from the set of standard transformation part types) unless otherwise noted. For a detailed description of the standard transformation relevant source element types see Section 9.5, “ Predefined Source Element Types ” .
The supported part element types are intended to capture the typical logical structure of procedural ( ps:function , ps:functionimpl ) and object-oriented programs (ps:class , ps:object , ps:method , ps:operator , ps:classalias ). Some general purpose types like ps:project , ps:link , ps:aspect , ps:flag , ps:variable , ps:value or ps:feature are also available. For a detailed description of the standard transformation relevant part element types seeSection 9.6, “ Predefined Part Element Types ” .
The transformation configuration for the standard transformation is either set up when a Configuration Space is created using the wizard, or can be set up by hand using the following instructions:
Open the Transformation Configuration page in the Configuration Space properties.
Add the module Action List Generator using the Add button. Name it for instance Generate Standard Transformation Actionlist .
Add an Action List Runner module. Name it for instance Execute Actionlist . Usually there should be only one Action List Runner module, otherwise the action list gets executed twice.
Note: If the standard transformation is used together with theMakefile Generator module to add content to one and the same file, then theAction List Runner module must not be placed before theMakefile Generator module. Otherwise all the content added to the Makefile by theAction List Runner module will be overwritten by the Makefile Generator module.
Some of the part element types have a mandatory attribute
Value
.
The value of this attribute is used by child source elements of the
part, for example to
determine the value of a C preprocessor#define
generated by a
ps:flagfile
source element. Unless noted otherwise
any part element with an attributeValue
can be combined with any
source element using an attributeValue
. For example, it is possible
to use aps:value
part with
ps:flagfile
and
ps:makefile
source elements to generate the same value into both
a makefile (as Makefile variable) and a header file (as
preprocessor
#define
).
Calculation of the value of a
ps:flag
or
ps:variable
part element is based on the value of attribute
Value
. The value may be a constant or calculation.
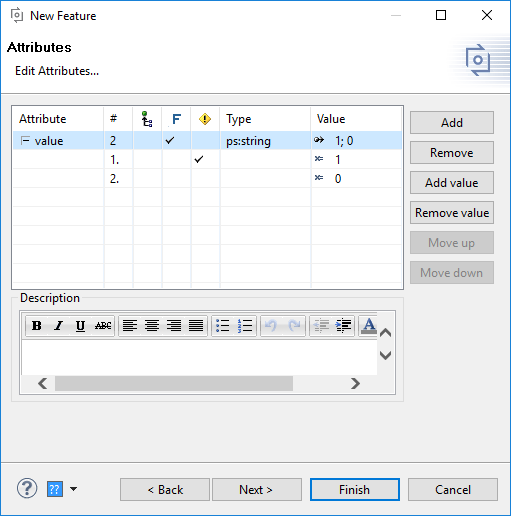
There may be more than one attributeValue
defined on
a part with maybe more than one value guarded by restrictions. The
attributes and its
values are evaluated in the order in which they are listed in the
Attributes page of the
element's Properties dialog. The first attribute resp. attribute value with
a valid
restriction that evaluates totrue
or without a restriction is
used.
Figure 6.27, “Multiple attribute definitions for Value calculation
”
shows typical
Value
attribute definitions. The value 1 is restricted and only set
under certain conditions. Otherwise the unrestricted value 0 is
used.
Text based files can be modified during the transformation using a search and replace operation based on regular expressions. For this purpose the file must be modelled by a source element with a type derived from type ps:destfile . The regular expression to modify the file is provided in the attributeregex:pattern that has to be added to the source element. This attribute can have several values, each containing a regular expression, that are applied to the file in the order they are given.
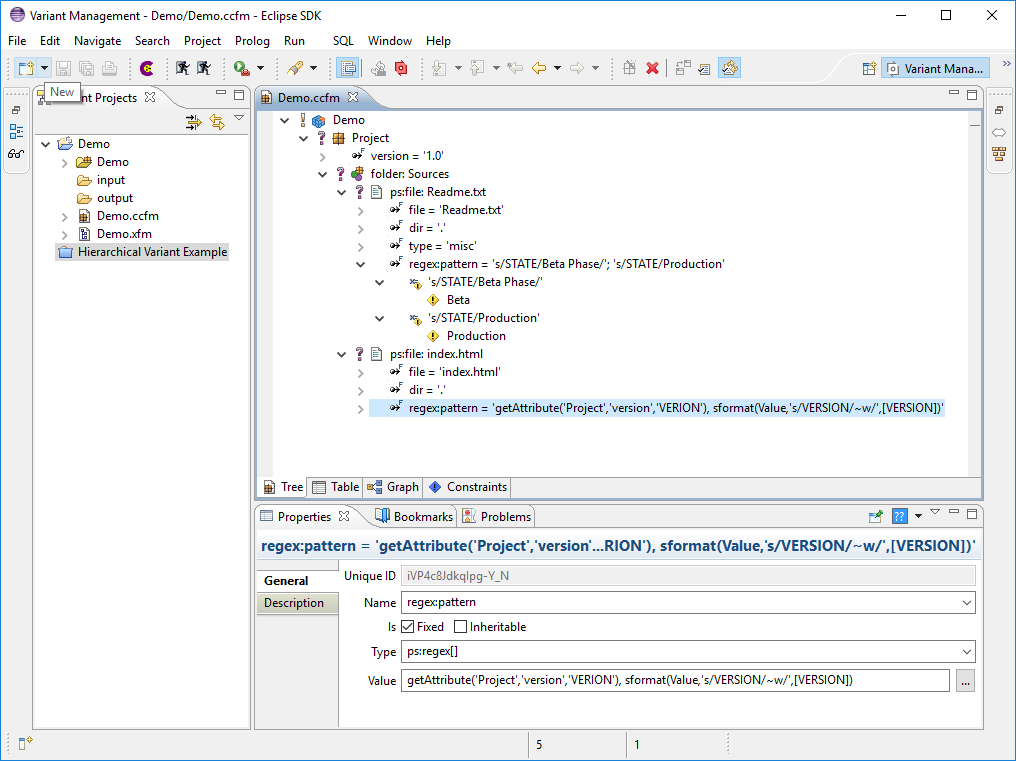
The syntax of the regular expressions is sed based:
s/pattern/replacement/flags
Prefix s indicates to substitute the replacement string for strings in the file that match the pattern. Any character other than backslash or newline can be used instead of a slash to delimit the pattern and the replacement. Within the pattern and the replacement, the pattern delimiter itself can be used as a literal character if it is preceded by a backslash.
An ampersand ( '&' ) appearing in the replacement is replaced by the string matching the pattern. This can be suppressed by preceding it by a backslash. The characters "\n", where n is a digit, are replaced by the text matched by the corresponding back reference expression. This can also be suppressed by preceding it by a backslash.
Both the pattern and the replacement can contain escape sequences, like '\n' (newline) and '\t' (tab).
The following flags can be specified:
- n
Substitute for the n-th occurrence only of the pattern found within the file.
- g
Globally substitute for all non-overlapping strings matching the pattern in the file, rather than just for the first one.
See http://www.opengroup.org/onlinepubs/000095399/utilities/sed.html for more details about thesed text replacement syntax.
In conjunction with the pure::variants JavaScript extension functions JavaScripts can be used to generate product variants. No special requirements are placed on the transformation you have to perform and using the extension functions is quite straightforward:
Open the transformation configuration page in the Configuration Space properties.
Add the JavaScript Transformation module using the Add button. Name it for instance Execute JavaScript .
The module parameters can be changed on next page.
Enter the path to the script file you want to execute as value of the javascriptfile parameter .
An (optional) output file can be specified using the outputfile parameter.
Press Finish to finish set up of the JavaScript transformation.
To demonstrate how to use JavaScripts for generating a product variant, the following example will show the generation of a text file, which contains a list of used features and some additional information about them. This example uses a user-provided JavaScript. The used JavaScript can also be found in the Javascript Transformation Example project.
Within the JavaScript the pure::variant extensibility options can be used. An API documentation is part of the pure::variants Extensibility SDK.
The example JavaScript looks like this:
/**
 * To set up JavaScript Transformation open configuration space properties
 * and go to "Configuration Space" -> "Transformation Configuration"
 * and add a JavaScript Transformation Module with this JavaScript.
 */

// global variables

var module = module_instance();

/**
 * Initialize this JavaScript transformation module.
 * This method is optional and does not need to be implemented.
 *
 * @param {IPVVariantModel} vdm
 *   The concrete variant description model.
 * @param {IPVModel[]} models
 *   The concrete feature and family models.
 *   This provides the full view of the current variant including all elements
 *   from instances, variant references and variant collections.
 * @param {java.util.Map<String, String>} variables
 *   The variables of the transformation configuration.
 * @param {java.util.Map<String, String>} parameter
 *   The parameter of the JavaScript transformation module.
 * @param {org.eclipse.core.runtime.IProgressMonitor} monitor
 *   The monitor for this operation
 *
 * @return {ClientTransformStatus} the status of this module method
 */
function init(vdm, models, variables, parameter, monitor) {

	var status = new ClientTransformStatus();
	status.setMessage(Constants().EMPTY_STRING);
	status.setStatus(ClientTransformStatus().OK);

	return status;
}

/**
 * Perform transformation preparation steps.
 *
 * This method is called after all modules have been initialized and before
 * any module is processed.
 *
 * This method is optional and does not need to be implemented.
 *
 * @param {org.eclipse.core.runtime.IProgressMonitor} monitor
 *   The monitor for this operation
 *
 * @return {ClientTransformStatus} the status of this module method
 */
function prepare(monitor){
	var status = new ClientTransformStatus();
	status.setMessage(Constants().EMPTY_STRING);
	status.setStatus(ClientTransformStatus().OK);

	return status;
}

/**
 * Do the work of this JavaScript transformation module
 *
 * @param {org.eclipse.core.runtime.IProgressMonitor} monitor
 *   The monitor for this operation
 *
 * @return {ClientTransformStatus} the status of this module method
 */
function work(monitor) {

	var status = new ClientTransformStatus();
	status.setMessage(Constants().EMPTY_STRING);
	status.setStatus(ClientTransformStatus().OK);

	var fo = null;

	try {
		var path = module.getVariable("OUTPUT");
		var filename = "FeatureList.txt";
		var outputfile = module.getParameter("outputfile");

		if (outputfile != null && outputfile != "") {
			fo = new java.io.FileWriter(new java.io.File(outputfile));
		} else {
			fo = new java.io.FileWriter(new java.io.File(path, filename));
		}

		var models = module.getModels();
		var steps = calculateWork(models);
		monitor.beginTask("Print Features",steps);

		for (var index = 0; index < models.length; index++) {
			// convert to pure::variants model
			var model = new IPVModel(models[index]);
			// check if model is a concrete feature model
			if (model.getType().equals(ModelConstants().CFM_TYPE) == true) {
				// convert to feature model
				var fmodel = new IPVFeatureModel(model);
				// get the root feature
				var root = fmodel.getRoot();
				// print features starting at root
				printFeatures(fo, root, monitor);
			}
		}
	} catch (e) {
		status.setMessage(e.toString());
		status.setStatus(ClientTransformStatus().ERROR);
	} finally {
	  if(fo != null){
		fo.close();
	  }
	}

	return status;
}

/**
 * Perform transformation post-processing steps.
 *
 * This method is called after all modules have been processed and before any
 * module is cleaned up, in reverse order. The first module on which
 * {@link #prepare(IProgressMonitor)} has been called is the last on which
 * this method is called.
 *
 * This method is optional and does not need to be implemented.
 *
 * @param {org.eclipse.core.runtime.IProgressMonitor} monitor
 *   The monitor for this operation
 *
 * @return {ClientTransformStatus} the status of this module method
 */
function postpare(monitor){
	var status = new ClientTransformStatus();
	status.setMessage(Constants().EMPTY_STRING);
	status.setStatus(ClientTransformStatus().OK);

	return status;
}

/**
 * Finalize JavaScript transformation module
 *
 * @param {org.eclipse.core.runtime.IProgressMonitor} monitor
 *   The monitor for this operation
 *
 * @return {ClientTransformStatus} the status of this module method
 */
function done(monitor) {
	var status = new ClientTransformStatus();
	status.setMessage(Constants().EMPTY_STRING);
	status.setStatus(ClientTransformStatus().OK);

	return status;
}

function calculateWork(models) {
	var total = 0;
	for (var index = 0; index < models.length; index++) {
		// convert to pure::variants model
		var model = new IPVModel(models[index]);
		// check if model is a concrete feature model
		if (model.getType().equals(ModelConstants().CFM_TYPE) == true) {
			total += model.getElementList().size();
		}
	}
	return total;
}

/**
 * Print the information of a feature to the output file
 * and do to the children.
 * @param {java.io.FileWriter} fo
 *   The file writer in order to write the information
 * @param {IPVElement} element
 *   The element to print
 * @param {org.eclipse.core.runtime.IProgressMonitor} monitor
 *   The monitor for this operation
 */
function printFeatures(fo, element, monitor) {
	monitor.subTask("Print: " + element.getName());

	// print information to file
	fo.append("Visible Name: ");
	fo.append(element.getVName());
	fo.append(Constants().NEWLINE_STRING);
	fo.append("Unique Name:  ");
	fo.append(element.getName());
	fo.append(Constants().NEWLINE_STRING);
	fo.append(Constants().NEWLINE_STRING);

	monitor.worked(1);

	// go to children
	var children = element.getChildren();
	var iterator = children.iterator();
	while (iterator.hasNext() == true && monitor.isCanceled() == false ) {
		var child = new IPVElement(iterator.next());
		printFeatures(fo, child, monitor);
	}
}
The script consists of three main functions. These three functions will be called by the transformation module.
init()
This method is optional. Necessary work can be done here, before transformation starts, like initializing the script. Gets necessary information from transformation module, like the used variant model, the used models in this variant, some variables and the transformation parameters. All this informations can also be retrieved from the JavaScript transformation module using getter functions.
prepare()
This method is optional. It is called after all transformation modules are initialized and before any transformation module is performed.
work()
Does the whole transformation work.
postpare()
This method is optional. This method is called after all modules have been processed and before any module is cleaned up, in reverse order. The first module on which prepare has been called is the last on which this method is called.
done()
This method is optional. After transformation is finished, this function is called, to provide possibility to do some work after transformation.
If the transformation parameter outputfile was used, the variableout can be used to write directly to the given file. Otherwise the variableout writes to the Java standard output. The functionmodule_instance() provides access to the transformation module instance, which is running the JavaScript transformation. This gives access to the transformation module API.
In general, one of the easiest ways to create variant specific assets is through the use of JavaScript transformations. It is possible to evaluate pvSCL expressions in the context of the currently transformed variant from within JavaScript transformations. We made this API as simple as possible, meaning all the cumbersome stuff of setting up the evaluator as well as putting each and every parameter correctly is hidden. You just take the expression and give it as parameter into one of two functions depending on having a rule (e.g. restriction or constraint) or a calculation.
The following two examples show the simple usage:
Evaluator.rule('Feature_A');

Evaluator.calculation('5*6');
The first line will evaluate to true or false depending on the selection state of the feature Feature_A and result of the second line is going to be30 . As you see very simple. Thus you may concentrate on implementing the heart of the transformation and not fiddling around on the evaluator in order to set it up in the right manner.
Side note: If you want to have full access to the correct initialized evaluator, you can call
Evaluator.getDefault();
With the object returned by this call, you have the evaluator for the currently transformed variant in hand. See the related Java API reference in the SDK documentation for more information.
When a transformation of a hierarchical variant is performed then a single transformation is performed for each variant in the hierarchy. Only those transformations of linked variants are executed that have the name "Default" or the name of the top-level variant transformation (if not "Default").
The order of the transformations is top-down, i.e. first the top-level variant is transformed, then the variants below the top-level variant, and so on. Each single transformation is performed on the whole Variant Result Model, stating two lists of model elements, i.e. the transformation Entry-Points list and the transformationExit-Points list. These lists describe the section of the Variant Result Model that represents the variant to transform. Some transformation modules may not support these lists and always work on the whole Variant Result Model.
There is a special variable
$(VARIANTSPATH)
that
should be used in a transformation of hierarchical variants to specify
the transformation
output directory. This variable contains the name of the currently
transformed variant
(VDM) prefixed by the names of its parent variants (VDMs) according to
the variant
hierarchy. The variant names are separated by a slash ("/"). Using this
variable makes it
possible to build a directory hierarchy corresponding to the variant
hierarchy. This may
also avoid that the results of the transformation of one variant are
overwritten by the
results of the transformation of another variant. SeeSection 9.8, “
Predefined Variables
”
for more information on the use and availability of
variables.
Transformations of linked variants have to handle the prefixed unique names and IDs in the models of the variant (see the section called “Unique Names and IDs in linked Variants” ). Especially Conditional Text resp. Conditional XML transformations have to reference elements with their full, i.e. prefixed, name. If for instance the condition in a file transformed with Conditional Text is "Foo" then this condition always will fail if evaluated in the context of a linked variant. The correct condition would be "Link1:Foo", if linked below the link element with unique name "Link1".
The transformation module Reuse Transformation provides the possibility to reuse already existing transformation configurations. These existing configurations can be run with the first vdm, the last vdm or with each vdm of a configspace or vdm selection.
The Reuse Transformation module has two mandatory parameter.
The first parameter Triggered by defines for which vdm of the current transformation the reused transformation configuration is triggered. The three allowed valuesFirst VDM , Each VDM and Last VDM are provided in a combo box. Each VDM is the default.
The second parameter Transformation defines the name of the transformation configuration, which will be triggered by this module.
The configuration space settings are inherited as follows:
Table 6.1. Configuration Space Settings
| Input Directory | Used from the Reuse Transformation configuration, if defined. From Configuration Space otherwise. |
| Output Directory | Used from the Reuse Transformation configuration, if defined. From Configuration Space otherwise. |
| Create Output Directory | Used from the Reuse Transformation configuration, if defined. From Configuration Space otherwise. |
| Cleanup Output Directory | Used from the Reuse Transformation configuration, if defined. From Configuration Space otherwise. |
| Create Output Directory | Used from the Reuse Transformation configuration, if defined. From Configuration Space otherwise. |
| Confirm Create Output Directory | Used from the Reuse Transformation configuration, if defined. From Configuration Space otherwise. |
| Confirm Cleanup Output Directory | Used from the Reuse Transformation configuration, if defined. From Configuration Space otherwise. |
| Recover Timestamps | Used from the Reuse Transformation configuration, if defined. From Configuration Space otherwise. |
| Force Transformation | Always true, because decision was made by user before running Reuse Transformation already. |
| Save Variant Result Model | Always false, because cannot be defined in transformation configurations. It is configuration space settings only. |
| Ignore Transformation Errors | Used from the Reuse Transformation configuration. |
The transformation module Ant Build Module provides the possibility to call an Ant build during the transformation. The module has two parameter.
The first parameter Build File defines the location of the Ant build file.
The second parameter Target defines the target for the build. If no target is given the default target of the Ant build file will be used.