Installing a connector into an existing pure::variants installation works the exact same way like installing the pure::variants Desktop Client into an exsiting Eclipse instance. You just have to make sure the depemding pure::variants connectors are already installed or they have to be installed together with the new connector. See the section called “Using update site”.
To install the pure::variants Connector for Capella, open Capella or Capella Studio and select ->. Enter the address of your pure::variants update site. From the list of available features, select "pure::variants - Connector for Capella", "pure::variants - Connector for EMF Feature Mapping" and the pure::variants feature (e.g., "pure::variants - Enterprise").
For installation in Capella, the standard Eclipse update site needs to be set up. Otherwise the installation will fail due to missing dependencies. Depending on the Capella version, a different Eclipse update site needs to be added. To do that, open ->->-> and add the update site.
For Capella 5.x use https://download.eclipse.org/releases/2020-06/
For Capella 6.x use https://download.eclipse.org/releases/2021-06/
For Capella 7.x use https://download.eclipse.org/releases/2023-03/
For using the pure::variants Integration for Microsoft TFS the server has to be prepared and the pure::variants Integration has to be installed.
The work item types, which should be aware of variability information, must be configured with additional attributes. These attributes can be pvRestriction, pvConstraint, pvDefaultSelected and pvName. At least, the attribute pvRestriction should be created (as shown in Figure 36, “A XML configuration for pvRestriction field.”).

Administrator: For having support while defining restrictions on work items, the control type for the pvRestriction attribute must be configured with "PVRestrictionEditorControl" (see Figure 37, “A XML configuration for pvRestriction field's control type.”).

The pure::variants Connector for PTC Integrity as well as the pure::variants Integrity Integration expect a variant-related preparation of the solution item. For this several changes on the solution and settings are necessary, which are described in the following.
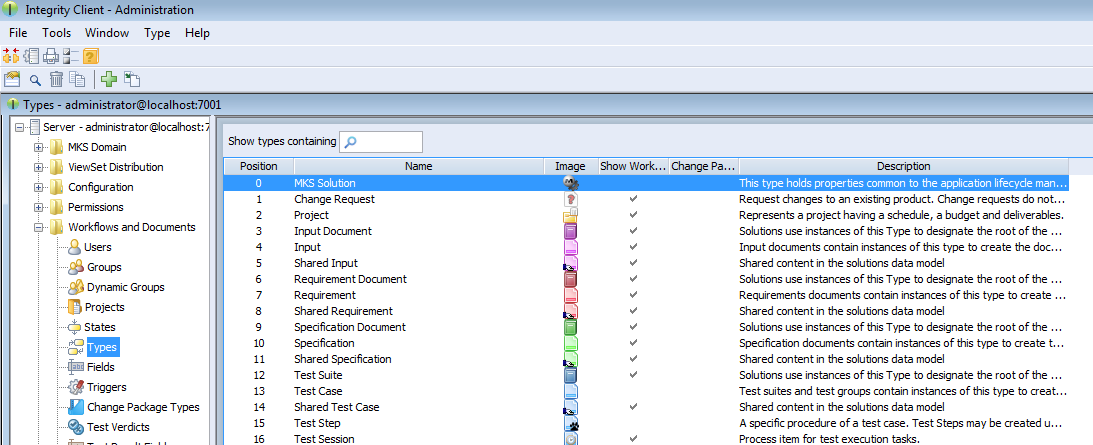
The following fields have to be created for the solution item, e.g. MKS Solution. In the PTC Integrity Administration open -> . Add the fields by choosing from the context menu.
Table 2. Additional fields
| Field | Description |
|---|---|
| pvRestriction | This field is needed to store the restriction rule on a requirement. Set longtext as the type of the field, and ensure that the field is editable. |
| pvVariants | This field is needed to store the names of variants a requirement is part of. Set longtext as the type of the field. Ensure that the field is editable. |
| pvVariantId | This field is needed to store the hexadecimal encoded ID of the pure::variants variant description model which was used to create a requirement document variant in PTC Integrity. Set longtext as the type of the field. Ensure that the field is editable. |

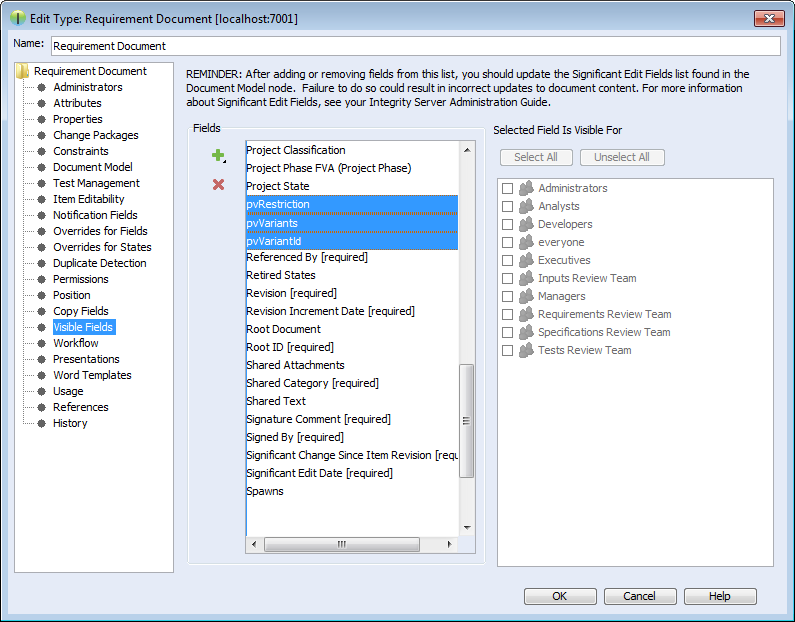
Open -> in the PTC Integrity Administration and filter for all Requirement types.
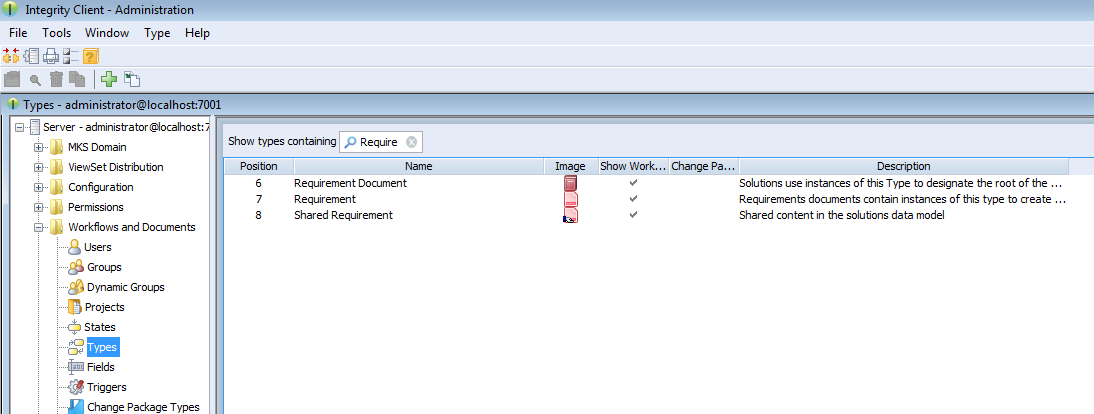
Add the new fields as Visible Fields to the following types.
Table 3. Types to add the fields for
| Type | Fields to add |
|---|---|
| Requirements Document | pvRestriction, pvVariants, pvVariantId |
| Requirement | pvRestriction, pvVariants |
| Shared Requirement | pvRestriction |
pure::variants uses following settings in order to connect to PTC Integrity. This includes settings for the pure::variants Connector for PTC Integrity, which allows importing and exporting documents, as well as the settings for the In-tool Integration, which allows adding and changing restriction rules in PTC Integrity.
Table 4. Settings
| Setting | Default Value | Description |
|---|---|---|
| Solution Item | MKS Solution | Used to get configuration properties |
| Document Type Field | Type | Used for the export of variant documents |
| Project Field | Project | Used for the export of variant documents |
| Document Fields | Document Short Title | Used to get several information from imported requirement documents, and to copy fields when exporting variant documents. The first field must always be the document title field |
| Document Title Field | Document Short Title | Used to get the document title from imported requirement documents, and to calculate the title of exported variant documents |
| Restriction Rule Field | pvRestriction | Used to get restriction rules from imported requirement documents, and to read and write restriction rules |
| Variant Enumeration Field | pvVariants | Used to store enumerated variant names in requirement documents |
| Variant Document ID Field | pvVariantId | Used to store the ID of pure::variants variant description models in variant requirement documents |
| Requirement Text Field | Text | Used while import to get the text of requirements from requirement documents |
Some of these settings can be directly changed before importing and exporting requirement documents. Others can only be changed in the connector configuration file and in the solution type. The following table shows the property names used to change these settings in the configuration file and the solution type.
Table 5. Properties
| Setting | Config File Property | Solution Type Property |
|---|---|---|
| Solution Item | solutionType | |
| Document Type Field | fieldname.documenttype | PUREVARIANTS.TYPE.FIELD |
| Project Field | fieldname.documentproject | PUREVARIANTS.PROJECT.FIELD |
| Document Fields | PUREVARIANTS.VARIANT.FIELDS | |
| Document Title Field | fieldname.documenttitle | PUREVARIANTS.TITLE.FIELD |
| Restriction Rule Field | attrname.restrictions | PUREVARIANTS.RESTRICTION.FIELD |
| Variant Enumeration Field | attrname.variants | PUREVARIANTS.VARIANTS.FIELD |
| Variant Document ID Field | fieldname.variantid | PUREVARIANTS.VARIANTID.FIELD |
| Requirement Text Field | fieldname.requirementtext | PUREVARIANTS.TEXT.FIELD |
To change these settings in the connector configuration file, create the file pvIntegrity.properties in directory %APPDATA%\pure-variants-6. For each setting to change, add a line with the config file property of the setting assigned to the new value. To change for instance the default field used for storing restriction rules to MyRestriction and the default field used for storing the enumerated variants to MyEnumeratedVariants, you would add the following two lines to the configuration file (the comments are optional):
# Field used to store restriction rules
attrname.restrictions=MyRestriction
# Field used to store enumerated variant names
attrname.variants=MyEnumeratedVariants
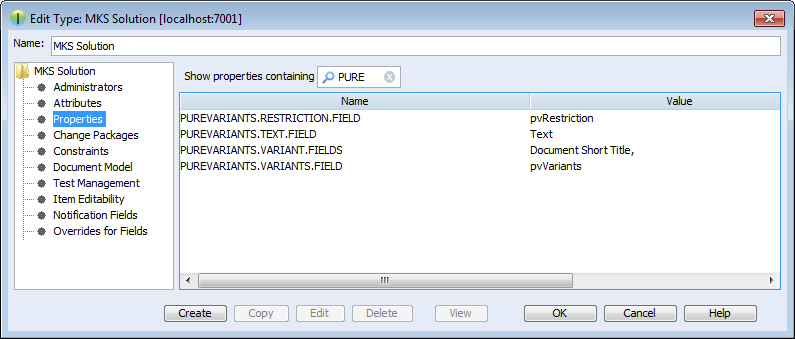
To change these settings on the solution item, open the Administration of PTC Integrity. Switch to -> and select the solution type (e.g. ).
Right-click the solution type and choose from the context menu. Then switch to , click the button and enter the solution type property name of the setting you want to change as name. Add the new default value as value and click .
Several fields of the original document are copied while creating a document variant. This includes the fields mentioned in section Section 5.4.1, “Add additional Fields for pure::variants” but also some fields that are copied by default. The list of fields that are to be copied by default can be configured by the Integrity administrator.
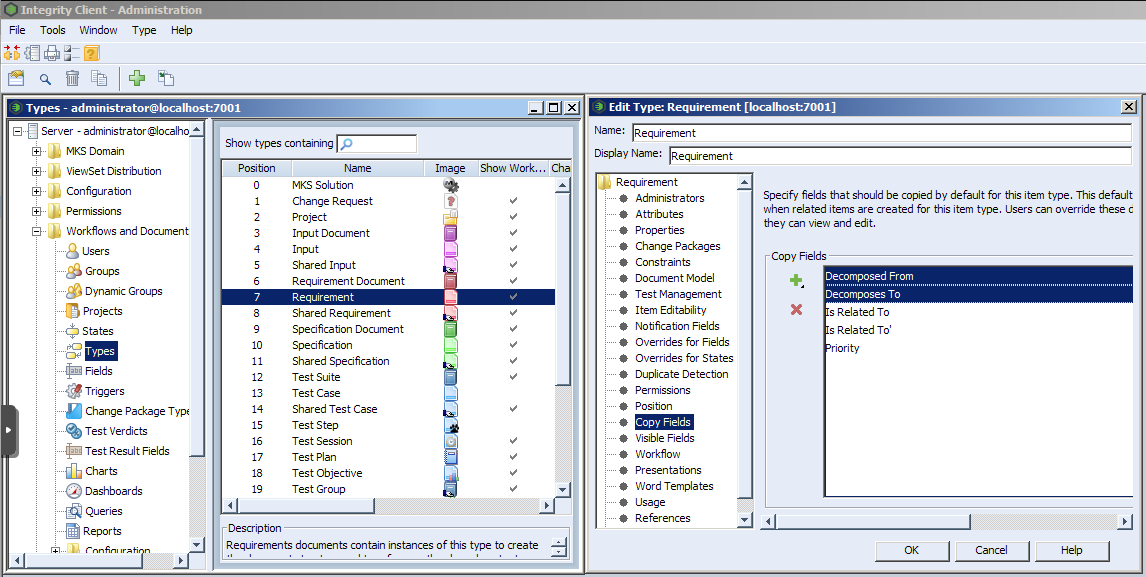
To additionally copy for instance decompose relationships, the administrator has to open the Administration of PTC Integrity. Then switch to -> and edit type Requirement. Open the Copy Fields list and add the fields Decomposes To and Decomposed From. This way fields could be added for the types Requirements Document, Requirement, and Shared Requirement.
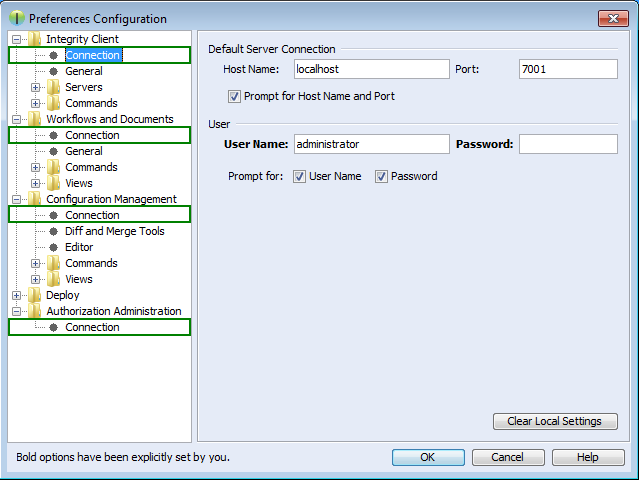
The connector and the integration for PTC Integrity require access to the Integrity client in order to work. Start the PTC Integrity client and open menu -> . For the entries , , , and click the Connection section and enable Prompt for Host Name and Port, prompt for User Name, and prompt for Password.
Note
These connection settings always are used even if you have the option "Prompt for Host Name and Port" enabled and change the connection settings in the corresponding dialog when importing documents from Integrity into pure::variants or exporting variants to Integrity.
If you are working with Rhapsody Model Manager (RMM) projects, additional setup steps are needed.
First, you need to make sure that all required software is installed. That includes RMM (Architecture Management) on the Jazz server and Rational Team Concert (RTC) on your client machine. Also in Rhapsody, the Rhapsody Model Manager add-on needs to be installed.
In RTC two integrations need to be installed: The IBM Rational Rhapsody integration for Rational Team Concert and the pure::variants Integration for RTC transformation. The IBM Rational Rhapsody integration for RTC is needed for RTC to work with RMM projects. Please consult the RTC documentation for installation instructions.
The pure::variants Integration for RTC
transformation is needed during transformation of RMM
projects. Without it, the transformation will fail. To install the
pure::variants Integration for RTC transformation, please open RTC and
use > to install all contents of archived update site
com.ps.consul.eclipse.rtc.integration.feature_[version].zip.
You can find the archived update site zip in your Rhapsody integration
installation folder (default is C:\Program
Files\pure-systems\pv_Enterprise_6.0\com.ps.consul.eclipse.ui.rhapsody.integration).
For the transformation of RMM projects to work, you still need to set the RTC executable location. You can do this in the pure::variants preferences at > > > > . Alternatively, you can define an environment or Java system variable that is named PV_RTC_EXEC_PATH and whose value points to the RTC executable location.
When using Rhapsody 9.0 or above, it is possible to run a transformation of RMM projects in offline mode. This means that the transformatin is carried out without starting RTC/EWM client. At the above mentioned preference page, you can select the checkbox to enable this feature. Alternatively, you can set an environment or Java system variable that is named PV_RHAPSODY_RMM_OFFLINE_MODE to true to set the offline mode.
Additionally, you can set a custom location of RTC/EWM's eclipse.ini and lscm.bat files. You can set an environment or Java system variable that is named PV_RTC_INI_PATH to set the location of the eclipse.ini file and PV_RTC_LSCM_BAT to set the location of the lscm.bat file. If this is not set, the trasformation will look for it in the default location.
This chapter describes installation instructions specific to the Codebeamer connector.
Follow the steps as described in ‘3.1. Install pure::variants Desktop Client’, in case installing pure::variants into an eclipse client, see chapter ‘3.1.2. Install into an existing Eclipse’.
Following components that are delivered as part of the pure::variants Enterprise installation package need to be installed on the Codebeamer server:
The pure::variants server component for Codebeamer to be deployed on the Codebeamer server.
The Jar files are packed in a zip file com.ps.consul.codebeamer.vel.jar-<version>.zip indicating the compatible pure::variants version for identification.
The 'pure::variants Widget to Codebeamer' that needs to be deployed on the Codebeamer server is packed in a zip archive com.ps.consul.codebeamer.pvwidget-<version>.zip.
The server component is a Spring based custom component running in the application context as defined for Codebeamer (for details see https://codebeamer.com/cb/wiki/18830).
Before deploying, unzip the jar files 'com.ps.consul.codebeamer.vel.jar' and 'pvcore.jar' from the zip archive of the server component. Also make sure the server certificate that is used by the Codebeamer server is trusted on the pure::variants Desktop Client side.
Similarly, the folder 'pv_integration' contained in the zip for the to the pure::variants Widget needs to be unzipped.
Note
The above steps are required only for Codebeamer versions up to 2.2.0.0. More details on how to enable the pure::variants widget in Codebeamer, starting from version 2.2.0.0, can be found in the following link: Enabling pure::variants Widget in Codebeamer.Follow the steps to install:
Stop the Codebeamer server
Copy 'com.ps.consul.codebeamer.vel.jar' and 'pvcore.jar' found in the zip archive to <codebeamer>/tomcat/webapps/cb/WEB-INF/lib
Copy following files included in 'pv_integration/widget' to following locations:
'pv_integration/widget' to <codebeamer>/tomcat/webapps/pv-widget/, e.g. /home/appuser/codebeamer/tomcat/webapps/pv-widget/
Restart the Codebeamer server
In Codebeamer, add following the "externalWidgetExtensions" section to the Application Configuration (https://<codebeamer>/sysadmin/configConfiguration.spr) as System Administrator:
    ...},
    "externalWidgetExtensions" : {
        "uri" : "https://<codebeamer>/pv-widget/extension.json"
    }
}
Note
The above steps are required only for Codebeamer versions up to 2.2.0.0. More details on how to enable the pure::variants widget in Codebeamer, starting from version 2.2.0.0, can be found in the following link: Enabling pure::variants Widget in Codebeamer.When running Codebeamer server in a docker container (https://codebeamer.com/cb/wiki/5562876), following additional information needs to be defined in the docker compose configuration file:
volumes:
      -./com.ps.consul.codebeamer.vel.jar:<codebeamer>/tomcat/webapps/ROOT/WEB-INF/lib/com.ps.consul.codebeamer.vel.jar
      -./pvcore.jar:<codebeamer>/tomcat/webapps/ROOT/WEB-INF/lib/pvcore.jar
e.g.
- ./libs/com.ps.consul.codebeamer.vel.jar:/home/appuser/codebeamer/tomcat/webapps/ROOT/WEB-INF/lib/com.ps.consul.codebeamer.vel.jar
- ./libs/pvcore.jar:/home/appuser/codebeamer/tomcat/webapps/ROOT/WEB-INF/lib/pvcore.jar
To deploy the 'pure::variant Widget to Codebeamer' following additional information needs to be added to the docker compose configuration file:
volumes:
      - ./pv_integration/widget:<codebeamer>/tomcat/webapps/pv-widget/

e.g.
- ./pv_integration/widget:/home/appuser/codebeamer/tomcat/webapps/pv-widget/
Then follow the steps to install:
Shut down the docker container first
Copy 'com.ps.consul.codebeamer.vel.jar' and 'pvcore.jar' found in the zip archive to a location accessible by docker, and as defined in the volumes mapping (see above)
Copy the folder 'pv_integration' including all content to a location accessible by docker, and as defined in the volumes mapping (see above). When updating, please make sure to remove old content of the complete directory first.
Restart the docker container
In Codebeamer, add following the "externalWidgetExtensions" section to the Application Configuration (https://<codebeamer>/sysadmin/configConfiguration.spr) as System Administrator:
    ...},
    "externalWidgetExtensions" : {
        "uri" : "https://<codebeamer>/pv-widget/extension.json"
    }
}
Note
The above steps are required only for Codebeamer versions up to 2.2.0.0. More details on how to enable the pure::variants widget in Codebeamer, starting from version 2.2.0.0, can be found in the following link: Enabling pure::variants Widget in Codebeamer.The Web Integration for Codebeamer allows you to pre-define specific settings to ease up or limitate the setup for end-user.
Please see chapter Section 7.2, “Pre-defined settings for Web Integration” for detailed explanations, which settings are available and how they are configured.
To use these pre-defined settings for Codebeamer Web Integration, you need to write the configuration (in JSON format) into a file called settings.json and put this into the deployment directory.
This settings.json must be placed into the existing deployment directory of the Integration.
E.g. <codebeamer>/tomcat/webapps/pv-widget/
|-index.html
|-extension.json
|-settings.json
|-... (other files)
The Widget for Codebeamer must be at least configured, if Single-Sign On (SSO) is used in the company's environment. If SSO is used, the pure::variants OIDC proxy has to be used (as described in section Section 5.6.8, “Configuration To Enable Open ID Connect (OIDC) Authentication”). Additionally, the widget must know this proxy's public URL, so the WIdget properly works in all use-cases. Therefore, please add the settings.json with the following content:
{
  "SSO_SERVER_URL: "https://codebeamer.server:9443/"
}
Please adapt the SSO server url accordingly to your environment setup.
The communication of pure::variants Desktop Client and Widget to Codebeamer application uses the Codebeamer REST API. In order to use the REST API end points, the user needs to have Rest / Remote API - Access permissions.
To do this, make sure the user group that the users are assigned to in Codebeamer have this permission set via System Admin->User Groups menu.
Use following REST call to query the version information of the server component, this way it can be checked if the server component is running correctly:
https://<path_to_codebeamer>/rest/v3/ps/vel/version
Note: Use the credentials (basic authentication) of a Codebeamer user with 'api_permission'.
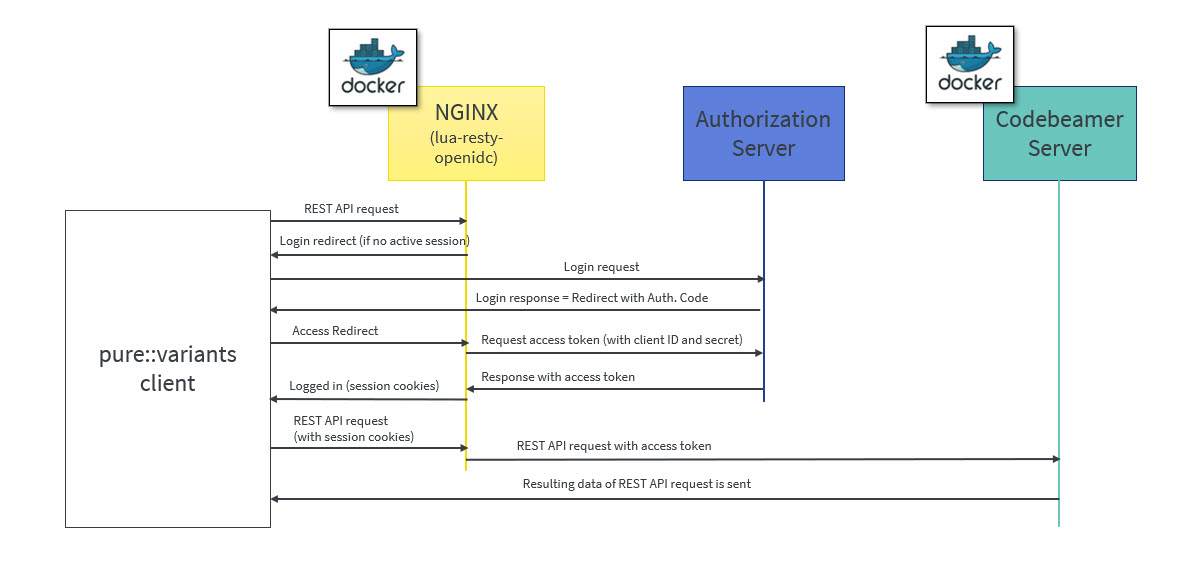
OpenID Connect (OIDC) is an authentication protocol that is an extension of OAuth 2.0.
According to this, a dedicated system (Authorization server/ Identity provider) takes care of authenticating a user and issuing access and id token if authentication was successful. This token can be used by clients to obtain data from the Resource Server, in this case the Codebeamer server. The REST API of Codebeamer requires such access token to enable this way of authentication.
To obtain the access token an Authentication Proxy needs to be deployed between the client and the server. All REST API calls are redirected through it, while the authentication process including the refreshing of the tokens is also managed by this proxy in the background.
Client registration steps:
During the client registration process, both Codebeamer and the Authentication Proxy needs to be registered.
The provided configuration files use the 'lua openresty' library for NGINX, implementing OIDC.
The registered client's Client ID and Client secret should be added in the configuration files of docker-compose and NGINX (see later).
Following chapter describe the docker configuration files and their parameters.
This file configures the auth-proxy service that is required by the pure::varaints client. The docker container image named “oidc-auth-proxy” will be created and started, on which NGINX service will be available, which in-turn will be used by pure::variants Desktop Client to make the REST calls.
Following parameters are to be set:
build: Builds a docker image from a dockerfile. The path is a directory of the host system.
ports: Specifies the port to which NGINX is listening to. 9943:9943 shows the mapping between host port and container port (host port: docker container port).
Note: The port used in oidc-auth-proxy-nginx.conf should be used as docker container port.
volumes: Contains the data which will be used by docker container. It is of the format source:target [:mode] where, source are the host files and target are container path where volumes are mounted.
Any dependent container(s) that will be used by oidc-auth-proxy or any additional container that needs to be built together can be deployed on the same docker machine by adding in the new container configuration under services.
Following code listing shows an example:
version: '3.1'
services:
  oidc-auth-proxy:
    build:
      context: .
      dockerfile: oidc-auth-proxy.dockerfile
    ##Specify the port to which nginx is listening to. (host port:docker port)
    ports:
      - 9943:9943
    volumes:
      - ./oidc-auth-proxy-nginx.conf:/usr/local/openresty/nginx/conf/nginx.conf:ro
      - ./server.crt:/usr/local/openresty/nginx/server.cert:ro
      - ./server.key:/usr/local/openresty/nginx/server.key:ro
      - ./cacerts.crt:/usr/local/openresty/nginx/cacerts.crt:ro
    restart: always
This file contains the set of commands that has to be executed to build a docker image. lua-resty-openidc library for NGINX is used to authenticate user against Open ID Connect provider. Hence this file contains the command to load the base image of openresty from docker hub and then Install the required packages on the current docker image, followed by command to start the NGINX.
Following code listing shows an example:
FROM openresty/openresty:alpine-fat
RUN apk add --update openssl-dev git && luarocks install lua-resty-openidc
CMD ["/usr/local/openresty/bin/openresty", "-g", "daemon off;"]
The directives that need to be adapted are as follows:
Set listen port to which NGINX should listen to.
The server name can be domain name or ip address of the host machine on which docker is running.
The redirect_uri_path should match the uri pre-registered in Authorization server during client registration.
OpenID Connect defines a discovery mechanism where OpenID Server publishes its metadata at a well known url of the format: https://server.com/.well-known/openid-configuration
The client_id and client_secret are obtained from the Authorization Server after the client registration.
proxy_pass value can be a docker container on which Codebeamer application is running, e.g. http://container-name:8090; or it can be a Codebeamer application server url to which a request should be forwarded, e.g. http or https://server-name:port(optional);
Following code listing shows an example:
events {
  worker_connections 128;
}

http {
  resolver 127.0.0.11 ipv6=off;
  lua_package_path '~/lua/?.lua;;';
  lua_ssl_trusted_certificate /usr/local/openresty/nginx/cacerts.crt;
  lua_ssl_verify_depth 5;
  lua_shared_dict discovery 5m;
  lua_shared_dict jwks 5m;

  server {
    listen 9943 ssl; ##mention the port to which nginx should listen to
    server_name codebeamer.example.com; ##domain name or ip address of the host on which docker is running
    ssl_certificate /usr/local/openresty/nginx/server.cert;
    ssl_certificate_key /usr/local/openresty/nginx/server.key;
    ssl_protocols TLSv1.2 TLSv1.3;
    client_max_body_size 16m;

    location / {
      access_by_lua_block {
        local opts = {
   ##redirect_uri should match the uri pre-registered in Authorization server during client registration.
          redirect_uri_path = "/login/oauth/authenticate.spr",
  ##OpenID Connect defines a discovery mechanism where OpenID Server publishes its metadata at a well known url of the format: https://server.com/.well-known/openid-configuration
          discovery = "https://jas.example.com:9643/oidc/endpoint/jazzop/.well-known/openid-configuration",
  ##Client_id and client_secret obtained from the authorization server after the client registration.
          client_id = "<set here the client ID>",
          client_secret = "<set here the client secret>",
          scope = "openid profile email",
          access_token_expires_leeway = 30,
          accept_none_alg = false,
          accept_unsupported_alg = false,
          renew_access_token_on_expiry = true,
          access_token_expires_in=3600,
          session_contents = {access_token=true, id_token=true}
        }
        if ngx.req.get_headers()["Authorization"] == nil or (not string.match(ngx.req.get_headers()["Authorization"], "Bearer")) then
          local res, err = require("resty.openidc").authenticate(opts)
          if err then
            ngx.status = 500
            ngx.say(err)
            ngx.exit(ngx.HTTP_INTERNAL_SERVER_ERROR)
          end
          ngx.req.set_header("Authorization", "Bearer " .. res.access_token)
          ngx.req.set_header("X-User", res.id_token.email)
        end
      }
   ##proxy_pass value can be a docker container on which Codebeamer application is running. For ex., http://container-name:8090;
   ##or it can be a Codebeamer application server url to which a request should be forwarded. For ex., http or https://server-name:port(optional);
      proxy_pass http://codebeamer-app:8090;
    }
  }
}
Following are the steps to create a docker container image named “oidc-auth-proxy”. NGINX will available on this docker container on the specified port.
Place the files provided (docker-compose.yml, oidc-auth-proxy.dockerfile, oidc-auth-proxy-nginx.conf) in a folder.
Place certificates to be used within the same folder. This will be used by NGINX for SSL handshake.
Modify the NGINX configuration file oidc-auth-proxy-nginx.conf as explained in the previous section (oidc-auth-proxy-nginx.conf).
Run docker-compose up to create/start a container.
This chapter describes how to setup the components in order to work properly together with Polarion
Follow the steps as described in ‘3.1. Install pure::variants Desktop Client’, in case installing pure::variants into an eclipse client, see chapter ‘3.1.2. Install into an existing Eclipse’.
The pure::variants enterprise ("pure::variants Windows Installer Package") contains the package com.ps.consul.polarion.api-<version>.zip which needs to be deployed to the Polarion server. Therefore please follow the following steps:
Unzip the archive com.ps.consul.polarion.api-<version>.zip which contains a folder
Place the extracted folder in the Polarion server at <polarion home> /polarion/extensions/pure-systems/eclipse/plugins/
Delete the cached Polarion configuration to ensure the pure::variants integration will be loaded properly on startup by deleting the folder <polarion home> /data/workspace/.config.
Note
Please make sure that you only delete the .config folder
Restart the Polarion service
The previous steps are only for installing the integration. To configure the the pure::variants plugin please follow the steps in Section 5.7.3, “Configuration of pure::variants server component for Polarion”
There are several steps necessary to prepare the Polarion server for pure::variants.
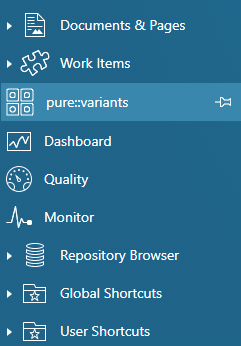
In order to show the in tool integration in the project's sidebar the pure::variants topic needs to be added in Polarion which can be done in the Global Administration or in the Project Administration
Navigate to the Administration area -> Poartal -> Topics
Create a new topics configuration or add the pure::variants topic to an existing one
Add <topic id="purevariants" /> to the topic xml
an example topic definition is given here:
<?xml version="1.0" encoding="UTF-8"?>
<topics xmlns="http://polarion.com/schema/Portal/Topics" xmlns:xsi="http://www.w3.org/2001/XMLSchema-instance" xsi:schemaLocation="http://polarion.com/schema/Portal/Topics">
    <topic id="wiki"/>
    <topic id="workitems"/>
    <topic id="plans"/>
    <topic id="testruns"/>
    <topic id="collections"/>
    <topic id="purevariants"/>
    <topic id="baselines"/>
    <topic id="builds"/>
    <topic id="dashboard"/>
    <topic id="quality"/>
    <topic id="reports"/>
    <topic id="monitor"/>
    <topic id="repository_browser"/>
    <topic id="global_shortcuts"/>
    <topic id="project_shortcuts"/>
    <topic id="user_shortcuts"/>
</topics>
If all steps from Section 5.7.2, “Installation of pure::variants server component for Polarion” and the above mentioned ones were successful the pure::variants menu should be visible on the sidebar of the project with the configured topics.
The connection settings of the pure::variants in tool integration for Polarion can be preconfigured with proper settings in order to ease the process of configuration for the user. Therefore a simple javascript file with the name pv.settings.js is placed in the subfolder webapp of the Polarion server extension. The configuration and possibilities of the javascript file are documented here: Section 7.2, “Pre-defined settings for Web Integration”. The default configuration looks lik this:
              pvWidgetConnectionSettings = {
   // PV_HUB: Defines either 'webhub' or 'desktophub' as tool to connect with
   "PV_HUB": undefined,
   // PV_HUB_EDITABLE: true or false. Defines if the user is able to change the connection
   "PV_HUB_EDITABLE": true,
   // PV_HUB_URL: provide the url if webhub is defined at PV_HUB
   "PV_HUB_URL": undefined,
   // PV_HUB_URL_EDITABLE: true or false. Defines if the webhub url is modifieable
   "PV_HUB_URL_EDITABLE": true
  };
Note
Please make sure not to modify the variable name pvWidgetConnectionSettings during the modification of the settings
For managing varaiblity information in Polarion assets pure::variants needs to know where restrictions are stored and which characters are starting a calculation. These settings can be stored either globally, on project level or even on document level. Therefore the settings priority follows this rule: document settings > project settings > global settings
The settings are stored in the key pvSettings in json format e.g.:
              pvSettings={"beginMarker":"[","endMarker":"]","escapeMarker":"%",
"performPartialTextSubstitution":true,"pvRestrictionFieldName":"pvRestriction"}
To store the settings globally navigate to the Global Administration and add the pvSettings property to the Configuration Properties
To store the settings for a specific project navigate to the Project Administration and add the pvSettings property to the Configuration Properties
To store the settings in a document of a project you need to add a custom field to the document. Therefore please navigate to the Project Administration -> Document & Pages -> Document Custom Fields and add a custom field to the document typs you want to support. The custom field's ID must be pvSettings and the type of the custom field must be String (single line plain text)
In order to store the restriction of a work item. The work item needs to have a custom field with the type String (single line plain text) the ID of the custom field must match the ID which is stored in the pvSettings object from above. Our default ID for the custom field is pvRestriction.
To add a custom field to a work item type please navigate to the Project Settings -> Work Items -> Custom Fields. There you need to select the work item type or all types and add a new field with the limitations mentioned.
During the enumeration transformation of pure::variants the work items will be tagged with their respective variant in which they are contained. To store that information another custom field is necessary. The ID of the custom field must match the ID which is provided in the transformation configuration of the variant which is transformed via pure::variants. Our default ID for the custom field is pvVariants. This custom field must be of type Rich Text (multi-line).
The procedure to add a custom field to a work item is described in the section called “Preparing restrictions for work items”