Models may be exported from pure::variants in a variety of formats. An Export item is provided in the Navigator and Variants Project views context menus and in the File menu. Select Variant Resources from category Variant Management and choose one of the provided export formats.
Currently supported export data formats are HTML, XML, CSV and Directed Graph. The Directed Graph format is only supported for some models. Additional formats may be available if other plug-ins have been installed.
HTML export format is a hierarchical representation of the model. XML export format is an XML file containing the corresponding model unchanged.
CSV, character separated values, export format results in a text file that can be opened with most spreadsheet programs (e.g. Microsoft Excel or OpenOffice). CSV export respects the filters set in the editor of the model to export, i.e. only the matching elements are exported. The export wizard permits the columns to be generated in the output file to be selected.
The HTML Export generates representations for feature and family models in HTML. The generated HTML file can be opened by any browser (e.g. "Internet Explorer", "Firefox", etc.).
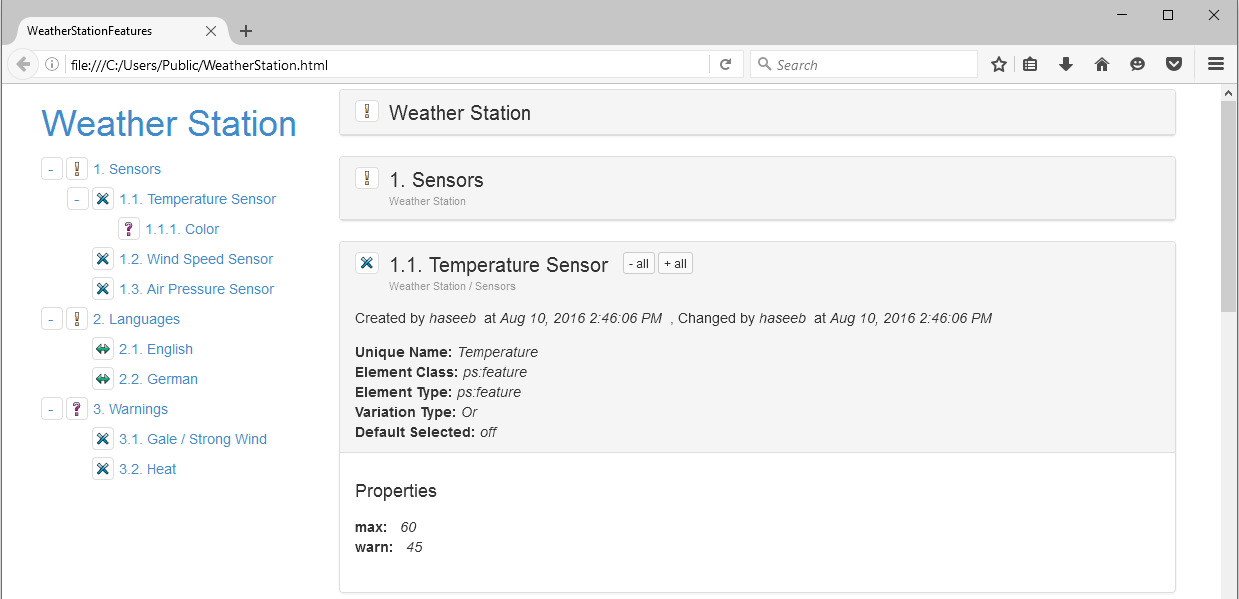
The export will generate a navigation section which represents all model elements hierarchical in a tree and the data of the elements on the right side of the generated html page. The navigation tree will help to navigate to elements quickly. The selected element in the navigation section will be shown on top of the content section. Each section of an element includes the following paragraphs:
- General Properties
- Description
- Properties
- Relations, Restrictions and Constraints
The General Properties paragraph shows information like Unique Name , Element Class , Variation Type , Element Type and Default Selected .
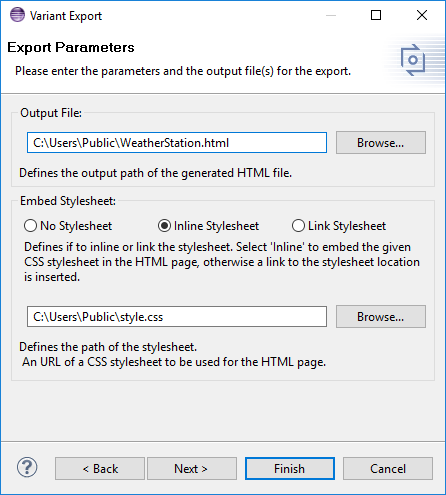
The following two pictures are showing the HTML Export wizard. The first page enables the user to define an absolute path for the output file. Using pure:variants path variables is supported. The style of the html output can be adjusted individually by referencing your own stylesheet (*.css) either as web URL or local file. The stylesheet can either be linked or inlined in the html output file.
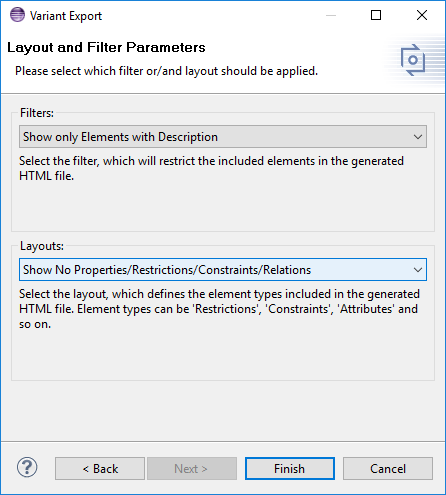
On the second configuration page a filter can be selected, which applies to the selected model. Elements which apply to the filter are not included in html output. Please see Section 6.9, “ Filtering Models ” for further instructions. To hide specific information (e.g. "Restrictions", "Specific Attributes",...) in the selected model a tree layout can be selected in the combo box Layouts . For further Information see the section called “ Tree Editing Page ” .
The following stylesheet classes are supported in the HTML Export.
| CSS Class | Description |
|---|---|
| .section | All sections including "General Properties", "Description", "Properties" and ... |
| .ps-general | "General Properties" section placed beneath Feature headline |
| .ps-description | "Description" section placed beneath "General Properties" |
| .ps-properties | "Properties" section placed beneath "Description" |
| .ps-relations | "Relations, Restrictions, Constraints" placed beneath "Properties" |
| .ps-breadcrumb | Breadcrumb navigation path beneath Feature's headline |
| .ps-feature | Section of a Feature |
Is the html output opened in a browser the following interactions are available:
- Breadcrumb navigation placed beneath each element headline to navigate quickly to the parents of the element.
- Expand/Collapse tree buttons on the bottom of the navigation on the left side of the website to expand/collapse the navigation tree.
- Expand/Collapse model buttons on the right bottom of the website to expand/collapse all element sections.
- Expand/Collapse buttons on any element sections and headline to expand/collapse all element sections and headline of the same type in the whole html document.
- Elements having a relation have a hyperlink to quickly navigate to the related elements.
The following image shows a typical html export.
It is not possible to export a Variant Description Model using the export wizard as described above. For exporting a vdm a transformation module is used. The transformation is described in the next section.
For exporting a vdm to a html document the transformation module HTML Transformation Module is used. See below the module in the transformation module selection dialog.

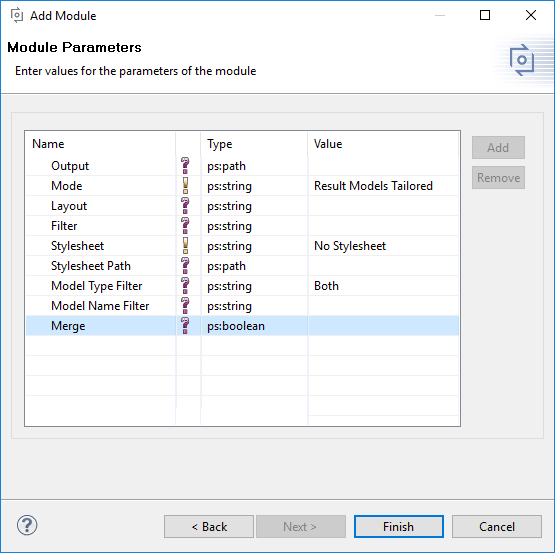
The next image shows the parameter of this transformation module.
The parameter Output enables the user to define a different output folder, for the result of the HTML transformation.
The transformation module for HTML has three different modi, called Result Models Tailored , Result Models Annotated and Input Models Only . The modus is selected with the parameter Mode
The Result Models Tailored mode executes a transformation of on variant description model and will output the transformed feature and family models as html representation. Each model will generate a single html output file. The name of this file will be the name of the model suffixed with the model type. In this mode only elements part of the variant will get exported to the html.
The Result Models Annotated mode exports all elements defined in the input models, but it will gray out all the elements, which are not part of the transformed variant..
The Input Models Only mode doesn't execute a transformation but exports all input models defined in the used configuration space. Furthermore are all configuration parameters definable except the filter parameter.
Third parameter Layout is optional. If used it defines a tree layout, which will be used during the transformation. ( the section called “ Tree Editing Page ” )
Fourth parameter Stylesheet defines whether No Stylesheet is used or if a Link Stylesheet is used, or if a Inline stylesheet is used.
Parameter Stylesheet Path is optional, but needed if Link Stylesheet or Inline Stylesheet was selected. It defines the path to the local css file or a URL to a remote css file.
The last two optional parameter allow the user to filter the input models of the configuration space. The Model Type Filter allows the user to filter the input models regarding their type. Additionally the parameter Model Name Filter allows the user to specify a regular expression, which is used to filter the models by their names.
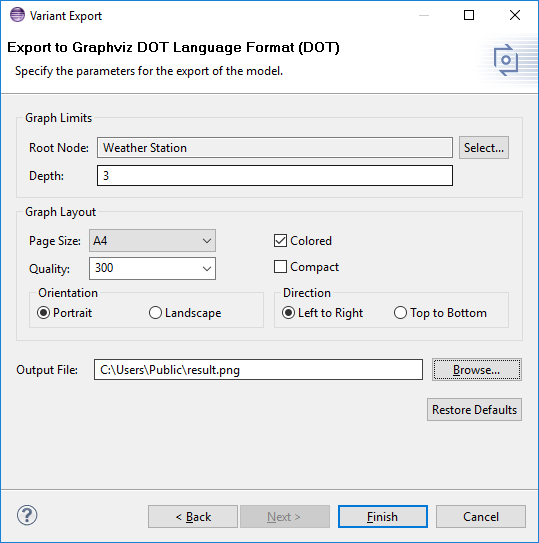
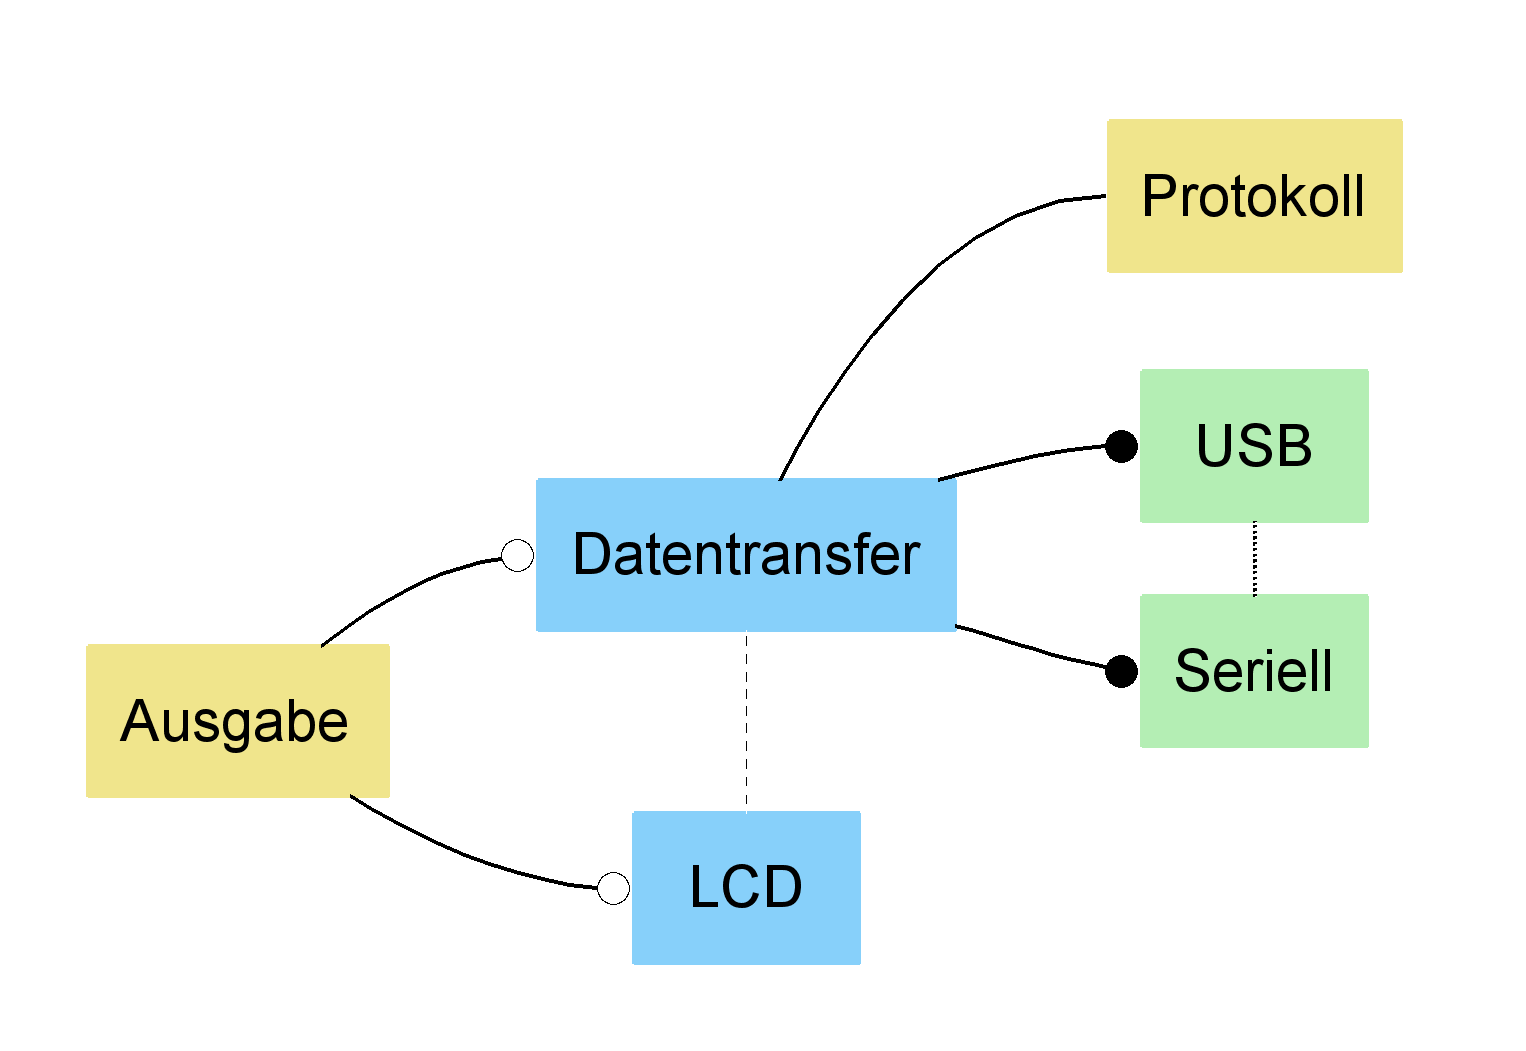
The directed graph export format generates a model graphs in the DOT language and with appropriate tools installed also images in many other image format such as JPEG, PNG, BMP. This can be used for generation of images for use in documentation or for printing. If the DOT language interpreter from the GraphViz package ( http://www.graphviz.org/) is installed in the computers executable path or the packages location is provided as a preference (Windows->Preferences->Variant Management->Image Export), many image formats can be generated directly. The dialog shown in Figure 6.52, “Directed graph export example” permits many details of the output, such as paper size or the layout direction for the model graph, to be specified. Graphs for sub-models may be exported by setting the root node to any model element. The Depth field is used to specify the distance below the root node beyond which no nodes are exported. The Colored option specifies whether Feature Models are exported with a colored feature background indicating the feature relation (yellow= ps:mandatory , blue= ps:or , magenta= ps:option , green= ps:alternative ). Figure 6.53, “Directed graph export example (options LR direction, Colored)” shows the results of a Feature Model export using the Left to Right graph direction and Colored options.
An Import item is provided in the Navigator and Variants Project views context menus and in the File menu. Select Variant Models or Projects from category Variant Management and choose one of the provided import sources.
Currently there exists following generic imports which are discussed below:
Import a Family Model from source directories. This import creates a Family Model or parts of a Family Model from an existing directory structure of Java or C/C++ source code files.
Import a Feature Model from a CSV file.
Import a Feature Model from an Excel file.
To learn more about how to import pure::variants server projets, see the documentation pure::variants Server Support Plug-In Manual. The Following steps explain how to import a Feature or a Family model from a CSV file accordingly:
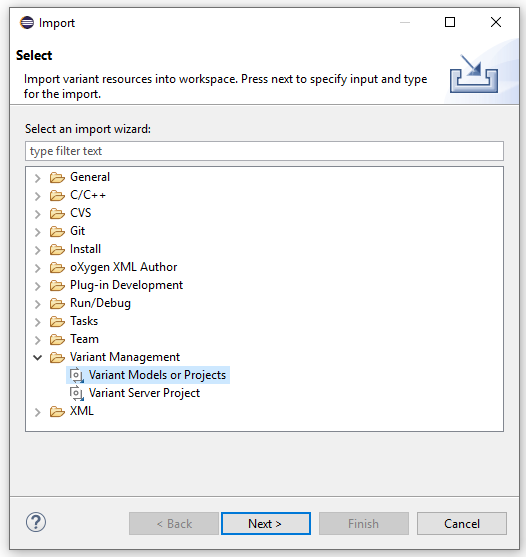
Make sure you change the perspective to "Variant Management" or " Variant Projects view" respectively.
Import item is provided in the Navigator and in the context menu and in the file menu
To Open the Import Wizard dialog, right click on the file and select import from the menu option. Select "Variant Models or Projects" as shown in the below dialog. Click "next" to continue.
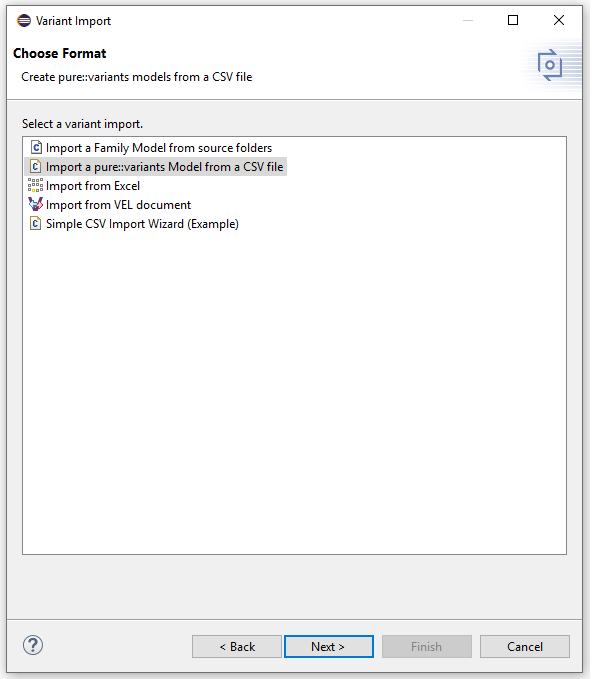
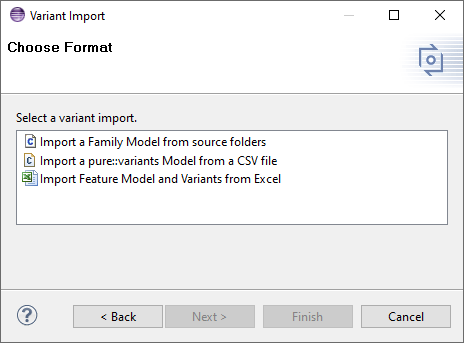
Choose "Import a pure::variants Model from a CSV file" and click "next" to continue.
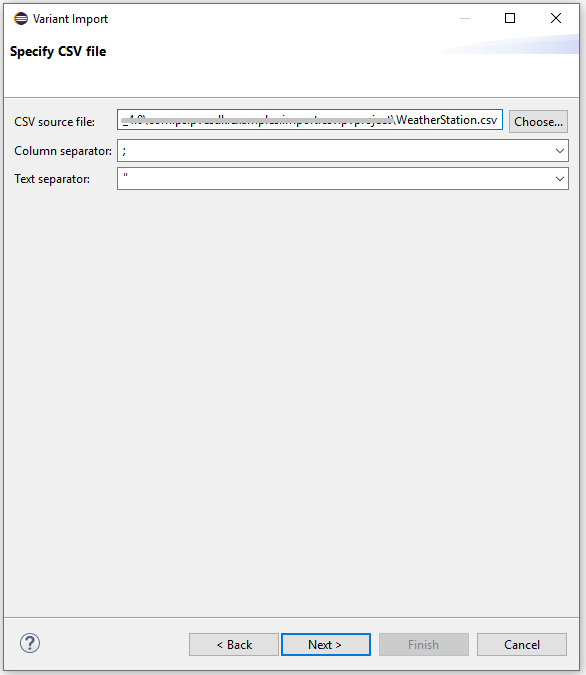
Select the source file from your local directory and press "next"
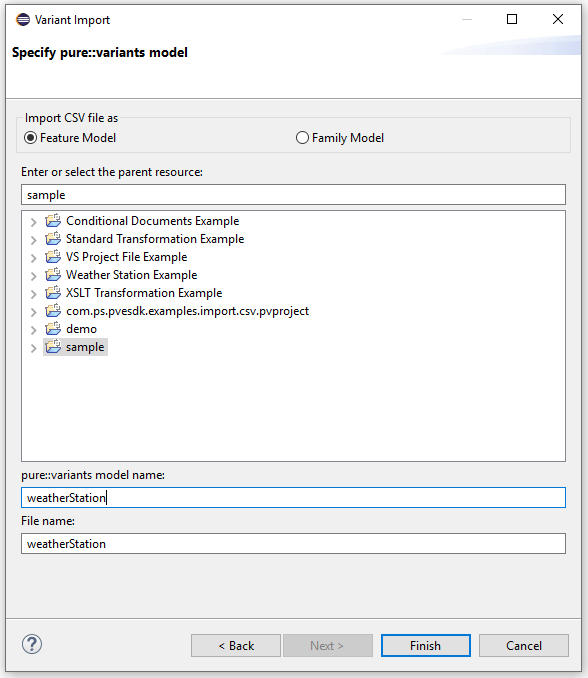
Specify the pure::variants model, enter the model name of your choice and press "Finish"
The import is completed successfully and you can now see the imported model as shown in the below figure

While importing, a few fields are directly used by pure::variants to build the model. Other fields are imported as attributes to the elements. These fields are:
Table 6.4. Import Fields
| Unique Name | Unique name of an element. |
| Unique ID | Unique Id of an element |
| Visible Name | Visible name of an element. |
| Variation Type | The variation type of an element. Possible values are: ps:mandatory, ps:optional, ps:or and ps:alternative. If no variation type is given ps:mandatory is used. |
| Parent Unique ID | The Unique ID of the parent element. |
| Parent Unique Name | The Unique Name of the parent element. |
| Parent Visible Name | The Visible Name of the parent element. |
| Parent Type | The Type of the parent element. |
| Class | The class of an element, most likely ps:feature for Feature Model or ps:component for Family Model. |
| Type | The type of an element, most likely ps:feature for Feature Model or ps:component for Family Model. |
For importing a CSV to a Feature Model the field Unique Name is necessary. If you like to import a hierarchical model either the fields Unique ID and Parent Unique ID or Unique Name and Parent Unique Name are necessary as well. In case of importing an hierarchical model the element without Parent Unique ID will be the root element, if no Parent Unique IDs given, the first element without will be the model root.
Please note, the CSV export of pure::variants exports more fields as the CSV import of pure::variants can import. Fields such as Relations , Restriction and Constraint are ignored by CSV import. Therefore a full round trip with the help of the CSV data format is not possible.
The third generic import, imports a Feature Model from an Excel file. While importing a few fields are directly used by pure::variants to build the model.
The Excel file needs a specific structure so pure::variants can interpret the information and generate models automatically from an Excel file. See below example shows this structure.
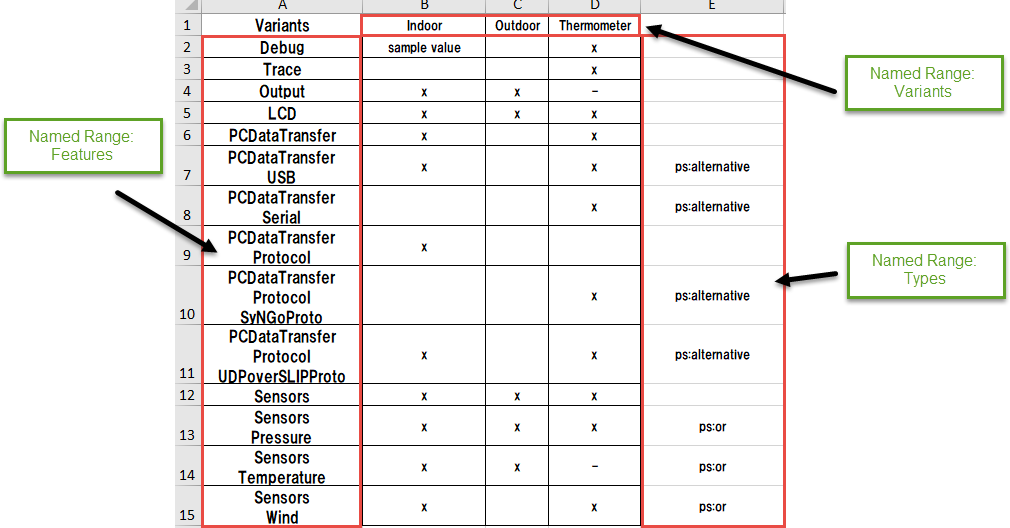
All cells named with name "Features" are used as unique names for features during the import. Names, which contains newlines become hirarchical. Meaning first name is the parent name and names after the newline are becoming childs of the first feature.
Cells names with "Variants" are considered to define variants during the import. In this example three variants will be created: Indoor, Outdoor and Thermometer. Those variants will be created in a configuration space named "Variants". The Selections are created based on regular expressions, which can configured. By Default "X" and "x" are considered as selection and "-" is considered to be an Exclusion. All other values become values of an attribute called "value". Empty cells are considered as unselection of the corresponding element.
The cells of the "Types" named range define the variation types of the cerated features.
This table can be alligned vertical or horizontal and all names for the named ranges and regular expressions for the selections are configurable in the import wizard.
The Following steps explain how to import a feature model from an example excel file accordingly:
Make sure you change the perspective to "Variant Management" or " Variant Projects view" respectively.
Import item is provided in the Navigator and in the context menu and in the file menu
To Open the Import Wizard dialog, right click on the file and select import from the menu option. Select "Variant Models or Projects" as shown in the below dialog. Click "Next" to continue.
Choose "Import Feature Model and Variants from Excel" and click "next" to continue.
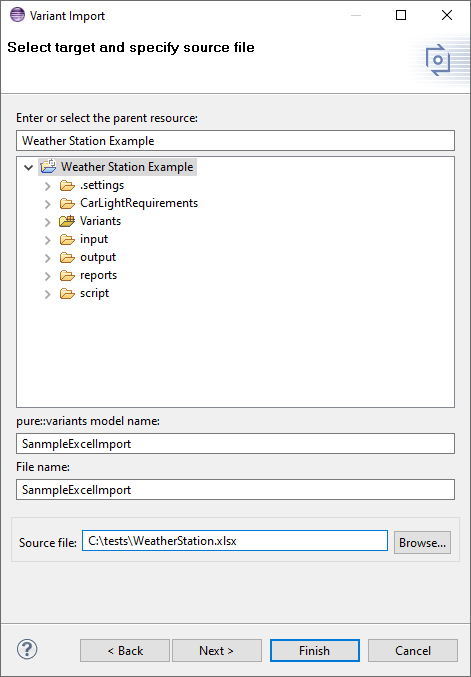
Select a target container and fill in the "pure::variants model name" and the "File name" as follows. Also, select the source from your local directory and press "next"
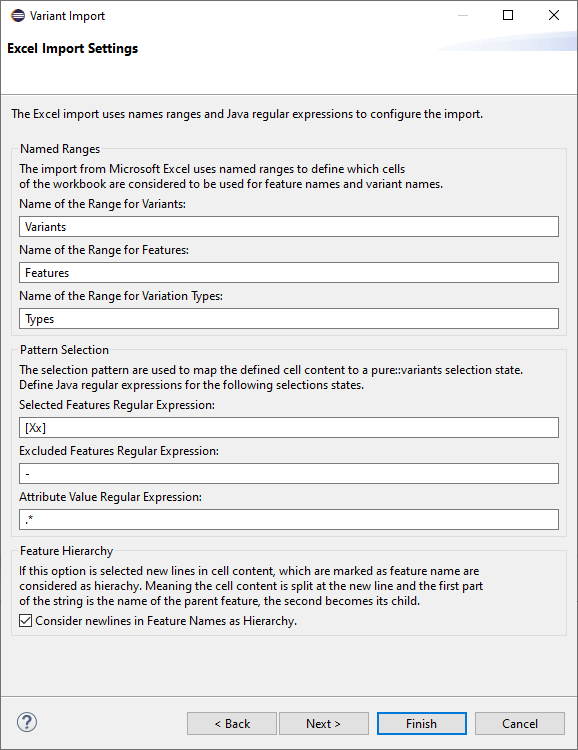
The default expressions for the selected, excluded and the value patterns are as follows. The default named ranges are also set. Here, changes can be done as per the requirement and press "Finish"
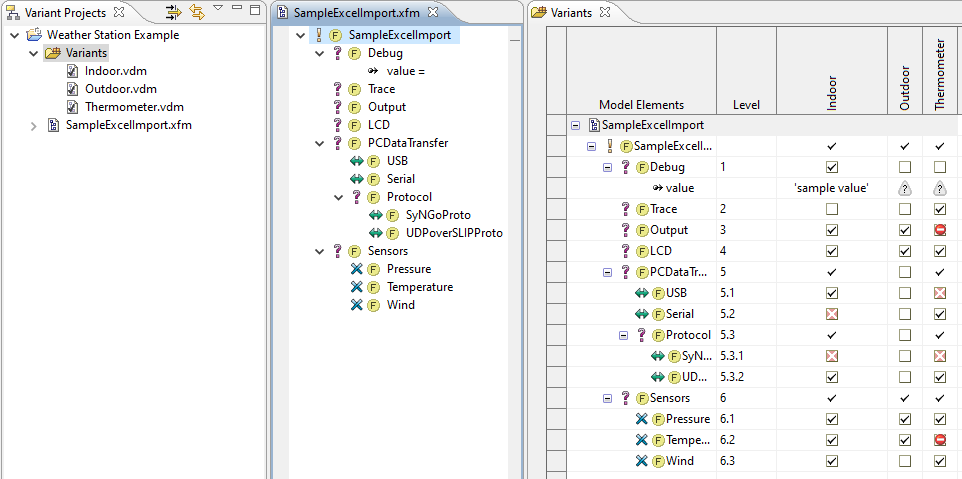
The import is completed successfully and you can now see the imported feature model as shown in the below figure. If variants are defined additionally those models will created in a configuration space called "Variants". The picture below shows the import result of the sample Excel file of picture Figure 6.59, “Excel File Structure” .
For customization of an imported pure::variants model a JavaScript Manipulator is provided. This manipulator is available for all importer, which support import manipulators.
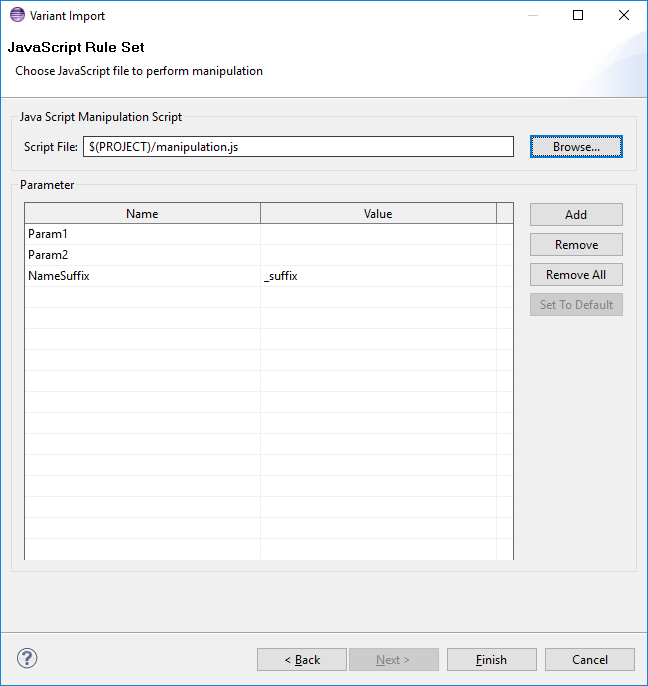
On the JavaScript Manipulator wizard page a JavaScript file needs to be given, which is performed after the import is done, to customize the resulting pure::variants model. It is allowed to use pure::variants path variables in the JavaScript path.
Additionally Parameter for the JavaScript can be defined on this page. Parameters are simple name value pairs. The JavaScript can also define parameter and default values in a comment at the top of the script. These parameters are automatically added to the parameters table, if the script is loaded.
Note
An example JavaScript is generated using the "New -> JavaScript Manipulation Script" entry from the context menu in the projects view. This script shows a basic model manipulation and how parameters are defined in a JavaScript.